Game maker studio для windows
Содержание:
Chained Accessors
Another change to GML is the ability to chain accessors. Much like you can now chain arrays together, you can chain the different Data Structure accessors together too, making accessing the data from nested structures much easier.
A simple example of this would be a DS grid, where each grid entry is a ds list. Previously you’d have to first retrieve the index of the list from the grid, and then access the data in the list, but now it’s as simple as doing something like this:
This would retrieve the data from the 6th position in the DS list that is being held in the grid (0, 0) position. Other examples of use are:
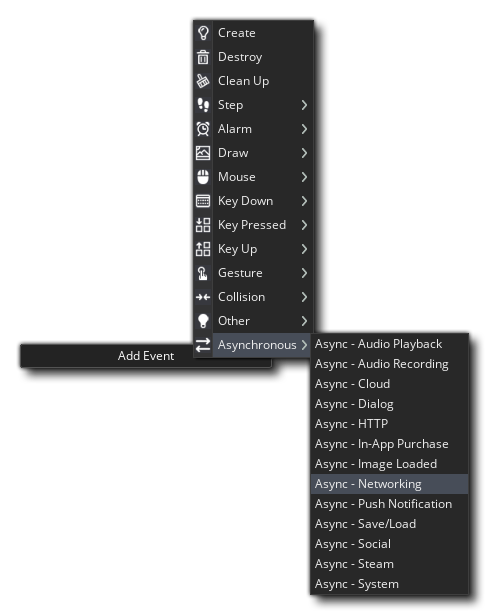
Networking Asynchronous Event
An important thing to note about networking is that everything happens asynchronously. This means that you can control when you send data out over the network, but have no idea when data will come in. So, you can send a data packet to the server but the game will continue to run until the server replies and returns data, which could be several milliseconds later, meaning that we have to have some way to intercept this data within the GameMaker Studio 2 event system. That’s where the Asynchronous Events come in…
Async Events are an event category that has no fixed position in the regular order of events, and the events in this category will be triggered at any time if any incoming data is received. In the case of networking, there is a specific Asynchronous Network Event that will be triggered when a connection or disconnection is detected or when incoming data is received. What this means is that a game can send data out from any event at any time, but that all incoming data must go through the Async Networking event, for both client and server. This means that we need to use our Networking event to find out what the incoming data is for and what it contains, then act accordingly.

Before continuing it’s worth noting that GameMaker Studio 2 will do a few things in the background when you are receiving data over the network. Generally, sockets send data “streams”, meaning that if a device sends 5 data packets over the network to a server, the server may end up getting only one single block of data comprised of all 5 packets «merged» into one. So rather than 5 callbacks of 32 bytes, you get one callback of 160 bytes. This can make networking a bit more complicated, but thankfully if you are using the function, then GameMaker STudio 2 will automatically split these combined packets up. What GameMaker Studio 2 does is attach a small «header» to each packet sent so when it is received it knows it’s a packet, and its size, and will trigger a separate Async event for each one so you can process it individually .
Где я могу получить GameMaker: Studio?
Основной сайт движка GM:S — это http://www.yoyogames.com/. Вы можете загрузить бесплатную версию или приобрести одну из лицензионных версий.
Ниже приведено сравнение различных версий GameMaker, взятых с веб-сайта YoYo Games:
Как вы видите, бесплатная версия (Studio) довольно ограничена, но это отличный способ увидеть рабочий процесс и расположение инструментов, а также потратить некоторое время на изучение языка.
Обновление: Бесплатная версия GameMaker: Studio теперь та же, что и стандартная версия! Для получения дополнительной информации см. GameMaker: Studio будет бесплатной.
Стандартная версия отлично подходит для разработчиков одиночек, которые только планируют разработку компьютерных игр; Профессиональная версия идеально подходит для небольшой команды разработчиков планирующих переходить в конечном итоге на кроссплатформенную разработку, поскольку они могут добавлять различные модули с течением времени после получения некоторого дохода; и Master Collection отлично подойдет для небольших команд, которые являются частью созданных студий, и хотели бы использовать кроссплатформенную разработку с самого начала.
GM:S также
доступен в Steam, но я бы рекомендовал не покупать его там, так как
YoYo Games не знает, что вы его приобрели, и,
следовательно обладателям их продукта будет больше хлопот в отделе обслуживания клиентов. Кроме
того, они иногда предлагают дешевые апгрейды для тех, у кого уже есть определенная версия GM:S, и они не могут дать то же обновление пользователям купившим в Steam. Кроме того, если вы покупаете у Steam, то необходимо войти в Steam, чтобы запустить GM:S, а это может раздражать.
Расширения
Если вам не хватает встроенных функций движка GameMaker, не волнуйтесь; он расширяемый! Бесплатная версия не позволяет использовать расширения, но в платной версии это возможно.
Что могут делать расширения?
Расширения добавляют новую функциональность, изначально не предусмотренную YoYo games. Вот некоторые примеры:
GiiMote — позволяет разработчику интегрировать WiiMote элементы управления в свою игру, добавляя функции, которые опрашивают состояние WiiMote (положение и нажатие кнопок).
FX Creator Extension — упрощает создание таких эффектов, как погода, лучи и брызги воды.
Взаимодействие с базами данных с помощью SQL — позволяет вашей игре подключиться к базе данных SQL, получить данные в виде строки, а затем использовать их в игре. Расширение
добавляет такие функции, как и так, что вы можете получить данные обратно в виде двух строк кода.
Одно серьезное ограничение — некоторые расширения несовместимы с мобильными платформами.
Как их установить
- Необходимо загрузить расширение — это должен быть файл .
- Щелкните правой кнопкой мыши папку Extensions в GM:S и выберите Add Existing Extension.
- Это должно вызвать диалоговое окно, и в правом нижнем углу вы увидите кнопку с надписью Install. Нажмите ее.
- Откроется другое диалоговое окно со списком установленных пакетов (возможно, пустым). Справа от этого окна есть кнопка, которая снова с надписью Install. Нажмите ее.
- Это открывает еще одно диалоговое окно; перейдите в папку, в которой сохранен файл , щелкните его и нажмите кнопку Open.
Writing A Networked Game
So, exactly how should you write a simple networked game? Well, there’s obviously an infinite number of ways, so we’ll pick a very simple example, and discuss that. For our system, we’ll run the whole game on the server, leaving the client to just display the results.
Now normally in a single player game, you’d have a the player object moving around and checking for keys itself, but for our networked game, we’re going to change that. Rather than the keyboard being directly checked by the player object, we’ll create a new «oClient» object that checks keys, and it will then forward these key pressed/released events to the server as they happen. This is very light on network traffic as, if you are running right (for example), then you get one event to start running, and then much later, one to stop. Only 2 network packets in total, which is ideal, and much better than trying to send an instance position over the network every step,
So, next we’ll need a server, something that will receive these keys and process all the connected players somehow. For that we’ll need another controller object «oServer». On creation, our «oServer» object attempts to create a socket and then attempts to listen to port 6510 (in the demo project that accompanies this tech blog we use that port), waiting for a client to connect. We create the server with a single line of code like this in the Create Event:
server = network_create_server( network_socket_tcp, 6510, 32);
The “32” is the total number of clients we want to allow to connect at once. This number is arbitrary for the demo, but note that with too many connections your game will saturate the network or your CPU won’t be able to handle the processing of that number of players, so set this value with care. Note that if creating the server fails, then it may be that we already have a server on the device, or that the port is in use by another program. Only one socket can listen to the same port at once, so if something else is using it, then you’ll need to pick another. you can add in some error handling code here to loop through a set of port values (for example) or simply not connect and run the game offline.
Once our server is created and listening, we can then get our client to connect. For that we’ll need to create a socket in the Create Event, then use that to try to connect:
client = network_create_socket(network_socket_tcp);
network_connect(client, “127.0.0.1”, 6510);
And that’s it for setting up the client and server sockets! We are now ready to send data back and forth between them.
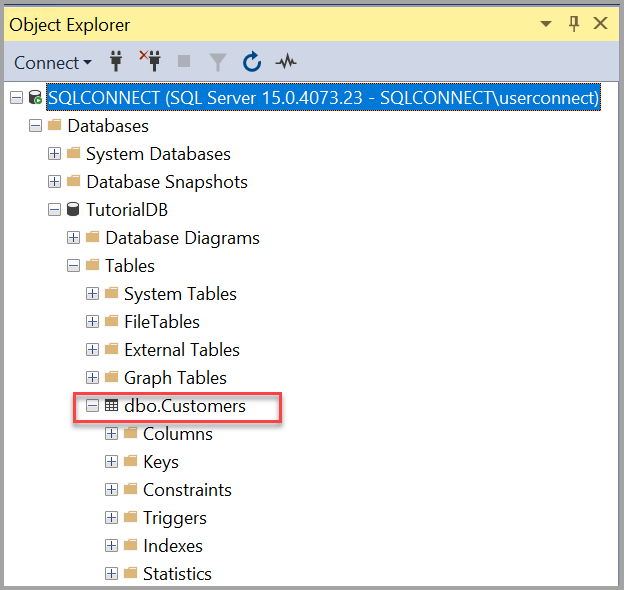
Обзор интерфейса
Последней версией Game maker studio №1 была 8.1.140, на сегодняшний день она перестала поддерживаться, так была выпущена новая версия Game maker studio 2.
Так же на официальном форуме можно скачать русификатор для движка.
Ссылка на русификатор: Google drive
После того как вы скачали и установили Game maker studio запускаем его и в окне вводим данные, которые зарегистрировали на официальном сайте при скачивании. После ввода данных нам открывается интерфейс движка.
Так как мы используем бесплатную версию программы, категория «Изучение» нам не будет доступна.
Для того, чтобы начать разработку игры, нажимаем на кнопку «Создать» и в следующем окне «Drag and Drop» после чего откроется окно, в котором нужно придумать название проекта и сохранить в удобное для вас место.
После того как откроется рабочее пространство, можно увидеть вкладки с правой стороны окна, где и будут сортироваться наши части игры.
Для того что бы начать работать и создавать объекты нам нужно будет нажать правой кнопкой по пустому пространству, и выбрать пункт «Ресурсы». В выпавшем окне выбираем с создания чего будем начинать разработку.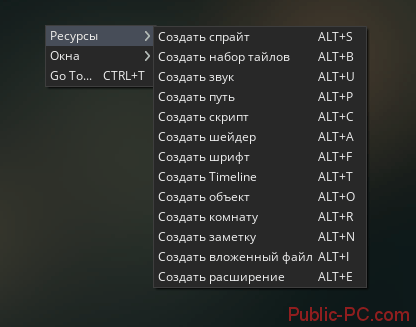
При создании спрайта нам откроется меню создания, анимированные персонажа нашей игры. Тут можно полностью с нуля, попиксельно, нарисовать персонажа или же импортировать уже готового. Так же анимировать его, создать по кадровую анимацию действий персонажа.
Для создания карты нам нужно выбрать «Ресурсы», а затем в выпавшем окне «Создать комнату». В редакторе комнаты предоставляются возможности задать размер, фон, установить элементы взаимодействия, разместить персонажей, нарисовать пути и т.д. В редакторе комнаты так же можно импортировать уже готовый фон или создать его саму с помощью этого редактора.
Создание событий можно произвести без обращения к программированию и созданию скриптов, все делается с помощью довольно интуитивно понятных меню и окон. Можно продумать и создать довольно сложные сценарии действий для объекта с помощью визуального редактора Game maker studio.
С помощью параметров можно выбрать платформу для которой создается игра и провести тонкие настройки игры, такие как размер окна для воспроизведения игры, версии, ярлыки, заставки при загрузке и т.п.
Стоит заметить часть программы, в которой нам дается возможность работать с кодом на языке GML. Очень радует та легкость, с которой простые командные функции могут быть сделаны. Поэтому если вы начинающий Game creator и готовы посвятить этому большую часть времени, тогда вам просто необходимо заняться изучением языка GML.
Connecting / Disconnecting
How will the server get the data that the client sends out? As already mentioned, we’ll be using the Asynchronous Network Event in the «oServer» object:
The Async Network event creates a new and assigns to hold it, and this allows us to look up everything we need, and this lets us decide on the current course of action.
var eventid = async_load[? "id” );
Here we get the unique socket ID of the socket that threw the networking event. This can either be the server ID, or an attached client ID. If it’s the server ID then we have a special connection/disconnection event type being triggered, and it’s at this point that we can start creating new players for the attaching client or throwing them away if they disconnect.
So, to tell if it’s a connection or a disconnection, we’ll check the event “type” in the ds_map:
var t = async_load;
We can check now for one of the built-in GML constants, in this case we check to see if it’s . If it is, then we can get the new socket ID and IP of the connecting device:
if t == network_type_connect
{
 var sock = async_load;
 var ip = async_load;
The variable will hold the ID that has been assigned to the connecting client, which will remain the same for as long as the client stays connected. We can therefore use this as a lookup for any client data. We can now store the socket ID in a DS map that we’d initialise in the Create Event of our oServer instance, and associate with that socket an instance ID of a new player instance that we create:
 var inst = instance_create_layer(64,192, "Instance_Layer", oPlayer);
 ds_map_add(clients, sock, inst);
}
Now when a client is connected, we store the socket ID along with the instance ID in the DS map, and now, whenever some incoming data arrives from the client, we can simply lookup the instance using the incoming socket ID and then assign the data as needed.
To detect a disconnect we need to check and see if , then get the ID of the socket, look it up in the DS map, then delete that map entry and destroy the player instance associated with it:
if t == network_type_disconnect
{
var inst = Clients;
ds_map_delete(Clients, sock);
instance_destroy(inst, true);
}
Учебные ресурсы
Уроки инди-разработчиков
Список уроков Chevy Ray — Chevy Ray является разработчиком Flash-игрового движка FlashPunk, частый соперник на Ludum Dare и разработчик нескольких классных игр. Он написал несколько уроков по GameMaker, и это подборка тех его материалов, которые он считает лучшими. Уроки охватывают такие темы, как масштабирование вида, оптимизация скорости, параллакс-скроллинг.
Серия уроков Derek Yu’s — Derek Yu является членом TIGSource и разработчиком Spelunky. Эта серия уроков для более старой версии GameMaker, но вы по-прежнему можете легко пройти ее. Это полное пошаговое руководство по созданию космической сайд-скроллер стрелялки; по мере создания вы узнаете, как работают игровые объекты, как создавать прокручивающиеся фоны, как создавать спрайт шрифты и множество других замечательных тем. Обязательно к прочтению.
Другие уроки и руководства
Официальные уроки — официальные уроки посвящены созданию нескольких игр разных стилей (некоторые из них 3D-игры, поэтому эти уроки могут быть особенно глубокими, если вы будете использовать GM:S). Кроме того, имеется урок по созданию многопользовательских игр, который, по моему мнению, является одним из лучших в Интернете по изучению создания многопользовательской игры в GM:S.
Я рекомендую их для людей, которые хотят разработать определенный тип игры и желают узнать как разрабатывать игры подобного типа, но если вы ищете урок для начинающих, я рекомендую уроки Derek Yu’s.
Также ознакомьтесь с официальными и неофициальными руководствами, поскольку они дают большой справочный материал.
Functions, Scripts and Method Variables
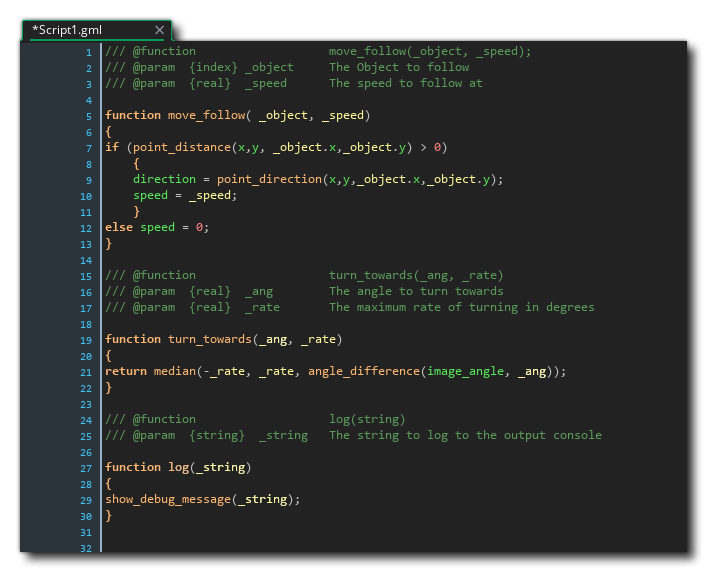
Above we outline some changes to the GameMaker Language, but now it’s time to talk about the good stuff… what’s been added! To start with we want to talk about in-line functions and scripts. Previously, a script was a single resource that was created on a global scope and used to create a single custom function which would then be called using the script name as the function name. This is no longer the case and scripts, while still global in scope, are now a type of «container» for one or more functions.
What this means is that when you compile your project, scripts are no longer called individually, but are actually all run at the start of the game in the global scope, so all variables that are defined in the script (outside of function definitions) will be considered global. That said, you should still use the identifier to explicitly define and identify global variables in your code.
The reason for this change is that scripts can now contain multiple functions. If you’ve only used GML to code projects then the idea of functions may be something new to you, but think of them as being the same as scripts, only explicitly assigned to a variable. This variable is called a method and is used to call the code that is in the function, the same as you would have previously called the script name. This is easier to visualise with an example, so let’s look at one. Consider this simple script :
Now, however, this would be defined as a function like this:
or like this:
You would call this function just as you would have called the script:
So, as we mentioned above, scripts can now contain multiple functions and these should be defined with the format shown above where you have the JS doc comment to identify the function, then the function definition below, and then the next JS Doc comment, and then the function, etc…
Above, we briefly mentioned that functions as variables were called method variables, but it should be explained in a bit more detail. Basically, when you create a function with a variable like this, you are creating a method variable, and they can have different scopes. Consider this function:
-
In the case of a script a variable called «foo» is declared at global scope
-
If the function is declared in an event then the variable «foo» is on the instance that ran that event
-
If the function is declared in an event using the keyword then the variable «foo» is local to the event only
-
If «foo» is declared inside a then it is declared on the that is active at that time
This means that if you have some code that you need to use only within a loop in an alarm event (for example), then you can define it as a local scope method variable at the start of the event and then use it within the loop without the need to clutter up the script assets with it.
It is worth noting that while the variable will be in the chosen scope, the actual function will be bound to the scope that it was initially defined in. Going back to script functions, these are all global scope and are considered «unbound» (ie: they are not associated with any instances), but if you have a script function that creates another function within it and then you call this script from an instance, the function used within the script will be bound to the instance. In general this is not something you ever need to think about but for more complex operations with method variables it’s worth taking into consideration. This also applies when using other constructs like — when you create a method variable inside a , the function will be bound to the instance that is currently in scope.
The following new functions have also been added to deal with methods:
Check the manual for details fo how these functions should be used.
Возможности
Структура игры, созданной в программе Game Maker, состоит из набора разнообразных объектов. Их дизайн редактируется с помощью спрайтов, а поведение описание реакции на те или иные действия игрока. Процесс создания напоминает работу с блок-схемами и использует режим drag-n-drop (перетаскивание специальных иконок с действиями в ячейки событий). Для совсем опытных юзеров создан свой собственный язык GML (напоминающий JavaScript). Он поддерживает синтаксис популярных языков (PHP, JS, Pascal), поэтому для написания кода можно использовать один из них. Это значительно расширяет возможности пользователя.
Программа имеет встроенный редактор позволяющий настроить поведение и внешний вид объектов, создать различные цели, которые надо выполнить игрокам, задать время для этого.

Обновление добавило поддержку HTML5. Это позволило разрабатывать приложения не только для компьютеров и мобильных телефонов, но и интернет браузеров.
Основные возможности:
- создание двухмерных игр без знания основ программирования;
- возможность использования режима drag-n-drop (дословный перевод – перетаскивай и бросай);
- использование собственного скриптового языка GML (Game Maker Language), похожего на JavaScript;
- создание собственных библиотек действий с помощью Library Maker.
Быстро и без особых усилий можно создать простую игру со своими правилами и целями. Благодаря этой программе пользователь может получить новые навыки и проявить творческие способности, даже без глубоких знаний языков программирования. Специалисты используют дополнительные скрипты, чтобы расширить возможности GM. Начинающие программисты используют ее для расширения своих знаний и получения опыта в сфере создания игр.
Встроенная система звуков поддерживает различные форматы аудиофайлов, но дополнительно созданы специальные DLL библиотеки. Можно добавлять фоновую музыку или эффекты.
Системные требования очень простые и позволяют запустить GM на системах с операционной системой Windows XP и выше. Качественный русификатор позволит без проблем использовать все возможности и функции, а простой и дружественный интерфейс – быстрее разобраться даже неопытным пользователям.
Receiving Data
The next thing to tackle, is what happens when the client sends some data to the server. This comes in to the Async Network Event with a socket ID that isn’t the server’s, but a client socket that we’ve already connected with and added to our client DS map. This means all we need to do in the server network event code, is check that it’s not the server socket, and if it’s not then lookup the instance ID associated with the socket in the ds_map and start reading the data into there. So, conceptually we’ll have with something like this:
var eventid = async_load;
// Check the incoming socket ID against the socket ID we stored when we created the server
if server == eventid
{
// Incoming data is from the server so it's a connect/disconnect event and we can deal with it here
}
else if eventid != global.client // Don't deal with data coming from the client running on the device that also runs the server
{
// Deal with received data here from connected clients
}
We’ve covered detecting connect and disconnect, so what about the part where we receive the data? To start with, we want to get the data from the map:
var sock = async_load;
var inst = Clients;
var buff = async_load;
var cmd = buffer_read(buff, buffer_s16);
We have the client socket ID, the instances associated with the socket and the packet of data sent in the buffer. We also read the first bytes of data from the buffer as that will hold our event type value so we can tell whether this is a command for the player, or a ping, or the player name, etc… We would then check this in a or in an chain and act appropriately, for example:
switch (cmd)
{
case KEY_CMD:
    // Read the key that was sent
    var key = buffer_read(buff, buffer_s16 );
    // And it's up/down state
    var updown = buffer_read(buff, buffer_s16 );
    // translate keypress into an index for our player array.
    if key == vk_left  key = LEFT_KEY;
    else if key == vk_right key = RIGHT_KEY;
    else if key == vk_space key = JUMP_KEY;
    if updown == 0 inst.keys = false else inst.keys = true;
    break;
case NAME_CMD:
    inst.PlayerName = buffer_read(buff, buffer_string);
    break;
case PING_CMD
    break;
}
Structs
The next new feature that we want to discuss in GameMaker Studio 2.3 is the creation of structs. A struct is — to put it simply — a variable that holds a collection of other variables — you can think of it as a kind of «light-weight object». The variables that a struct holds can be of any data type and these variables can be read from and written to after the initial struct declaration, and you can also add more variables to a struct after it has been declared. It should also be noted that the contents of a struct are independent of the instance or script that created it, and as such you can — if you wish — use the built-in variable names like or and . One of the benefits of using structs is that (unlike instances), after the initial creation, structs have no processing overhead while they exist, although they will take up space in memory. The struct syntax is as follows:
So, an example of this in practice would be:
The above creates an instance scope struct in the variable «mystruct» and populates it with some values (structs can be created at local, instance and global scope, just like any other variable). Note that you don’t have to populate the contents of a struct when it is created initially and you can create an empty struct by simply doing this:
This struct can then be added to at a later point in the game code. Here is an example of a struct with various variables and data types:
You’ll notice in the above code that you can also define methods and use runtime functions in structs, and that you can use expressions consisting of any variable previously defined within the context of the struct itself, as well as any variable defined within the scope of the struct itself.
Once a struct has been defined, you can access the data within using the «point» notation, like this:
You can also perform operations on the variables within a structure or use them in functions, just as you would any other variable. For example:
Finally, structs can have other structs nested inside of them, like this:
To access such nested structs you would still use the point notation, like this:
When a struct is no longer required it can be removed from memory using the operator, which is another new GML feature added in the 2.3 update. This de-references the struct and hints to the garbage collector that it may be available for collection. This is not strictly required as the garbage collector may do this automatically in the following game steps if the struct is no longer referenced in your code, but it is good practice to do so and we recommend it (for example, call delete in the Clean Up event of an instance to explicitly tell the garbage collector that an instance scope struct is to be deleted).
Also note that structs can be created using functions, which requires the use of the operator and the keyword (two more new features to GML), as shown in the following example:
Here we are creating the function and telling GameMaker Studio 2 that this is a function for making a struct by adding the keyword after the definition. You can then call this function like this:
Now the variable v1 will reference a struct with the variables x and y and the static method variable .
Note that there are other additional functions for structs, specifically:
Check the manual for details of how these functions should be used.
Sending Data
The last part of this puzzle is sending out updates to the connected clients, and have it update the game. Again, this is handled through the Async Network Event, and the only difference is that we want to handle it in the client controller object. In the case of the demo that this tech blog is based on, all the client will do is receive the data from the server and use that to draw all the sprites.
As with the server code, we’ll have some code in the client to get the socket ID, the instance associated with that socket and a buffer of data. We can now read the data from the buffer, and store the relevant information in the local instance. So, to start with:
 var eventid = async_load;
 if client == eventid
 {
 }
Now, to buffer the incoming data we opted to use a DS list which in the demo project is created in the oClient Create Event. Whenever we get new data, we clear this list, then add the data to it:
 var buff = async_load;
 sprites = buffer_read(buff, buffer_u32);  // get the number of sprites
 ds_list_clear(allsprites);
 for (var i = 0; i
Now that we have something to draw, we can draw this inside the *oClient Draw Event in a simple loop, and if you check the demo project you can see this being done (and note that the player and enemy objects have their own draw events suppressed with a comment so they aren’t drawing twice).
Summary
That’s it really! LAN networking is fairly simple, but before we finish let’s just revise what we’ve discussed. At it’s most basic all you need for a LAN game to work is a client object, a server object and a player object. These will work together as follows:
-
oClient: The client is a «dumb» client that simply sends key presses/releases to the server, and it will also draw all the sprites from the data that the server sends back.
-
oServer: This is the main controller. It will connect/disconnect clients, create new players as they come in (mapping them to a socket id), and send out all sprite data to all connected clients.
-
oPlayer: The player object is pretty much the same as you’d have in any offline game, except it no longer checks keys directly, but instead checks an array of keys that the server fills in when it gets key press data from the client(s).
Возможности
Изначально автор приложения – Марк Овермарс – хотел создать обучающую программу, которая объясняла бы студентам принципы программирования. Однако постепенно разработка превратилась в игровой редактор. Он развивается уже более 15 лет, обрастая функционалом, что позволяет:
- придумывать 2D-игры;
- создавать презентации;
- рисовать анимацию;
- использовать программу в учебных целях.
Интерфейс приложения интуитивно понятен, окно содержит привычные для обычных пользователей строки меню и панели кнопок. В меню находится раздел справки, где можно увидеть обучающий ролик, объясняющий всю суть программы.
Sockets
To start with, let’s talk about sockets. The actual definition of a socket is «one endpoint of a two-way communication link between two programs running on the network», so for a game being run on two different devices to talk to each other, each will need to have a socket connected to the other. We’ll be doing this initially using TCP/IP connections, which is what the internet is based on (IPv4 to be more precise). This in essence will let you connect one socket using an IP address (let’s say 192.168.1.10) to another socket on another IP address (say 192.168.1.11). Once connected, the two sockets can send data back and forth using the function and the Network Asynchronous Event in GameMaker Studio 2, but we’ll get more into that later in the tech blog.
IP addresses also have what are called ports. Instead of programs having to read and deal with every bit of network traffic coming into a device, IP addresses are linked with ports which are given a value ranging from 0 to 65535. This allows each program to «listen» to only a specific port number to get just the packets that are relevant to it, and not everything that’s coming in. This saves considerable CPU time, as it seriously cuts down on data processing. One thing you should note though, is that some ports are already in use by your system, and so you should try to pick an appropriate port number for your sockets. You can see a general list of port values and their uses http://en.wikipedia.org/wiki/ListofTCPandUDPportnumbers.
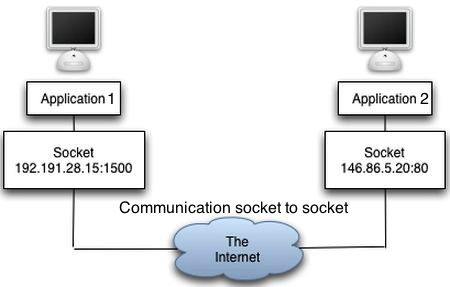
So to reiterate over what’s been said: A socket is a connection point bound to a port on an IP address. It can be either a client socket — and so can send and receive data — or it can be a server socket and “listen” to a port to get connection/disconnection information as well as send and receive data. This means that the typical flow of events in a game would be:
- create a server socket
- tell it to listen to a port
- have a client try to connect to the socket
- the server connects and creates a “link” between the client and server sockets
Once the link has been established the game can then freely send data back and forth.
Заключение
Game Maker Studio — кроссплатформенный движок игр с легким освоением и подробной документацией. Программа предлагает интуитивно понятный и простой в использовании Drag-и-Drop (называется «DnD» теперь) Интерфейс «значки действий», которые позволят вам начать создавать свои собственные игры очень быстро. Вы можете импортировать и создавать образы и звуки для использования их в игре, а затем мгновенно увидеть результаты ваших действий при нажатии на кнопку. Следует отметить, что GameMaker: Studio заточен на двумерные игры, (но имеется так же базовая поддержка работы с 3d). С помощью D&D любой человек без знаний программирования может создать простенькую игру, на подобии Марио или Тетриса.