Настройка firewalld в centos
Содержание:
- Другие приложения, чтобы сделать свой собственный Emoji
- Test/Demo Plan
- Allow Other Connections
- Шаг 2 — Настройка файрвола
- UFW in Ubuntu
- List current firewall rules and stop firewall (old method)
- Файлы, связанные с SIHClient.exe
- Шаг 3 — Настройка экспорта NFS на хосте
- Общие команды для управления firewalld
- Как вычислить дату в Excel
- Other General Changes and Fixes
- Conclusion
- Настройка фаервола Ubuntu
- Шаг 1 — Загрузка и установка компонентов
- Saving your Iptables Configuration
- Getting started
- Step 7 — Deleting Rules
- Schritt 9 — Aktivieren oder Zurücksetzen von UFW (optional)
- Какие бывают правила
- Enabling and disabling Ubuntu Firewall
- Шаг 5 — Разрешение других соединений
- Schritt 6 — Ablehnen von Verbindungen
- Block an IP Address
Другие приложения, чтобы сделать свой собственный Emoji
Makemoji — это еще одно приложение для iOS, которое позволяет вам создавать любые смайлики, о которых вы только можете подумать. Приложение невероятно простое в использовании. Все, что вам нужно сделать, это выбрать базовый шаблон для смайликов, которые вы хотите, а затем добавить слои всех различных деталей, которые вы хотите на ваших смайликов. Это очень интуитивно понятно, а подход на основе слоев действительно облегчает редактирование.
Установить: iOS ( бесплатно)
Bobble Keyboard
Bobble Keyboard — это приложение, очень похожее на Bitmoji, в котором оно создает наклейки и смайлики из вашего аватара. Он сильно отличается от Bitmoji тем, что использует ваше селфи для создания аватара мультфильма, а затем создает из него несколько стикеров, GIF-файлов и даже историй. Это очень забавное приложение, и вы обязательно должны его проверить.
Установка: Android , iOS (бесплатно)
EmojiFace
EmojiFace — это еще одно приложение для iOS, которое превращает ваше лицо в несколько смайликов, накладывая на ваши селфи эффекты эмодзи. Приложение простое в использовании, и может создавать действительно потрясающие эмодзи с вашего лица. У смайликов, созданных с помощью EmojiFace, индивидуальный подход, потому что они — все ваши картинки, только с некоторыми наложенными функциями смайликов, благодаря чему они выглядят совсем по-другому.
Установить: iOS (бесплатно, с покупками в приложении)
Test/Demo Plan
The source code has testing scripts. Can use (from the top-level source):
$ cd <top-level source directory>
$ ./run_tests.sh -s
$ sudo ./run_tests.sh -s root
Additionally, once the package is installed, can use:
$ sudo ufw status
$ sudo ufw enable && sudo ufw status
$ sudo ufw disable && sudo ufw status
$ sudo ufw enable
$ sudo ufw logging on && sudo iptables -L -n | grep LOG
$ sudo ufw logging off && sudo iptables -L -n | grep LOG
$ sudo ufw default allow && sudo iptables -L -n | grep 'INPUT (policy'
$ sudo ufw default deny && sudo iptables -L -n | grep 'INPUT (policy'
$ sudo ufw allow 53 && sudo ufw status
$ sudo ufw delete allow 53 && sudo ufw status
$ sudo ufw allow 80/tcp && sudo ufw status
$ sudo ufw delete allow 80/tcp && sudo ufw status
$ sudo ufw allow smtp && sudo ufw status
$ sudo ufw delete allow smtp && sudo ufw status
$ sudo ufw allow from 192.168.254.254 && sudo ufw status
$ sudo ufw delete allow from 192.168.254.254 && sudo ufw status
And for IPv6 testing (need at least ufw 0.10):
$ sudo sed -i 's/^IPV6=no/IPV6=yes/' /etc/default/ufw
$ sudo ufw disable && sudo ufw status
$ sudo ufw enable && sudo ufw status
$ sudo ufw allow proto tcp from 2001:db8::/32 to any port smtp && sudo ufw status
$ sudo ufw delete allow proto tcp from 2001:db8::/32 to any port smtp && sudo ufw status
The README also contains information for testing.
IMPORTANT: When enabling the firewall and/or using ‘/etc/init.d/ufw start’, the chains are necessarily flushed and connections may be dropped (eg ssh connections). You can add rules to the firewall before enabling it however, so if you are testing ufw on a remote machine, it is recommended you perform:
$ sudo ufw allow proto tcp from any to any port 22
before running ‘ufw enable’. Once the firewall is enabled, adding and removing rules will not flush the firewall (though modifying an existing rule will).
Allow Other Connections
Now you should allow all of the other connections that your server needs to respond to. The connections that you should allow depends your specific needs. Luckily, you already know how to write rules that allow connections based on a service name or port—we already did this for SSH on port 22.
We will show a few examples of very common services that you may need to allow. If you have any other services for which you want to allow all incoming connections, follow this format.
HTTP—port 80
HTTP connections, which is what unencrypted web servers use, can be allowed with this command:
If you’d rather use the port number, 80, use this command:
HTTPS—port 443
HTTPS connections, which is what encrypted web servers use, can be allowed with this command:
If you’d rather use the port number, 443, use this command:
FTP—port 21
FTP connections, which is used for unencrypted file transfers (which you probably shouldn’t use anyway), can be allowed with this command:
If you’d rather use the port number, 21, use this command:
Шаг 2 — Настройка файрвола
Перед тем, как начать проверять работу Nginx, нам необходимо настроить наш файрвол для разрешения доступа к сервису. При установки Nginx регистрируется в сервисе файрвола . Поэтому настройка доступа осуществляется достаточно просто.
Для вывода настроек доступа для приложений, зарегистрированных в , введём команду:
В результате выполнения этой команды будет выведен список профилей приложений:
Как видно из этого вывода, для Nginx настроено три профиля:
- Nginx Full: этот профиль открывает порты 80 (обычный, не шифрованный веб-трафик) и 443 (трафик шифруется с помощью TLS/SSL).
- Nginx HTTP: этот профиль открывает только порт 80 (обычный, не шифрованный веб-трафик).
- Nginx HTTPS: этот профиль открывает только порт 443 (трафик шифруется с помощью TLS/SSL).
Рекомендуется настраивать таким образом, чтобы разрешать только тот трафик, который вы хотите разрешить в явном виде. Поскольку мы ещё не настроили SSL для нашего сервера, в этой статье мы разрешим трафик только для порта 80.
Сделать это можно следующей командой:
Вы можете проверить изменения введя команду:
В результате должен отобразиться вывод следующего вида:
UFW in Ubuntu
Ubuntu 8.04 LTS introduced ufw, and it is available by default in all Ubuntu installations after 8.04 LTS.
Available Versions in supported versions of Ubuntu
-
Ubuntu 12.04 ESM: 0.31.1-1
-
Ubuntu 14.04 ESM: 0.34~rc-0ubuntu2
-
Ubuntu 16.04 LTS: 0.35-0ubuntu2
-
Ubuntu 18.04 LTS: 0.36-0ubuntu0.18.04.1
-
Ubuntu 20.04: 0.36-6
-
Ubuntu 20.10: 0.36-7
-
Ubuntu Core: 0.36pre
Features
ufw has the following features:
|
Feature |
0.31.1-1 |
0.34~rc-0ubuntu2 |
0.34-2 |
0.35 |
|
default incoming policy (allow/deny) |
yes |
yes |
yes |
yes |
|
allow/deny incoming rules |
yes |
yes |
yes |
yes |
|
IPv6 (by default) |
yes |
yes |
yes |
yes |
|
status |
yes |
yes |
yes |
yes |
|
logging (on/off) |
yes |
yes |
yes |
yes |
|
extensible framework |
yes |
yes |
yes |
yes |
|
python 2.5 support |
yes |
no |
no |
no |
|
application integration |
yes |
yes |
yes |
yes* |
|
IPv4 rate limiting via ‘limit’ command |
yes |
yes |
yes |
yes |
|
internationalization |
yes |
yes |
yes |
yes |
|
multiport incoming rules |
yes |
yes |
yes |
yes |
|
debconf/preseeding |
yes |
yes |
yes |
yes |
|
default incoming policy (reject) |
yes |
yes |
yes |
yes |
|
reject incoming rules |
yes |
yes |
yes |
yes |
|
rule insertion |
yes |
yes |
yes |
yes |
|
log levels |
yes |
yes |
yes |
yes |
|
per rule logging |
yes |
yes |
yes |
yes |
|
outgoing filtering (on par with incoming) |
yes |
yes |
yes |
yes |
|
filtering by interface |
yes |
yes |
yes |
yes |
|
bash completion |
yes |
yes |
yes |
yes |
|
upstart support |
yes |
yes |
yes |
yes |
|
improved reporting |
yes |
yes |
yes |
yes |
|
reset command |
yes |
yes |
yes |
yes |
|
rsyslog support |
yes |
yes |
yes |
yes |
|
delete by rule number |
yes |
yes |
yes |
yes |
|
python 2.6 support |
yes |
yes |
yes |
yes |
|
‘show listening’ report |
yes |
yes |
yes |
yes |
|
python 2.7 support |
yes |
yes |
yes |
yes |
|
increased protocol support (ah, esp) |
yes |
yes |
yes |
yes |
|
IPv6 rate limiting via ‘limit’ command |
— |
yes |
yes |
yes |
|
python 3.2 support |
— |
yes |
yes |
no |
|
python 3.3 support |
— |
yes |
yes |
yes |
|
‘show added’ report |
— |
yes |
yes |
yes |
|
python 3.4 support |
— |
yes |
yes |
yes |
|
before/after extensibility hooks |
— |
yes |
yes |
yes |
|
routed packet filtering (FORWARD) |
— |
yes |
yes |
yes |
|
systemd support |
— |
— |
yes |
yes |
|
increased protocol support (igmp, gre) |
— |
— |
yes |
yes |
|
python 3.5 support |
— |
— |
yes |
yes |
|
Snappy for Ubuntu Core support |
— |
— |
— |
yes |
|
per rule comments |
— |
— |
— |
yes |
support for application integration is limited on Ubuntu Core at this time
List current firewall rules and stop firewall (old method)
You can type the following command to see if firewall is active or not (open a terminal or ssh session and type the following command):
Sample outputs:
Chain INPUT (policy ACCEPT)
target     prot opt source               destination
ACCEPT     udp  --  0.0.0.0/            0.0.0.0/           udp dpt:53
ACCEPT     tcp  --  0.0.0.0/            0.0.0.0/           tcp dpt:53
ACCEPT     udp  --  0.0.0.0/            0.0.0.0/           udp dpt:67
ACCEPT     tcp  --  0.0.0.0/            0.0.0.0/           tcp dpt:67

Chain FORWARD (policy ACCEPT)
target     prot opt source               destination
ACCEPT     all  --  0.0.0.0/            192.168.122.0/24    state RELATED,ESTABLISHED
ACCEPT     all  --  192.168.122.0/24     0.0.0.0/
ACCEPT     all  --  0.0.0.0/            0.0.0.0/
REJECT     all  --  0.0.0.0/            0.0.0.0/           reject-with icmp-port-unreachable
REJECT     all  --  0.0.0.0/            0.0.0.0/           reject-with icmp-port-unreachable

Chain OUTPUT (policy ACCEPT)
target     prot opt source               destination
You can save existing firewall rules as follows:
Finally, type the following commands to stop firewall and flush all the rules:
Файлы, связанные с SIHClient.exe
Шаг 3 — Настройка экспорта NFS на хосте
Теперь рассмотрим подробнее файл конфигурации NFS и настроим общий доступ к этим ресурсам.
Откройте на хосте файл в текстовом редакторе с привилегиями root.
Файл содержит комментарии, показывающие общую структуру каждой строки конфигурации. Синтаксис выглядит следующим образом:
/etc/exports
Нам нужно создать строку для каждого каталога, к которым мы планируем предоставить общий доступ. Обязательно замените сокращение своим реальным IP-адресом:
/etc/exports
Здесь мы используем для обоих каталогов одинаковые параметры конфигурации, за исключением . Посмотрим, что означают эти опции:
- : эта опция дает клиенту доступ к чтению и записи на соответствующем томе.
- : эта опция принудительно заставляет NFS записывать изменения на диске, прежде чем отправлять ответ. В результате мы получаем более стабильную и согласованную среду, поскольку в ответе отражается фактическое состояние удаленного тома. Однако при этом снижается скорость операций с файлами.
- : данная опция предотвращает проверку вложенного дерева, когда хост проверяет фактическую доступность файла в экспортированном дереве при каждом запросе. Это может вызвать много проблем в случае переименования файла, когда он открыт на клиентской системе. Проверку вложенного дерева в большинстве случаев лучше отключить.
- : по умолчанию NFS преобразует запросы удаленного пользователя root в запросы пользователя без привилегий на сервере. Это предназначено для обеспечения безопасности, чтобы пользователь root клиентской системы не мог использовать файловую систему хоста с правами root. Опция отключает такое поведение для определенных общих ресурсов.
Когда вы закончите внесение изменений, сохраните и закройте файл. Чтобы сделать общие ресурсы доступными для настроенных клиентов, перезапустите сервер NFS с помощью следующей команды:
Прежде чем вы сможете использовать новые общие ресурсы, вам нужно будет убедиться, что правила брандмауэра разрешают трафик этих общих ресурсов.
Общие команды для управления firewalld
Посмотреть состояние:
firewall-cmd —state
Мягко перечитать правила (применить настройки):
firewall-cmd —reload
Перечитать правила и сбросить текущие подключения:
firewall-cmd —complete-reload
* в официальной документации сказано, что данную команду стоит применять только в случаях проблем с firewalld.
Посмотреть созданные правила:
firewall-cmd —list-all
Остановить службу:
systemctl stop firewalld
Запустить сервис:
systemctl start firewalld
Запретить автозапуск:
systemctl disable firewalld
Разрешить автозапуск:
systemctl enable firewalld
Сохранить текущие правила, сделав их постоянными (permanent):
firewall-cmd —runtime-to-permanent
Как вычислить дату в Excel
Other General Changes and Fixes
- Added a new program theme: Acri.
- Changed the default program theme to dark mode for new users.
- Changed the text of «Multi-adapter Compatibility» in game capture to «SLI/Crossfire Capture Mode (Slow)». This was changed because the wording «Multi-adapter Compatibility» was a bit vague, and users are not typically aware of the potential performance impact when using the option.
- Optimized the preview pane and reduced GPU usage by 2-8% depending on how many sources were in the preview.
- The streaming/recording buttons in the main window now highlight while streaming/recording.
- Fixed a bug on Windows where desktop audio capture could go slightly out of sync with display/game/window capture on certain audio devices
- Fixed an issue where certain Elgato devices would not output audio by default, and would require users to select the audio device manually.
- Fixed a bug with studio mode where scenes that are set to fully duplicate would not retain their filters.
- Fixed a stuttering bug on Linux with audio monitoring
- Fixed MP3 audio support in the browser source on macOS
- Fixed a few Dark/Rachni theme issues
- Fixed a lot of minor bugs and a few minor memory leaks
- Fixed a known crash that could happen on startup for certain AMD cards/drivers.
Conclusion
In this quick tutorial, you learned how to secure your Ubuntu Linux 20.04 LTS server or desktop with the help of UFW. For more info, please see the ufw help page here.
This entry is 10 of 10 in the Uncomplicated Firewall (UFW) series. Keep reading the rest of the series:
- Install UFW firewall on Ubuntu 16.04 LTS server
- Open ssh port 22 using ufw on Ubuntu/Debian Linux
- Configure ufw to forward port 80/443 to internal server hosted on LAN
- Block an IP address with ufw on Ubuntu Linux server
- Limit SSH (TCP port 22) connections with ufw on Ubuntu Linux
- Ubuntu Linux Firewall Open Port Command Using UFW
- Open DNS port 53 using ufw on Ubuntu/Debian Linux
- Set Up a Firewall with UFW on Ubuntu 18.04
- Delete a UFW firewall rule
- Configure Firewall with UFW on Ubuntu 20.04 LTS
If you liked this page, please support my work on Patreon or with a donation.
Get the latest tutorials on SysAdmin, Linux/Unix, Open Source/DevOps topics:
- RSS feed or Weekly email newsletter
| Category | List of Unix and Linux commands |
|---|---|
| File Management | cat |
| Firewall | Alpine Awall • CentOS 8 • OpenSUSE • RHEL 8 • Ubuntu 16.04 • Ubuntu 18.04 • Ubuntu 20.04 |
| Network Utilities | dig • host • ip • nmap |
| OpenVPN | CentOS 7 • CentOS 8 • Debian 10 • Debian 8/9 • Ubuntu 18.04 • Ubuntu 20.04 |
| Package Manager | apk • apt |
| Processes Management | bg • chroot • cron • disown • fg • jobs • killall • kill • pidof • pstree • pwdx • time |
| Searching | grep • whereis • which |
| User Information | groups • id • lastcomm • last • lid/libuser-lid • logname • members • users • whoami • who • w |
| WireGuard VPN | Alpine • CentOS 8 • Debian 10 • Firewall • Ubuntu 20.04 |
Настройка фаервола Ubuntu
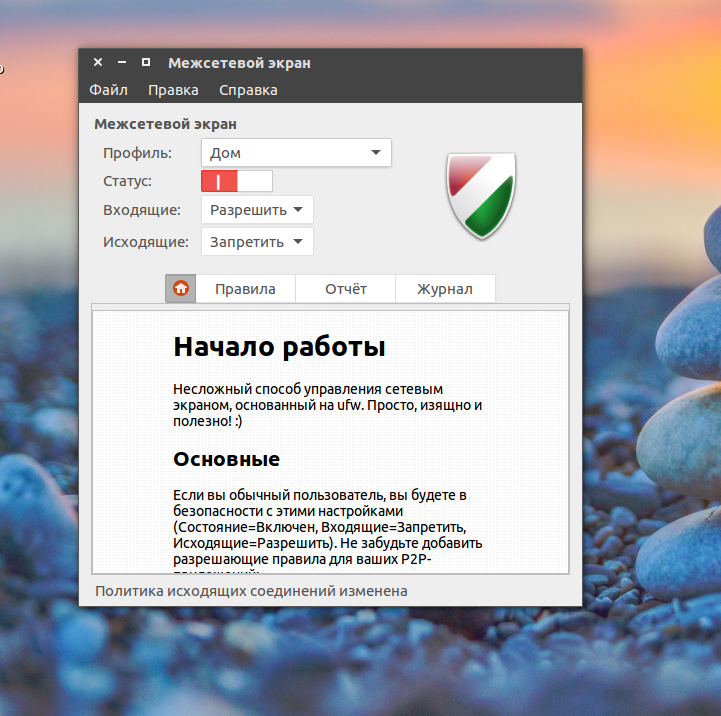
Главное окно программы выглядит вот так, здесь, кроме главных инструментов есть небольшая справка пр работе с программой:

Здесь есть все необходимые функции, чтобы настройка gufw ubuntu была удобной, но в то же время очень простой. Для начала нужно включить работу фаервола переключив переключатель статус в положение включен. Окно программы сразу изменится и станут доступными все функции:
Здесь вы можете менять общие режимы работы для дома, общественного места и офиса. С различными параметрами для трафика и правилами. Режим для дома блокирует входящий трафик и разрешает исходящий. Профили отличаются только параметрами входящего и исходящего трафика.
Открыв меню Правка, Параметры, вы можете настроить общую работу Gufw linux, здесь вы также можете создавать свои профили. Для каждого профиля вы можете добавлять свои правила.

Настройка правил gufw
Запрет и разрешение трафика для входящих и исходящих подключений ничего бы не значило, если бы не было возможности настройки правил для определенных приложений и сервисов. Настройка правил программы выполняется в главном окне.
В самом низу есть три кнопки, добавить правило +, удалить правило — и кнопка в виде бутерброда для редактирования правила.
Давайте сначала запретим весь входящий и исходящий трафик:

Затем попытайтесь выполнить в терминале ping запрос к какому либо сайту. Ничего не получится. Это так называемая строгая блокировка, когда мы разрешаем только нужные процессы, все остальное запрещено:

Gufw ubuntu блокирует весь трафик, теперь разрешим dns с помощью правила. Для этого нажмите +. В открывшимся окне вы можете выбрать политику разрешить или запретить, в нашем случае нужно разрешать.
 Во второй строчке можно указать направление трафика — входящий или исходящий, а также можно выбрать оба направления.
Дальше мы должны выбрать приложение или службу, для которой нужно мы будем разрешать трафик. Вы можете выбрать категорию и под категорию чтобы облегчить поиск или же воспользоваться фильтром приложений, нас сейчас интересует DNS.

После завершения добавления правила окно не закроется и настройка gufw ubuntu может быть продолжена. Вы можете добавлять другие правила. Но перед тем, давайте проверим действительно ли работает DNS:

DNS работает IP адрес был получен, но ICMP все еще не разрешен. Подобно тому как мы это сделали, можно настроить правило для любого из доступных приложений.
Но правила созданные таким способом не могут контролировать все программы и порты. Поэтому существуют расширенные способы создания правил.
В окне создать правило, кроме вкладки Предустановленные, вы можете выбрать Обычные или Расширенные. На вкладке Обычные нет выбора приложения, здесь вы можете выбрать только порт и протокол:

А на вкладке расширенные есть также настройка входящего и исходящего IP адреса:

Теперь давайте разрешим работу браузеров Chromium, Firefox и т д. Для этого нам понадобится разрешить работу исходящий трафик на порт 80 и из порта 80, а также 443, или же мы можем воспользоваться предустановленным набором правил для сервисов HTTP и HTTPS:


После добавления этих правил браузеры будут работать. Таким образом, может быть выполнена настройка gufw ubuntu, для всех необходимых вам приложений. Кроме разрешающих правил, вы можете создавать запрещающие, просто установив главное поведение программы все разрешить, а потом создавайте правила для запрета тех или иных служб.
Но здесь есть еще одно но, чтобы знать как и что разрешать и запрещать возможно вам понадобятся журналы программы.
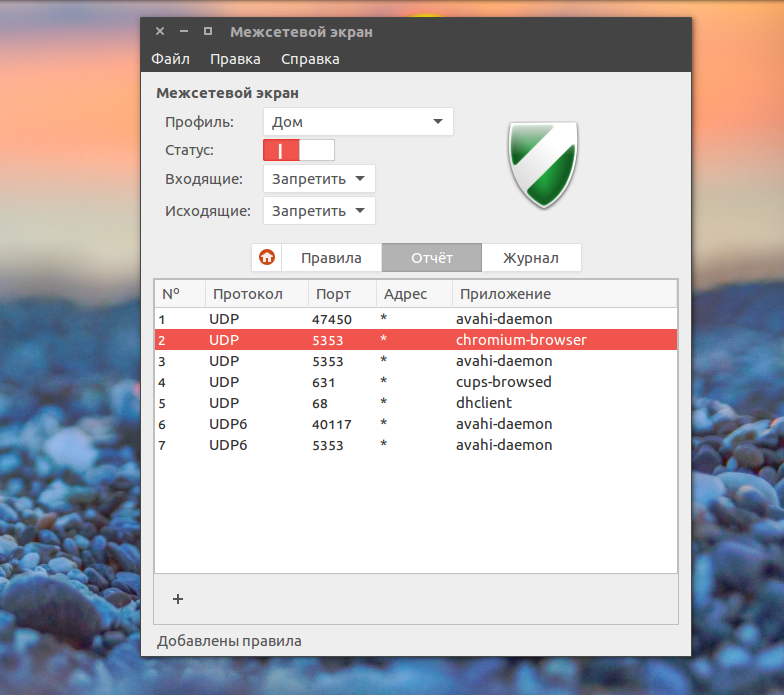
Посмотрев какие программы пытаются проникнуть в сеть вы сможете понять что нужно разрешить и нет.
Посмотреть какие программы работают с сетью вы можете на вкладке отчет в главном окне:
А на вкладке журнал вы найдете информацию по работе программы, переключению режимов и удалению правил.
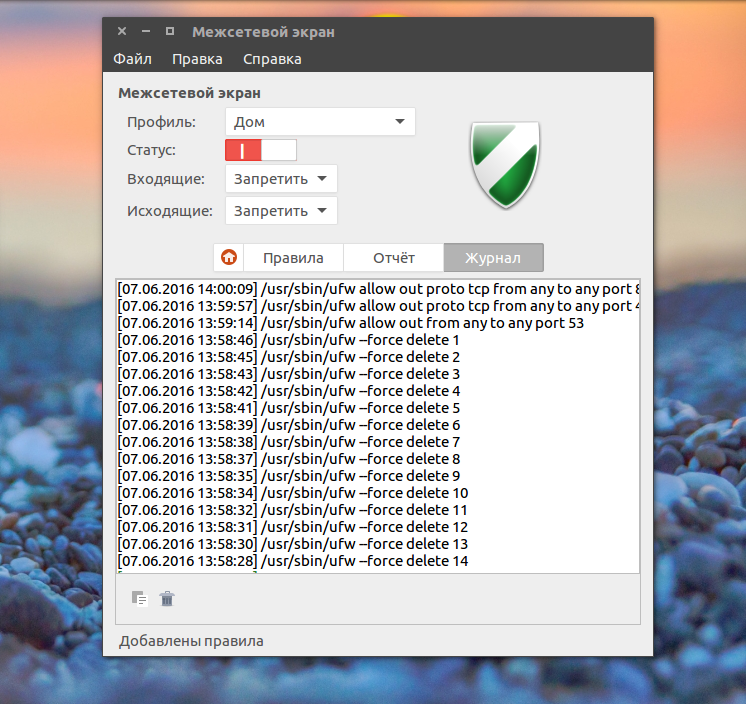
С этой информацией настройка фаервола Ubuntu будет более эффективной и вы сможете решить возникшие проблемы.
Шаг 1 — Загрузка и установка компонентов
Вначале установим на каждом сервере необходимые компоненты.
На хосте
Установите на хосте пакет , которы позволит вам предоставлять доступ к вашим каталогам. Поскольку это первая операция, которую вы выполняете с помощью в этом сеансе, обновите индекс локальных пакетов перед установкой:
После установки пакетов переключитесь на клиентский сервер.
На клиенте
На клиенте необходимо установить пакет , обеспечивающий функции NFS без добавления каких-либо серверных компонентов. Обновите индекс локальных пакетов перед установкой, чтобы гарантированно использовать актуальную информацию:
Теперь на обоих серверах установлены необходимые пакеты, и мы можем приступить к их настройке.
Saving your Iptables Configuration
By default, the rules that you add to iptables are ephemeral. This means that when you restart your server, your iptables rules will be gone.
This is actually a feature for some user because it gives them an avenue to get back in if they have accidentally locked themselves out of the server. However, most users will want a way to automatically save the rules you have created and to load them when the server starts.
There are a few ways to do this, but the easiest way is with the package. You can download this from Ubuntu’s default repositories:
During the installation, you will be asked if you would like to save your current rules to be automatically loaded. If you are happy with your current configuration (and you have tested your ability to create independent SSH connections, you can select to save your current rules.
It will also ask you if you want to save the IPv6 rules that you have configured. These are configured through a separate utility called which controls the flow of IPv6 packets in almost the same way.
Once the installation is complete, you will have a new service called that is configured to run at boot. This service will load in your rules and apply them when the server is started.
Saving Updates
If you ever update your firewall and want to preserve the changes, you must save your iptables rules for them to be persistent.
Save your firewall rules with this command:
Getting started
By default, Ubuntu 16.x and 18.x use , or Uncomplicated Firewall. For the purpose of this mini guide, we’ll be going through the steps needed to disable and reset the firewall, and then allow connections through to the most common ports.
Step 1: Disabling ufw
By disabling , we’re allowing all connections through. If, after executing the command below, you are able to connect via SSH, or to your website/application, the firewall was blocking your connection attempt and you can move forward with the next steps. If you are still unable to access your Droplet via SSH, or access to your website/application continues to be blocked, there may be another issue preventing access.
Step 3: Deny All Incoming Connections
By denying all incoming connections, we’re using the whitelist method of allowing access only on the ports that we define. We’ll define those ports in Step 5.
Step 4: Allow All Outgoing Connections
By allowing all outgoing connections, we’re allowing any connection from the Droplet to the outside world, regardless of which port the connection is being made on. Unless you have a specific use case for limiting outgoing connections, it’s best to allow all.
Step 5: Defining Ports That Allow Connections
For the purpose of this mini guide, we’re focused on three primary ports (listed below), though you can add additional ports through the firewall at any time (without having to repeat steps 1-4). The command to add a port through remains the same, only the port will change.
Common Ports
- SSH — Port 22
- HTTP — Port 80
- HTTPS — Port 443
Allow TCP connections on Port 22
Allow TCP connections on Port 80
Allow TCP connections on Port 443
Step 6: Enabling ufw
Now that we’ve reset the firewall and defined our whitelisted ports, we’ll enable which will enforce the rules that we’ve put in to place.
Step 7 — Deleting Rules
Knowing how to delete firewall rules is just as important as knowing how to create them. There are two different ways to specify which rules to delete: by rule number or by the actual rule (similar to how the rules were specified when they were created). We’ll start with the delete by rule number method because it is easier.
By Rule Number
If you’re using the rule number to delete firewall rules, the first thing you’ll want to do is get a list of your firewall rules. The UFW status command has an option to display numbers next to each rule, as demonstrated here:
If we decide that we want to delete rule 2, the one that allows port 80 (HTTP) connections, we can specify it in a UFW delete command like this:
This would show a confirmation prompt then delete rule 2, which allows HTTP connections. Note that if you have IPv6 enabled, you would want to delete the corresponding IPv6 rule as well.
By Actual Rule
The alternative to rule numbers is to specify the actual rule to delete. For example, if you want to remove the rule, you could write it like this:
You could also specify the rule by , instead of by service name:
This method will delete both IPv4 and IPv6 rules, if they exist.
Schritt 9 — Aktivieren oder Zurücksetzen von UFW (optional)
Wenn Sie entscheiden, dass Sie UFW nicht mehr verwenden möchten, können Sie die Firewall mit diesem Befehl deaktivieren:
Alle Regeln, die Sie mit UFW erstellt haben, sind dann nicht mehr aktiv. Sie können später jederzeit nutzen, um sie wieder zu aktivieren.
Wenn Sie bereits UFW-Regeln konfiguriert haben, aber lieber neu anfangen möchten, können Sie den Befehl reset verwenden:
Dadurch wird UFW deaktiviert und alle Regeln, die zuvor definiert wurden, werden gelöscht. Beachten Sie, dass die Standardrichtlinien nicht zu ihren ursprünglichen Einstellungen zurückkehren, wenn Sie sie irgendwann geändert haben. Jetzt sollten Sie mit UFW neu anfangen können.
Какие бывают правила
Для легкой работы с файрволом разработана тройка основных правил (команд):
1.Input.
Правило применяется, когда необходимо контролировать входящий трафик. Например, когда юзер подключается к удаленному серверу по протоколу Secure Shell, файрвол начнет сравнивать его айпи с другими айпи из своего списка. В зависимости от результата, то есть от наличия в списке запретов, доступ пользователю будет открыт или закрыт.
2.Forward.
Правило применяется в случаях, когда необходимо проверить входящее сообщение, проходящее через данный компьютер. Например, маршрутизатор постоянно пересылает сообщения к адресату от сетевых пользователей или приложений. Зачастую данное правило не используется, если только юзер целенаправленно не настраивает маршрутизацию на своем устройстве.
3.Output.
Правило применяется к исходящим соединениям. Например, юзер хочет проверить пинг к одному из заданных сайтов – утилита вновь сверится со своими правилами из списка и определит, как поступить при пинге веб-сайта: разрешить или запретить.
Примечание:
Делая ping к внешнему хосту, машина не только отправляет пакет, но и дожидается обратного ответа. Поэтому, настраивая Iptables, не нужно забывать о наличии двухсторонних коммуникаций и запрещать подключение к серверам через протокол SSH.
Enabling and disabling Ubuntu Firewall
UFW Firewall is disabled by default on Ubuntu 18.04, so we need to enable it, but we need to do it the correct way. The correct way is, first we must add firewall rule to open ssh port 22, then we activate the firewall. If you start the firewall without opening SSH port, we won’t able to access the command line remotely.
This is how it is Done.
First, we need to add a rule that will allow us to remotely connect through SSH:
Then, we can activate the firewall with ufw enable command:
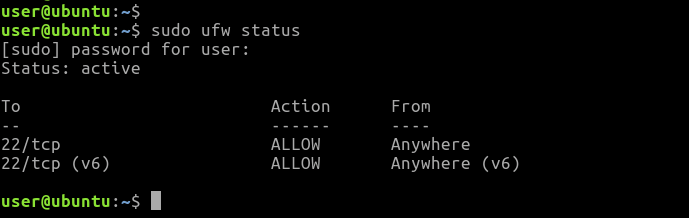
We can see the status of Ubuntu firewall with following command:
As you can see ufw is now activated, We also have firewall rules that allow incoming SSH traffic both IPv4 and IPv6.
If you want to disable Ubuntu Firewall, simply execute:
At this point our Ubuntu server blocks all incoming traffic except for the SSH. Next, we will see how to open additional network ports on UFW.
Opening ports in UFW to allow network traffic
The ufw allow command adds allow rules to the firewall. To allow incoming traffic from a specific port we can use either service name or the port number.
If you are running a web server on your Ubuntu system, you need to allow HTTP traffic from the firewall. The following command will allow HTTP traffic from all sources:
Alternately, you can use the port number in place of the name of a service:
Note that we specified the protocol name when opening the port 80, because it is a TCP port. If you leave out the protocol name, ufw will open a port for both TCP and UDP protocols.
The preceding rule will open DNS port 53 for both TCP and UDP protocols.
Filter network access by IP/Network
The Ubuntu UFW firewall can allow/block incoming traffic based on the client IP Address or Network. For example, following firewall rule will allow all traffic from the from the 192.168.1.10 IP Address.
Allow FTP traffic from the 192.168.1.0/24 network:
The ufw deny command use to add deny rules. Following rule will deny all incoming traffic from 192.168.1.10 IP:
Note that «to any» means, to any interface on the server.
Delete Firewall rules
We can remove a rule by simply prefixing the original rule with delete option. You can list added rules as they added by running the following command:
For example, if the original rule was:
Delete the rule as follows:
Alternatively, you can delete rules by specifying the rule number. To see a list of numbered rules, use:
For example, if you want to delete rule number ‘2’, Run:
Resetting the Ubuntu Firewall
If you want to remove all firewall rules, run the reset command. The reset command Disables and resets firewall to installation defaults.
Ubuntu Firewall is no longer active after the reset operation:
Summary
UFW, also known as uncomplicated firewall, is the default front-end command line tool to manage iptables on Ubuntu 18.04. Ufw Firewall is disabled by default in Ubuntu 18.04 and we must open the ssh port before we enable the firewall. Otherwise, we will not be able to access the command line remotely once we exit from from the current ssh session.
Шаг 5 — Разрешение других соединений
К этому моменту вы должны были разрешить все другие соединения, необходимые вашему серверу. Состав разрешаемых соединений должен соответствовать вашим конкретным потребностям. К счастью, вы уже знаете, как писать правила, разрешающие соединения по имени службы или номеру порта, поскольку мы уже делали это для SSH на порту . Также вы можете использовать это для следующих соединений:
- соединения HTTP на порту 80, которые используются веб-серверами без шифрования, с помощью команды или
- соединения HTTPS на порту 443, которые используются веб-серверами с шифрованием, с помощью команды или
Помимо указания порта или службы есть другие способы разрешить другие соединения.
Определенные диапазоны портов
С помощью UFW вы можете указывать диапазоны портов. Некоторые приложения используют для соединений не один порт, а несколько.
Например, чтобы разрешить соединения X11, которые используют порты -, нужно использовать следующие команды:
Когда вы указываете диапазоны портов с помощью UFW, вы должны указать протокол ( или ), к которому должны применяться эти правила. Мы не упоминали этого ранее, поскольку если протокол не указать, оба протокола будут разрешены, что подходит для большинства случаев.
Конкретные IP-адреса
При работе с UFW вы также можете указывать конкретные IP-адреса. Например, если вы хотите разрешить соединения с определенного IP-адреса, например с рабочего или домашнего адреса , вам нужно использовать опцию , а затем указать IP-адрес:
Также вы можете указать определенный порт, к которому IP-адресу разрешено подключаться. Для этого нужно добавить опцию , а затем указать номер порта. Например, если вы хотите разрешить IP-адресу подключаться к порту (SSH), нужно использовать следующую команду:
Подсети
Если вы хотите разрешить подсеть IP-адресов, вы можете указать маску сети с помощью нотации CIDR. Например, если вы хотите разрешить все IP-адреса в диапазоне от до , вы можете использовать следующую команду:
Также вы можете указывать порт назначения, к которому разрешено подключаться подсети . В качестве примера мы используем порт (SSH):
Подключения к определенному сетевому интерфейсу
Если вы хотите создать правило брандмауэра, применимое только к определенному сетевому интерфейсу, вы можете использовать для этого опцию «allow in on», а затем указать имя сетевого интерфейса.
Прежде чем продолжить, вам может понадобиться просмотреть сетевые интерфейсы. Для этого нужно использовать следующую команду:
В выделенной части результатов показаны имена сетевых интерфейсов. Обычно они носят имена вида или .
Если на вашем сервере имеется публичный сетевой интерфейс под названием , вы можете разрешить трафик HTTP (порт ) для этого интерфейса с помощью следующей команды:
Это позволит вашему серверу принимать запросы HTTP из публичной части интернета.
Если вы хотите использовать сервер базы данных MySQL (порт ) для прослушивания соединений на интерфейсе частной сети (например, ), вы можете использовать следующую команду:
Это позволит другим серверам в вашей частной сети подключаться к вашей базе данных MySQL.
Schritt 6 — Ablehnen von Verbindungen
Wenn Sie die Standardrichtlinie für eingehende Verbindungen nicht geändert haben, ist UFW so konfiguriert, dass alle eingehenden Verbindungen abgelehnt werden. Das vereinfacht im Allgemeinen das Erstellen einer sicheren Firewall-Richtlinie, da Sie Regeln erstellen müssen, die bestimmte Ports und IP-Adressen explizit zulassen.
Manchmal werden Sie jedoch einzelne Verbindungen auf Grundlage der Quell-IP-Adresse oder des Subnetzes ablehnen wollen, vielleicht weil Sie wissen, dass Ihr Server von dort angegriffen wird. Wenn Sie Ihre Richtlinie für eingehenden Datenverkehr in allow ändern möchten (was nicht empfohlen wird), müssten Sie für alle Dienste oder IP-Adressen, bei denen Sie keine Verbindung zulassen wollen, deny-Regeln erstellen.
Um deny-Regeln zu schreiben, können Sie die oben beschriebenen Befehle verwenden und allow durch deny ersetzen.
Um zum Beispiel HTTP-Verbindungen abzulehnen, können Sie diesen Befehl verwenden:
Oder wenn Sie alle Verbindungen von ablehnen möchten, können Sie diesen Befehl verwenden:
Jetzt werfen wir einen Blick auf das Löschen von Regeln.
Block an IP Address
To block all network connections that originate from a specific IP address, for example, run this command:
In this example, specifies a source IP address of “15.15.15.51”. If you wish, a subnet, such as , may be specified here instead. The source IP address can be specified in any firewall rule, including an allow rule.
Block Connections to a Network Interface
To block connections from a specific IP address, e.g. , to a specific network interface, e.g. , use this command:
This is the same as the previous example, with the addition of . The network interface can be specified in any firewall rule, and is a great way to limit the rule to a particular network.