Igpu multi monitor что это в биосе?
Содержание:
- Настройки биоса на компьютере по умолчанию
- Проверка лицензии в Windows 10
- 1 комментарий
- # NVRAM
- # NVRAM
- Shader stripping
- Использование батареи
- Прежде чем начать
- Разгон процессора и памяти
- Перегрузки
- FromHdc(IntPtr)
- Энергопотребление экрана
- # Misc
- # UEFI
- Настройка BIOS материнских плат Asus
- Пошаговая инструкция по правильной настройке BIOS на компьютере
- Вкладка Boot
- Настройка плана энергосбережения
- Включение поддержки адресации huge pages в Ubuntu
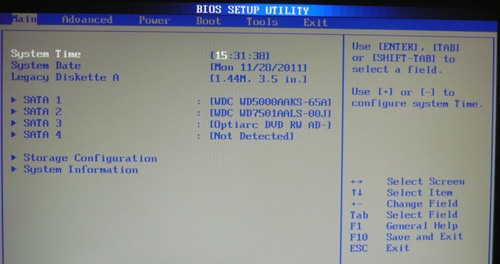
Настройки биоса на компьютере по умолчанию
После подключения к сети вашего персонального друга (компьютера) начинается загрузка основной ОС, затем подключается винчестер, с которого загружается «Виндоус» или другая ОС. Настройки биоса не включаются автоматически на персональном устройстве.
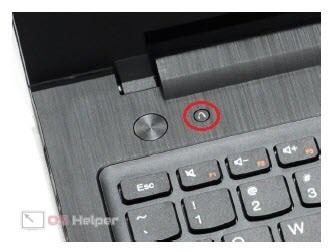
Для входа в этот режим настроек необходимо после включения компьютера подождать одиночный звуковой сигнал или начало надписи о загрузке, а затем несколько раз нажать кнопку «F2» или «DEL (Delete)» (зависит от «материнки»). Правильный вариант высвечивается внизу экрана.
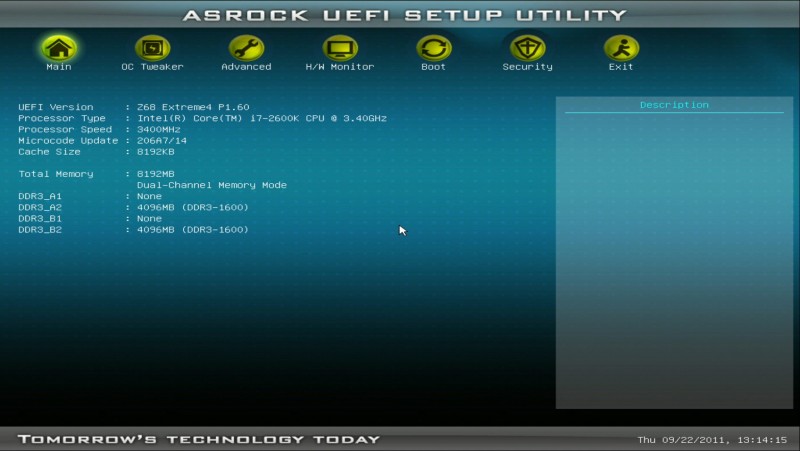
После этого включаются настройки биоса на компьютере по умолчанию. Количество и названия основных пунктов меню, расположенных вверху таблицы настроек bios, могут отличаться. Мы рассмотрим основные разделы и подразделы одного из вариантов такого меню, которое состоит из пунктов:
- Main — выбор даты, времени, жестких дисков и подключенных накопителей.
- Advanced — выбор этого пункта позволит выбрать и поменять режимы:
- процессора (например, разогнать его);
- памяти;
- портов (входов-выходов) компьютера.
- Power — изменение конфигурации питания.
- Boot — изменение загрузочных параметров.
- Boot Setting Configuration (Boot) — выбор параметров, влияющих на быстроту загрузки ОС и на определение мыши и клавиатуры.
- Tools — специализированные настройки. Например, обновление с «флешки».
- Exit — Выход. Можно записать изменения и выйти из bios или оставить все как было (по умолчанию).
Проверка лицензии в Windows 10
1 комментарий
# NVRAM

Add
4D1EDE05-38C7-4A6A-9CC6-4BCCA8B38C14
Used for OpenCore’s UI scaling, default will work for us. See in-depth section for more info
More in-depth Info
Booter Path, mainly used for UI Scaling
-
UIScale:
- : Standard resolution
- : HiDPI (generally required for FileVault to function correctly on smaller displays)
-
DefaultBackgroundColor: Background color used by boot.efi
- : Syrah Black
- : Light Gray
4D1FDA02-38C7-4A6A-9CC6-4BCCA8B30102
OpenCore’s NVRAM GUID, mainly relevant for RTCMemoryFixup users
More in-depth Info
-
rtc-blacklist: <>
- To be used in conjunction with RTCMemoryFixup, see here for more info:
- Most users can ignore this section
7C436110-AB2A-4BBB-A880-FE41995C9F82
System Integrity Protection bitmask
General Purpose boot-args:
| boot-args | Description |
|---|---|
| -v | This enables verbose mode, which shows all the behind-the-scenes text that scrolls by as you’re booting instead of the Apple logo and progress bar. It’s invaluable to any Hackintosher, as it gives you an inside look at the boot process, and can help you identify issues, problem kexts, etc. |
| debug=0x100 | This disables macOS’s watchdog which helps prevents a reboot on a kernel panic. That way you can hopefully glean some useful info and follow the breadcrumbs to get past the issues. |
| keepsyms=1 | This is a companion setting to debug=0x100 that tells the OS to also print the symbols on a kernel panic. That can give some more helpful insight as to what’s causing the panic itself. |
| alcid=1 | Used for setting layout-id for AppleALC, see supported codecs to figure out which layout to use for your specific system. More info on this is covered in the Post-Install Page |
GPU-Specific boot-args:
| boot-args | Description |
|---|---|
| agdpmod=pikera | Used for disabling boardID on Navi GPUs(RX 5000 series), without this you’ll get a black screen. Don’t use if you don’t have Navi(ie. Polaris and Vega cards shouldn’t use this) |
| nvda_drv_vrl=1 | Used for enabling Nvidia’s Web Drivers on Maxwell and Pascal cards in Sierra and HighSierra |
| -wegnoegpu | Used for disabling all other GPUs than the integrated Intel iGPU, useful for those wanting to run newer versions of macOS where their dGPU isn’t supported |
-
csr-active-config:
- Settings for ‘System Integrity Protection’ (SIP). It is generally recommended to change this with via the recovery partition.
- csr-active-config by default is set to which enables System Integrity Protection. You can choose a number of different values but overall we recommend keeping this enabled for best security practices. More info can be found in our troubleshooting page:
-
run-efi-updater:
This is used to prevent Apple’s firmware update packages from installing and breaking boot order; this is important as these firmware updates (meant for Macs) will not work.
-
prev-lang:kbd: <>
- Needed for non-latin keyboards in the format of , recommended to keep blank though you can specify it(Default in Sample config is Russian):
- American: ( in HEX)
- Full list can be found in AppleKeyboardLayouts.txt
- Hint: can be changed into a String so you can input directly instead of converting to HEX
| Key | Type | Value |
|---|---|---|
| prev-lang:kbd | String | en-US:0 |
Delete
Info
Forcibly rewrites NVRAM variables, do note that will not overwrite values already present in NVRAM so values like should be left alone. For us, we’ll be changing the following:
| Quirk | Enabled |
|---|---|
| WriteFlash | YES |
More in-depth Info
-
LegacyEnable: NO
Allows for NVRAM to be stored on nvram.plist, needed for systems without native NVRAM
-
LegacyOverwrite: NO
Permits overwriting firmware variables from nvram.plist, only needed for systems without native NVRAM
-
LegacySchema
Used for assigning NVRAM variables, used with LegacyEnable set to YES
-
WriteFlash: YES
Enables writing to flash memory for all added variables.
# NVRAM
Add
4D1EDE05-38C7-4A6A-9CC6-4BCCA8B38C14
Used for OpenCore’s UI scaling, default will work for us. See in-depth section for more info
More in-depth Info
Booter Path, mainly used for UI Scaling
-
UIScale:
- : Standard resolution
- : HiDPI (generally required for FileVault to function correctly on smaller displays)
-
DefaultBackgroundColor: Background color used by boot.efi
- : Syrah Black
- : Light Gray
4D1FDA02-38C7-4A6A-9CC6-4BCCA8B30102
OpenCore’s NVRAM GUID, mainly relevant for RTCMemoryFixup users
More in-depth Info
-
rtc-blacklist: <>
- To be used in conjunction with RTCMemoryFixup, see here for more info:
- Most users can ignore this section
7C436110-AB2A-4BBB-A880-FE41995C9F82
System Integrity Protection bitmask
General Purpose boot-args:
| boot-args | Description |
|---|---|
| -v | This enables verbose mode, which shows all the behind-the-scenes text that scrolls by as you’re booting instead of the Apple logo and progress bar. It’s invaluable to any Hackintosher, as it gives you an inside look at the boot process, and can help you identify issues, problem kexts, etc. |
| debug=0x100 | This disables macOS’s watchdog which helps prevents a reboot on a kernel panic. That way you can hopefully glean some useful info and follow the breadcrumbs to get past the issues. |
| keepsyms=1 | This is a companion setting to debug=0x100 that tells the OS to also print the symbols on a kernel panic. That can give some more helpful insight as to what’s causing the panic itself. |
| alcid=1 | Used for setting layout-id for AppleALC, see supported codecs to figure out which layout to use for your specific system. More info on this is covered in the Post-Install Page |
GPU-Specific boot-args:
| boot-args | Description |
|---|---|
| agdpmod=pikera | Used for disabling boardID on Navi GPUs(RX 5000 series), without this you’ll get a black screen. Don’t use if you don’t have Navi(ie. Polaris and Vega cards shouldn’t use this) |
| nvda_drv_vrl=1 | Used for enabling Nvidia’s Web Drivers on Maxwell and Pascal cards in Sierra and HighSierra |
| -wegnoegpu | Used for disabling all other GPUs than the integrated Intel iGPU, useful for those wanting to run newer versions of macOS where their dGPU isn’t supported |
-
csr-active-config:
- Settings for ‘System Integrity Protection’ (SIP). It is generally recommended to change this with via the recovery partition.
- csr-active-config by default is set to which enables System Integrity Protection. You can choose a number of different values but overall we recommend keeping this enabled for best security practices. More info can be found in our troubleshooting page:
-
run-efi-updater:
This is used to prevent Apple’s firmware update packages from installing and breaking boot order; this is important as these firmware updates (meant for Macs) will not work.
-
prev-lang:kbd: <>
- Needed for non-latin keyboards in the format of , recommended to keep blank though you can specify it(Default in Sample config is Russian):
- American: ( in HEX)
- Full list can be found in AppleKeyboardLayouts.txt
- Hint: can be changed into a String so you can input directly instead of converting to HEX
| Key | Type | Value |
|---|---|---|
| prev-lang:kbd | String | en-US:0 |
Delete
Info
Forcibly rewrites NVRAM variables, do note that will not overwrite values already present in NVRAM so values like should be left alone. For us, we’ll be changing the following:
| Quirk | Enabled |
|---|---|
| WriteFlash | YES |
More in-depth Info
-
LegacyEnable: NO
Allows for NVRAM to be stored on nvram.plist, needed for systems without native NVRAM
-
LegacyOverwrite: NO
Permits overwriting firmware variables from nvram.plist, only needed for systems without native NVRAM
-
LegacySchema
Used for assigning NVRAM variables, used with LegacyEnable set to YES
-
WriteFlash: YES
Enables writing to flash memory for all added variables.
Shader stripping
Lower your build data size and improve loading times by stripping out certain shaders.
By default, Unity looks at your Scenes and lightmapping settings to figure out which A post-processing effect that overlays a color onto objects depending on the distance from the camera. Use this to simulate fog or mist in outdoor environments, or to hide clipping of objects near the camera’s far clip plane. More infoSee in and modes are not in use, and skips corresponding An internal version of the Shader that Unity generates according to the specific combination of Shader keywords and their status. If you add more keywords to the Shader, you increase the number of possible combinations, which results in more Shader Variants. More infoSee in .
However, you can choose specific modes if you are building asset bundles to ensure that the modes you want to use are included.
Lightmapping
By default, the Lightmap modes property defaults to Automatic, meaning that Unity decides which shader variants to skip.
To specify which modes to use yourself, change this to Custom and enable or disable the following lightmapping modes:
- Baked Non-Directional
- Baked Directional
- Realtime Non-Directional
- Realtime Directional
- Baked Shadowmask
- Baked Subtractive
Fog
By default, the Fog Modes property defaults to Automatic, meaning that Unity decides which shader variants to skip.
To specify which modes to use yourself, change this to Custom and enable or disable the following fog modes:
- Linear
- Exponential
- Exponential Squared
Instancing Shader variants
Unity strips instancing variants if GPU instancing is not enabled on any GameObjectThe fundamental object in Unity scenes, which can represent characters, props, scenery, cameras, waypoints, and more. A GameObject’s functionality is defined by the Components attached to it. More infoSee in in the Scene. You can use the Instancing Variants property to override the default stripping behavior.
| Value | Description |
|---|---|
| Strip Unused (Default value) | When Unity builds a Project, it only includes instancing Shader variants if at least one Material referencing the Shader has Enable instancing enabled. Unity strips any Shaders that are not referenced by Materials with Enable instancing disabled. |
| Strip All | Strip all instancing Shader variants, even if they are being used. |
| Keep All | Keep all instancing Shader variants, even if they are not being used. |
Использование батареи
После перехода в блок «использование батареи» вы сможете найти всю информацию о том, куда расходуется заряд и какие приложения потребляют большую его часть.
Здесь же можно обнаружить процентное соотношение расхода аккумулятора основными составляющими: 1. беспроводное соединение Wi-Fi; 2. дисплей; 3. система.
Данная информация может сильно помочь для выстраивания политики энергосбережения. Так как с ее помощью вы можете определить какие программы потребляют больше всего и какие лучше отключить. Кроме того, если вы планируете продлить автономную работу, то при возможности отключите Wi-Fi.
Здесь же можно найти и другие данные касаемо работы приложений. Например, потребление энергии в обычном режиме и в скрытом (фоновом).
Прежде чем начать
Установка Хакинтош (macOS на обычный компьютер) для новичка может показаться настоящим АДОМ, так как вы наверняка не один день просидели в Google задавая запрос «установка mac os на pc»! Мало того что вам нужно:
- Выбор железа для Хакинтош
- Скачивание образа macOS
- Настройка BIOS / UEFI
- Хакинтош: Какие kext нужны и где скачать?
- Куда устанавливать kext Хакинтош?
- Скачать драйвера drivers64UEFI
- Создание загрузочной флешки macOS (Хакинтош)
- В Windows с помощью (BDU) Boot Disk Utility
- С помощью UniBeast в macOS
- С помощью терминала в macOS
- Создание config.plist для установки Хакинтош
- Значение аргументов (ключей) загрузки
- Установить Хакинтош: шаг за шагом
- Установить Nvidia Web Driver на Хакинтош
Так еще и после этих всех подготовок macOS может и не начать устанавливаться на компьютер, потому что UEFI или BIOS неправильно настроен! Чтобы все заработало нужно вносить правки! На данный момент в странах СНГ мало наглядной информации какие настройки вносить и где их найти в UEFI/BIOS, поэтому было решено написать данный материал!
Теперь приступим к внесению правок в настройки вашего ПК!
Разгон процессора и памяти
Меню встроенного программного обеспечения позволяет увеличить тактовую частоту процессора и оперативной памяти, чтобы получить лучшую производительность. Правда, при этом рискуя перегреть компоненты, что может привести к повреждению. Поэтому вы должны позаботиться о надлежащем охлаждении. С другой стороны, может уменьшить номинальную частоту для снижения энергопотребления и уровня шума. Intel и AMD предлагают процессоры, предназначенные для разгона. В Intel модели маркируются буквой K (например, Core i7-3930K). AMD предлагает системы центрального процессора с изменяемым мультипликатором. Вы узнаете их по метке Black Edition.
В современных компьютерах вы можете установить уровень частоты с помощью нескольких параметров. Нужно найти подходящие настройки, например, в меню Ai Tweaker (Asus), M.I.T или Performance (Gigabyte). Множитель процессора (CPU Clock Ratio) оказывает непосредственное влияние на частоту процессора, умножив частоту системной шины (CPU Base Clock или Host Clock Value). Это самый простой способ разогнать процессор, но требуется модель с переменным множителем.
В других системах, вам нужно поднять частоту шины процессора, как Overclock RAM. Третий параметр является напряжением на процессоре (Vcore), увеличение которого вы должны контролировать, чтобы не дестабилизировать компьютер.
Опытные пользователи имеют еще одну возможность оптимизировать производительность компьютера. Вы можете настроить модуль оперативной памяти временный сигнал. Параметры синхронизации памяти определяют время доступа к ячейкам памяти, выраженные как число циклов. BIOS читает тактовую частоту, умолчанию SPD-EPROM, которая находится на модуле памяти. Время доступа в последовательности цифр, например. 4-4-4-4-12. Первые четыре числа циклов может быть в значительной степени уменьшается на 1. Однако, вы можете еще больше сократить время Row (Refresh) Cycle Time после повышения FSB (системной шины). Значительное увеличение производительности приводит, в частности, сокращение времени доступа RAS to CAS Delay (tRCD).
Перегрузки
|
Создает новый объект Graphics из указанного дескриптора для контекста устройств.Creates a new Graphics from the specified handle to a device context. |
|
|
Создает новый объект Graphics из указанного дескриптора контекста устройства и дескриптора устройства.Creates a new Graphics from the specified handle to a device context and handle to a device. |
FromHdc(IntPtr)
Создает новый объект Graphics из указанного дескриптора для контекста устройств.Creates a new Graphics from the specified handle to a device context.
-
hdc
- IntPtr
Дескриптор контекста устройства.Handle to a device context.
Возвращаемое значение
- Graphics
Этот метод возвращает новый объект Graphics для заданного контекста устройств.This method returns a new Graphics for the specified device context.
Примеры
Следующий пример кода предназначен для использования с Windows Forms и требует PaintEventArgs , что является параметром Paint обработчика событий.The following code example is designed for use with Windows Forms, and it requires PaintEventArgs, which is a parameter of the Paint event handler. Код выполняет следующее действие:The code performs the following action:
-
Создает переменную внутреннего типа указателя и задает ее в качестве маркера для контекста устройства графического объекта формы.Creates an internal pointer type variable and sets it to the handle to the device context of the graphics object of the form.
-
Создает новый графический объект с помощью .Creates a new graphics object using .
-
Рисует прямоугольник с новым графическим объектом (на экране).Draws a rectangle with the new graphics object (on the screen).
-
Освобождает новый графический объект с помощью .Releases the new graphics object using .
Комментарии
Следует всегда вызывать Dispose метод для освобождения Graphics связанных ресурсов, созданных FromHdc методом.You should always call the Dispose method to release the Graphics and related resources created by the FromHdc method.
Даже если устройство вывода имеет связанный цветовой профиль ICM, GDI+GDI+ по умолчанию этот профиль использовать не будет.Even if the display device has an associated ICM color profile, GDI+GDI+ will not use that profile by default. Чтобы включить ICM для Graphics , создайте Graphics из с параметром hdc после передачи в функцию HDC (и ICM_ON) .To enable ICM for a Graphics, construct the Graphics from an HDC after you pass the HDC (and ICM_ON) to the function. Затем любая прорисовка, выполненная с помощью, Graphics будет скорректирована в соответствии с профилем ICM, связанным с устройством отображения.Then any drawing done by the Graphics will be adjusted according to the ICM profile associated with the display device. Включение ICM приведет к снижению производительности.Enabling ICM will result in slower performance.
Состояние контекста устройства (режим сопоставления, логическая единица и т. д.) во время вызова FromHdc может повлиять на отрисовку, выполненную Graphics .The state of the device context (mapping mode, logical unit, and the like) at the time you call FromHdc can affect rendering done by the Graphics.
Энергопотребление экрана
Как отключить энергосберегающий режим на мониторе LG? Следующий совет подойдет и для любой другой модели дисплея. Оставаясь в диалоговом окне с дополнительными параметрами электропитания, можно продолжить настройку экрана. Пользователю доступны изменение времени работы монитора, а также регулировка яркости.
В первом случае можно выбрать время, спустя которое экран будет отключен полностью. Также можно попробовать адаптивную регулировку яркости. Она позволяет выполнить мониторинг датчиков освещения, для определения изменения освещения и выбора нужного уровня яркости.
И наконец, как отключить энергосберегающий режим в БИОСе? Для начала необходимо перейти в этот режим. Далее нужно отыскать раздел AI Tweaker, в котором выбираем строку EPU Power Saving Mode. Это настройка режима энергосбережения. Поэтому достаточно будет поставить напротив него значение Disable, которого его отключит.
# Misc
Debug
Info
Helpful for debugging OpenCore boot issues(We’ll be changing everything but ):
| Quirk | Enabled |
|---|---|
| AppleDebug | YES |
| ApplePanic | YES |
| DisableWatchDog | YES |
| Target | 67 |
More in-depth Info
-
AppleDebug
Enables boot.efi logging, useful for debugging. Note this is only supported on 10.15.4 and newer
: YES
-
ApplePanic
Attempts to log kernel panics to disk
: YES
-
DisableWatchDog
Disables the UEFI watchdog, can help with early boot issues
: YES
- DisplayLevel:
-
SerialInit
Needed for setting up serial output with OpenCore
: NO
-
SysReport: NO
- Helpful for debugging such as dumping ACPI tables
- Note that this is limited to DEBUG versions of OpenCore
- Target:
These values are based of those calculated in OpenCore debugging
Security
Info
Security is pretty self-explanatory, do not skip. We’ll be changing the following:
| Quirk | Enabled | Comment |
|---|---|---|
| AllowNvramReset | YES | |
| AllowSetDefault | YES | |
| BlacklistAppleUpdate | YES | |
| ScanPolicy | ||
| SecureBootModel | Default | This is a word and is case-sensitive, set to if you do not want secure boot(ie. you require Nvidia’s Web Drivers) |
| Vault | Optional | This is a word, it is not optional to omit this setting. You will regret it if you don’t set it to Optional, note that it is case-sensitive |
More in-depth Info
-
AllowNvramReset
Allows for NVRAM reset both in the boot picker and when pressing Cmd+Opt+P+R
: YES
-
AllowSetDefault
Allow CTRL+Enter and CTRL+Index to set default boot device in the picker
: YES
-
ApECID
Used for netting personalized secure-boot identifiers, currently this quirk is unreliable due to a bug in the macOS installer so we highly encourage you to leave this as default.
: 0
-
AuthRestart
Enables Authenticated restart for FileVault 2 so password is not required on reboot. Can be considered a security risk so optional
: NO
-
BlacklistAppleUpdate
Used for blocking firmware updates, used as extra level of protection as macOS Big Sur no longer uses run-efi-updater variable
: YES
-
BootProtect
Allows the use of Bootstrap.efi inside EFI/OC/Bootstrap instead of BOOTx64.efi, useful for those wanting to either boot with rEFInd or avoid BOOTx64.efi overwrites from Windows. Proper use of this quirks is covered here: Using Bootstrap.efi
: None
-
DmgLoading
Ensures only signed DMGs load
: Signed
- ExposeSensitiveData:
-
Vault:
- We won’t be dealing vaulting so we can ignore, you won’t boot with this set to Secure
- This is a word, it is not optional to omit this setting. You will regret it if you don’t set it to , note that it is case-sensitive
- ScanPolicy:
-
SecureBootModel: Default
- Enables Apple’s secure boot functionality in macOS, please refer to Security section for further details.
- Note: Users may find upgrading OpenCore on an already installed system can result in early boot failures. To resolve this, see here:
Entries
Used for specifying irregular boot paths that can’t be found naturally with OpenCore.
Won’t be covered here, see 8.6 of Configuration.pdf for more info
# UEFI

ConnectDrivers: YES
Forces .efi drivers, change to NO will automatically connect added UEFI drivers. This can make booting slightly faster, but not all drivers connect themselves. E.g. certain file system drivers may not load.
Add your .efi drivers here.
Only drivers present here should be:
- HfsPlus.efi
- OpenRuntime.efi
Audio
Related to AudioDxe settings, for us we’ll be ignoring(leave as default). This is unrelated to audio support in macOS.
For further use of AudioDxe and the Audio section, please see the Post Install page: Add GUI and Boot-chime
Input
Related to boot.efi keyboard passthrough used for FileVault and Hotkey support, leave everything here as default as we have no use for these quirks. See here for more details: Security and FileVault
ProtocolOverrides
Mainly relevant for Virtual machines, legacy macs and FileVault users. See here for more details: Security and FileVault
Quirks
Info
Relating to quirks with the UEFI environment, for us we’ll be changing the following:
| Quirk | Enabled | Comment |
|---|---|---|
| IgnoreInvalidFlexRatio | YES | |
| UnblockFsConnect | NO | Needed mainly by HP motherboards |
More in-depth Info
-
DeduplicateBootOrder: YES
Request fallback of some Boot prefixed variables from OC_VENDOR_VARIABLE_GUID to EFI_GLOBAL_VARIABLE_GUID. Used for fixing boot options.
-
IgnoreInvalidFlexRatio: YES
Fix for when MSR_FLEX_RATIO (0x194) can’t be disabled in the BIOS, required for all pre-Skylake based systems
-
RequestBootVarRouting: YES
Redirects AptioMemoryFix from EFI_GLOBAL_VARIABLE_GUID to OC_VENDOR_VARIABLE_GUID. Needed for when firmware tries to delete boot entries and is recommended to be enabled on all systems for correct update installation, Startup Disk control panel functioning, etc.
-
UnblockFsConnect: NO
Some firmware block partition handles by opening them in By Driver mode, which results in File System protocols being unable to install. Mainly relevant for HP systems when no drives are listed
ReservedMemory
Used for exempting certain memory regions from OSes to use, mainly relevant for Sandy Bridge iGPUs or systems with faulty memory. Use of this quirk is not covered in this guide
Настройка BIOS материнских плат Asus
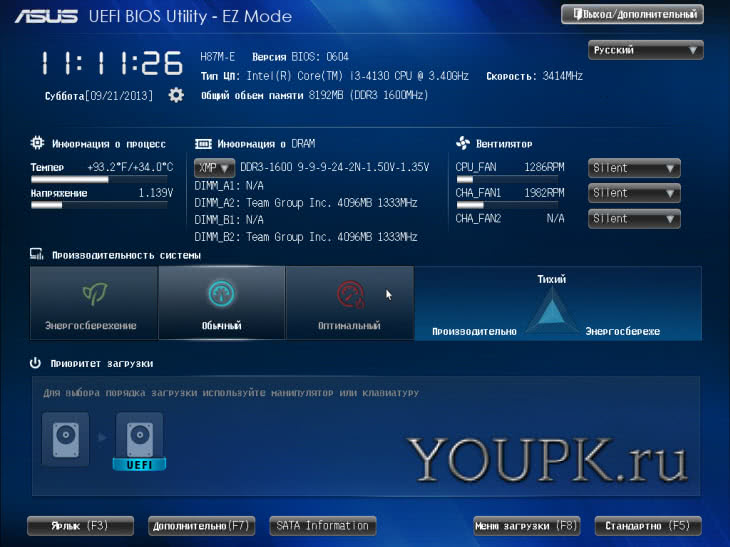
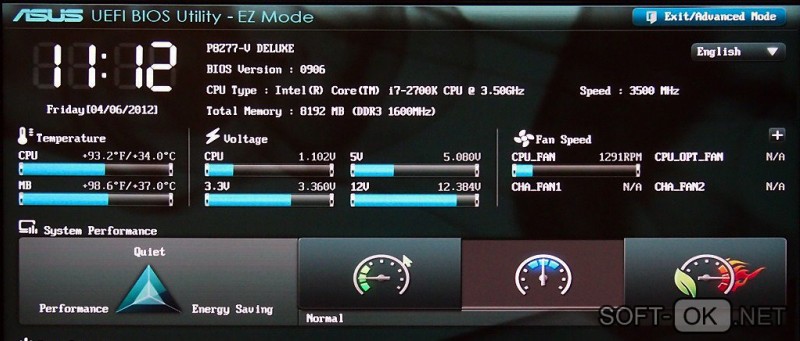
Чтобы войти в BIOS системной платы производителя Asus, следует нажать на Del или F2. Здесь доступны два режима – EZ Mode и Advanced Mode. По умолчанию загружается EZ Mode. Для перехода во второе состояние необходимо внизу найти соответствующую ссылку или использовать клавишу F7. Рассмотрим более подробно Advanced Mode.
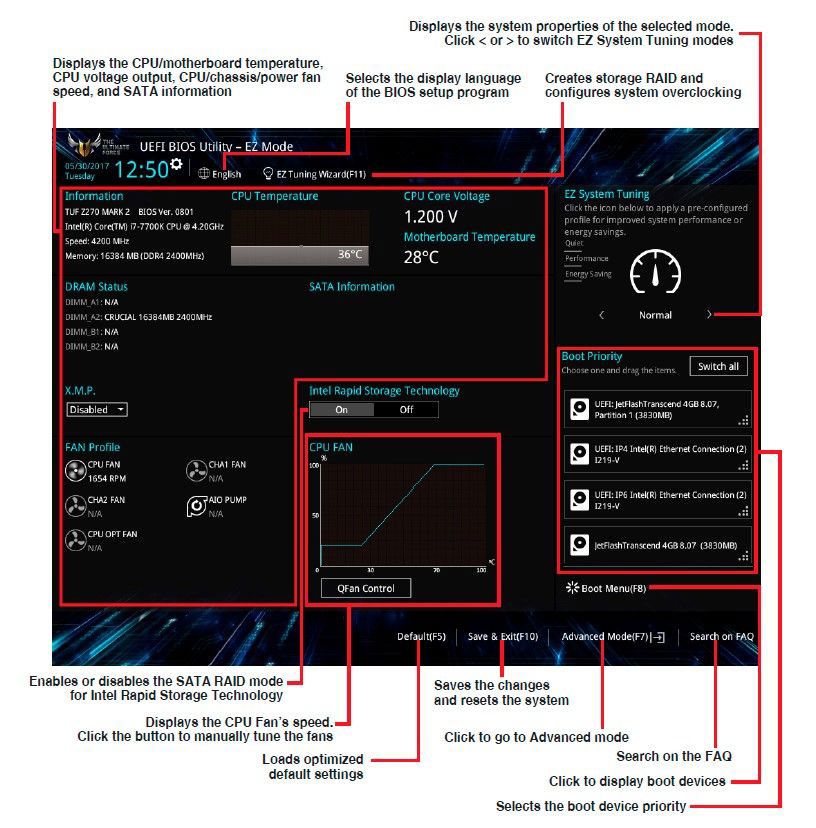
Опции, отвечающие за работу кулеров в системе, находятся в QFan Control (F6). Здесь имеются предустановленные и ручной профили для процессорного и корпусных вентиляторов: Standard, Silent, Turbo, Full Speed, Manual. В ручном режиме можно построить зависимость степени вращения каждого кулера от температуры.
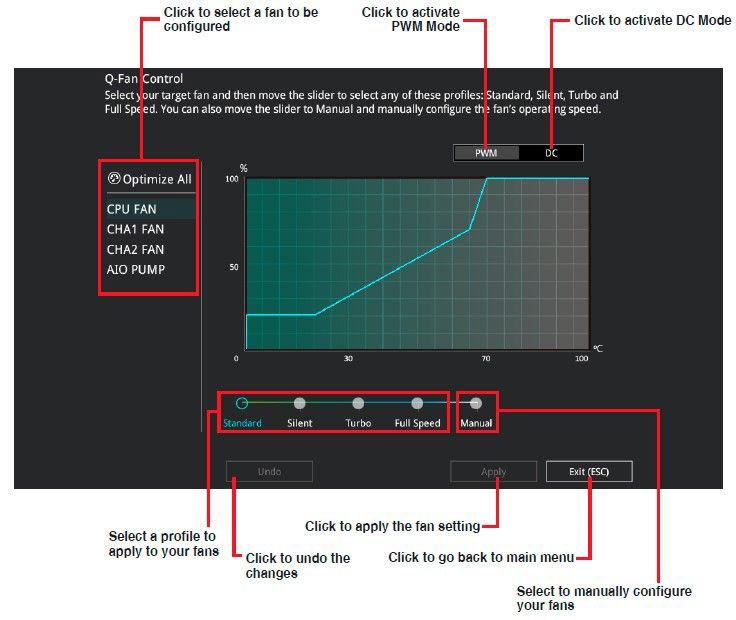
Отключить функцию управления охладителями можно в меню MonitorQ-Fan Configuration. Доступно регулирование и 3-х пиновых вентиляторов, выбрав режим DC Mode.
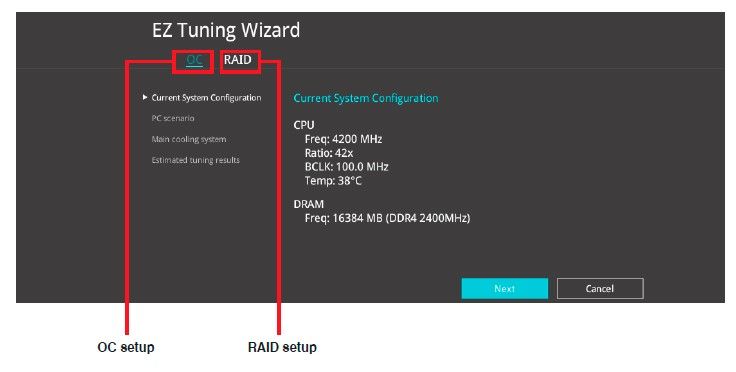
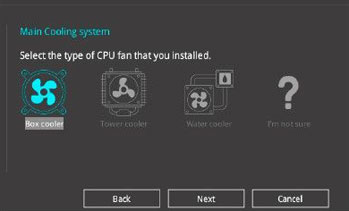
Утилита EZ Tuning Wizard (F11) позволяет разогнать процессор c учетом типа его охлаждения. Это актуально для обладателей процессоров Intel с индексом К. В подменю ОС выбираем сценарий для компьютера повседневного использования (Daily Computing) или игрового ПК (Gaming/Media Editing). Потом кликаем на пиктограмму с боксовым, башенным или жидкостным куллером и запускаем процесс тюнинга.

Активация профиля XMP для оперативной памяти происходит в подменю Ai Overclock Tuner.
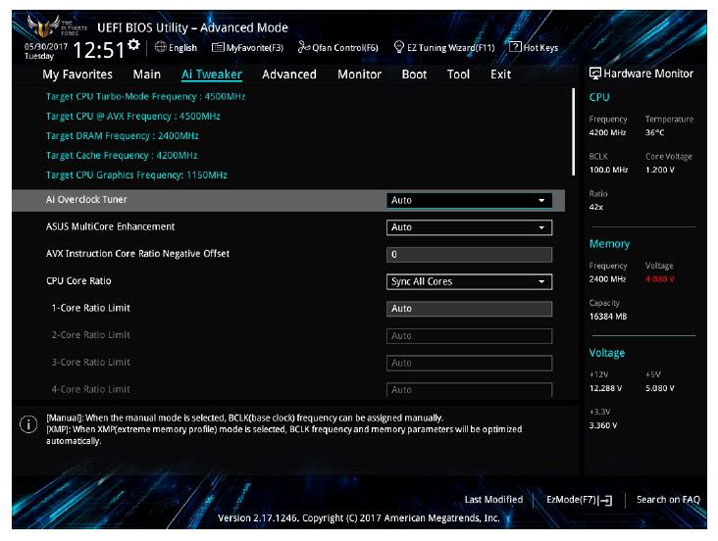
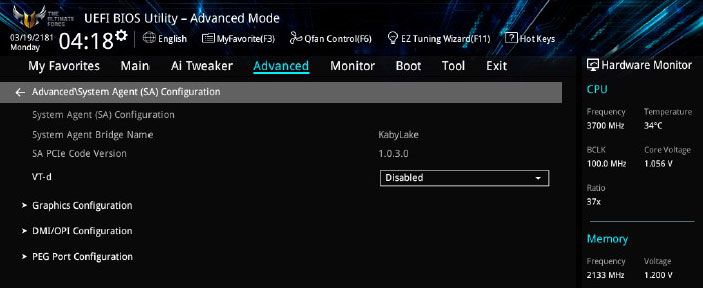
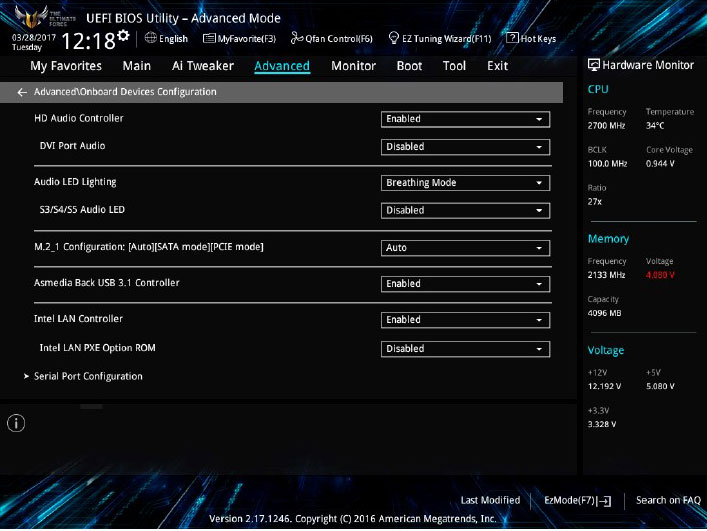
Для встроенной в CPU графики необходимо в разделе AdvancedSystem Agent (SA) ConfigurationGraphics ConfigurationPrimary Display выставить значение IGFX, а для дискретного видео адаптера – PEG.
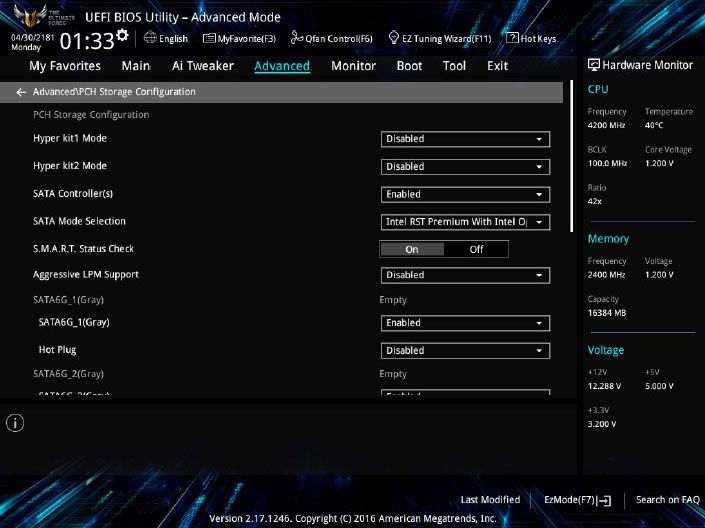
Режим работы накопителей с интерфейсом SATA настраивается в AdvancedPCH Storage ConfigurationSATA Mode Selection. Выбираем AHCI. Здесь же пункт S.M.A.R.T. Status Check обеспечивает мониторинг состояния жестких дисков и оповещает об ошибках в их работе.
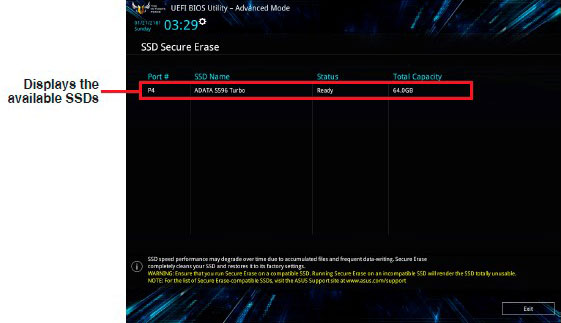
Скорость SSD устройств снижается с течением времени по мере заполнения свободного пространства. Утилита Secure Erase в меню Tool оптимизирует работу твердотельных накопителей, возвращая тем самым им изначальную производительность.

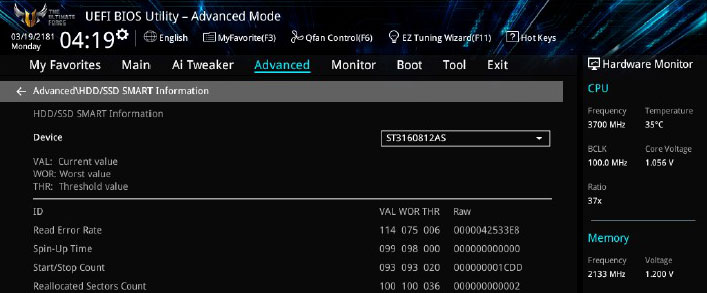
Информацию о всех подключенных носителей информации можно посмотреть в AdvancedHDD/SSD Smart Information.
Включение/отключение встроенного в материнскую плату аудио контроллера осуществляется в подменю AdvancedHD Audio Controller.
Приоритет в загрузке устройств задается в меню BootBoot Option Priorities.
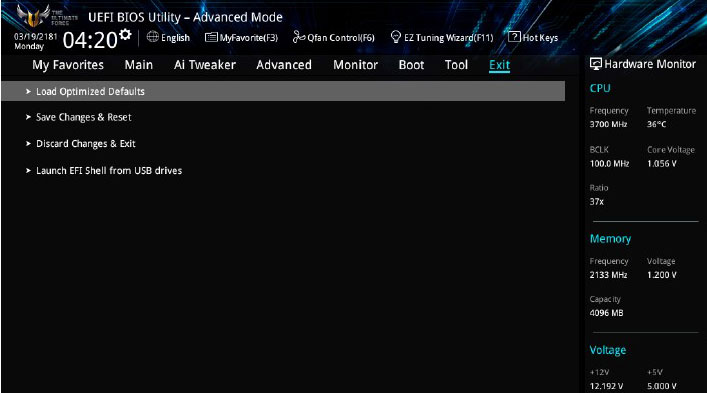
Сохранение и отмена внесенных изменений в BIOS, загрузка оптимальных заводских параметров доступно в главном меню Exit.
Настройка BIOS важна для тех, кто стремится получить от сборки конфигурации компьютера максимальную отдачу. Поэтому перед установкой операционной системы нужно детально изучить эту процедуру, которая описана в инструкции, поставляемой в коробке с материнской платой.
Пошаговая инструкция по правильной настройке BIOS на компьютере
BIOS является системной программой, вшитой в специальный чип, расположенный на материнской плате любого компьютера. Настройка bios позволяет немного подкорректировать некоторые параметры вашего ПК и увеличить его работоспособность.
Бытует неправильное мнение, что настройка bios собьется при отсутствии напряжения. Чтобы этого не случилось, на «материнку» ставят литиевый аккумулятор или специальную батарейку, поддерживающую настройки биоса на компьютере по умолчанию. Эта программа является посредником и обеспечивает взаимодействие устройств с ОС. А как же включить bios?
Вкладка Boot

Порядок загрузки системы и данных с носителей определяется в этом разделе
Boot Device Priority

Тут можно определить, какое устройство будет грузиться первым
1st Boot Device – приоритетное устройство при загрузке системы, указывается тип и модель.
Hard Disk Drives

А тут уже устанавливается порядок чтения жестких дисков
Здесь определяется устройство, с которого будет грузиться операционная система. Данная функция актуальна, если в ПК стоит более одного жесткого диска.

А здесь все, что связано с самой загрузкой системы и ее скоростью
Security

Тут можно проводить манипуляции с паролем пользователя
- Change Supervisor Password – изменяет или удаляет пароль администратора, если он установлен.
- User Access Level – указывает права зашедшего с паролем пользователя.
- Change User Password – меняет пользовательский пароль, используемый для запуска BOS или ПК.
- Password Check – определяет область действия паролей, если они установлены – только при входе и изменении параметров или еще при загрузке операционной системы.
Настройка плана энергосбережения
Не считая стандартных, на любом компьютере существует возможность более тонко настраивать под себя приемлемые режимы энергопотребления. Это характерно в основном для компьютеров, питающихся от аккумуляторов (так как стационарные всегда работают подключенными к сети на максимуме).
Переход к параметрам осуществляется уже упомянутым способом вызова «Электропитания» из трея.
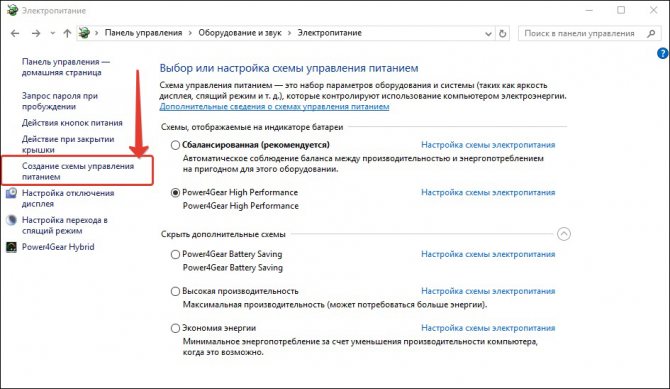
Доступные для регулировки параметры открываются нажатием по разделу, показанному на следующем рисунке:
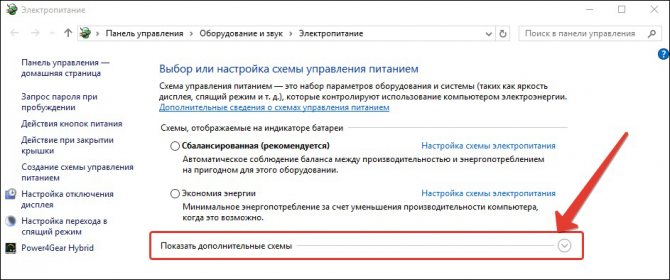
Здесь мы попадаем в список всех возможных схем:
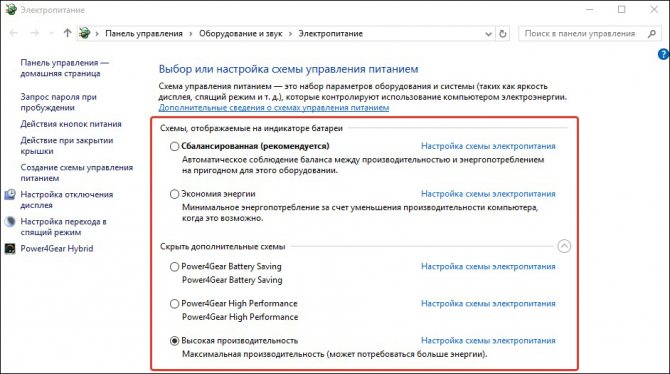
Схемы управления питанием
Отдельно нужно сказать о том, что помимо схем операционной системы здесь будут отображаться и те, которые соответствуют установленным приложениям от производителя вашего ноутбука (в данном случае «Power4Gear»).
Включённый чекбокс соответствует используемой в данный момент схеме.
Если ваш ноутбук работает попеременно от батареи и от сети, то логично создать свою схему питания во избежание попеременного метания между включением сбалансированности и максимума.
Для этого в окне «Электропитание» помещаем курсор на «Создание схемы…»:
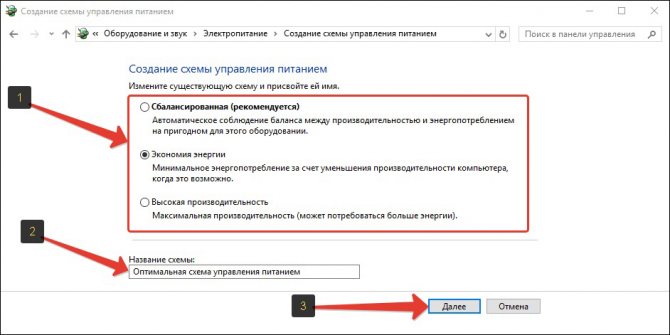
Создание схемы управления питанием
Подключаем чекбокс напротив любой из существующих (неважно какой) (1), вводим имя для создаваемой новой схемы (2), активируем кнопку «Далее» (3):
Настройки схемы управления питанием
Перед нами откроется прямой доступ к трём главным настройкам и к изменению списка дополнительных:
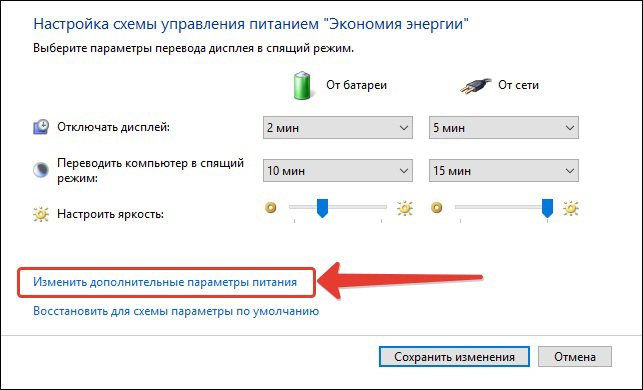
Доступность для их корректировки включается, как показано на картинке:
Включение поддержки адресации huge pages в Ubuntu
В версии xmrig 5.2.0 и выше есть возможность включения поддержки huge pages на лету, но это требует рут-привилегий для программы-майнера.
Эту же операции для текущей сессии (до перезагрузки системы) можно сделать (с привилегиями root) командой:
sysctl -w vm.nr_hugepages=1280, где 1280 – количество выделяемых больших страниц памяти.
Более разумно обеспечить работоспособность больших страниц памяти на этапе загрузки ядра с помощью конфигурационного файла sysctl.conf.
Это делается командой:
sudo echo "vm.nr_hugepages=1280" >> /etc/sysctl.conf $ sudo sysctl -p $ sudo reboot
где 1280 – это число зарезервированных страниц памяти.
Можно сделать аналогичную операцию с помощью утилиты nano и команды:
sudo nano /etc/sysctl.conf
В появившемся окне терминала нужно пролистать sysctl.conf до конца и вписать в него:
# enable huge/large pages for Monero mining

vm.nr_hugepages=1280
Затем нужно сохранить изменения (клавиши ctrl+O), нажать Enter, Ctrl+x и перезагрузить компьютер (sudo reboot).