Nowrap nowrap nowrap class
Содержание:
- Controlling white space rendering
- How White-space Analysis can help you?
- Многоточие в конце текста
- What is white space?
- Обработка пробелов: white-space
- Misconceptions
- Используем overflow
- CSS Reference
- CSS Properties
- Some HTML Background
- Управляем переносом строки с разбитием слов
- Добавляем градиент к тексту
- Отступы в тексте: text-indent
- Свойство word-wrap
- Управляем пространством между словами и буквами
- CSS Properties
- Why don’t we see white spaces in devtools?
- Properties
- Управление регистром букв: text-transform
- A Few Common Uses
- Property Values
- Опции CSS для выравнивания текста: text-align
- CSS Properties
Controlling white space rendering
Using the CSS white-space property, you can control how white space characters are processed when a given inline formatting context is laid out.
css-tricks.com has a nice article about this property.
The important thing is that if you set this property to pre, pre-wrap or pre-line, this will actually honor some or all of the white space character in the source HTML code, and they will start taking space in the layout.
If we take a simple example from earlier:
<h1>◦◦◦Hello◦⏎⇥⇥⇥⇥<span>◦World!</span>⇥◦◦</h1>
But add the following CSS rule:
h1 { white-space: pre; }
We then end up with the following layout:

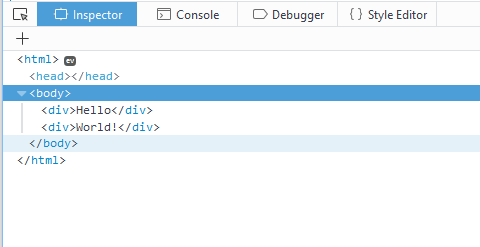
Using Firefox DevTools to highlight text nodes, you can see exactly what space is occupied by the “Hello” text node. See live at https://captainbrosset.github.io/white-space-article/example5.html.
As you can see above, the layout inside the h1 element respects the formatting of the source HTML file. There is some space before the word Hello, then a line break, then more space and the word World!.
In fact, as you can see, the first node shown in devtools inside the h1 element is a text node and hovering over it does highlight the space taken by that node in the page.
Hovering over the span element also highlights the space taken in the page, and in particular, you can see the space before the word World! coming from:
<span>◦World!</span>
Therefore, that’s a second reason why devtools should show white space text nodes. Indeed, someone trying to understand the layout and not knowing about the white-space property may be confused.
How White-space Analysis can help you?
Let me share how white space mapping actually helped a DemandFarm customer to unlock $40 million from the existing 23 accounts.
A $600 million IT services company with 50+ key accounts used the account landscape to map and grow their accounts. When DemandFarm has implemented a couple of years ago the account managers of these accounts were asked to identify various buying centers of the accounts. Here we have taken an example of Airbus. So, the account manager of Airbus identified Helicopters, CIO Org, Commercial Aircraft, etc. as the Buying Centers. Before this, we had already configured various service lines or Offerings which the customer was taking to the market. For e.g. Engineering Consulting, Enterprise Security, IoT, then had Platforms and so on so forth.
Многоточие в конце текста
Вместо градиента в конце обрезанного текста также можно использовать многоточие. Причём оно будет добавляться автоматически с помощью свойства text-overflow. Его понимают все браузеры, включая старые версии IE, и единственным недостатком этого свойства является пока его неясный статус. В CSS3 вроде это свойство входит, но код с ним не проходит валидацию.
В примере 3 показано применение свойства text-overflow со значением ellipsis, которое добавляет многоточие. При наведении курсора мыши на текст, он отображается целиком и подсвечивается фоновым цветом.
Пример 3. Использование text-overflow
HTML5CSS3IECrOpSaFx
Результат данного примера показан на рис. 3.
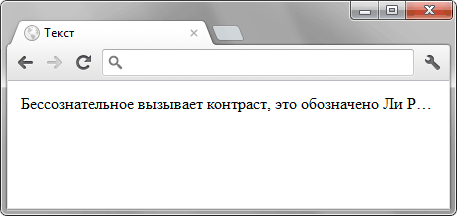
Рис. 3. Текст с многоточием
What is white space?
White space is any string of text composed only of spaces, tabs or line breaks (to be precise, either CRLF sequences, carriage returns or line feeds).
As someone who writes code, you probably know the vital importance of these characters. They allow you to format your code in a way that will make it easily readable by yourself and other people. In fact much of our source code is full of these white space characters (that is, unless you write obfuscated code). They’re most often used for breaking the code on multiple lines and indenting lines to represent the nesting of elements.
But, because these characters are important for people who read the code doesn’t mean they’re important for people who visit your web page. These formatting-only characters wouldn’t look too good if they did impact the layout of your page, right?
Let’s take a simple example:
<!DOCTYPE html> <h1> Hello World! </h1>
This source code contains a line feed after the DOCTYPE and a bunch of space characters before and inside the h1 tag, but the browser doesn’t seem to care at all and just shows the words Hello World! as if these characters didn’t exist at all!
See live at https://captainbrosset.github.io/white-space-article/example1.html.
Unlike a word processing application, the browser seems to completely ignore white spaces (most of the time at least).
Обработка пробелов: white-space
Когда вы нажимаете клавишу , пробел или форсированно обрываете строку (с клавишей или тегом ), вы создаете пробелы в своем документе.
По умолчанию браузеры объединяют все последовательности пробелов в один, удаляют обрывы строки и заставляют строки занимать ширину контейнера. Это удобно потому что позволяет делать отступы и разделять фрагменты текста, сохраняя исходник документа читаемым и поддерживаемым, не заботясь о его отображении в браузере.
Однако, что делать, если у нас другая цель? Предположим, вы хотите сохранить все пробелы, которые вы создали в HTML-документе. Или вы хотите, чтобы фрагмент текста выводился как сниппет кода, со всеми отступами. Или же вы хотите вывести текст в одну линию, без переносов.
В тех случаях, когда вам нужно изменить дефолтное поведение браузера, свойство предлагает несколько интересных вариантов.
Ключевое слово идентично дефолтному поведению — все лишние пробелы схлопываются в один, строка переводится после достижения края контейнера.
Значение
Ключевое слово позволяет вам вывести текст с сохранением всех пробелов и всех форсированных переводов строки в исходнике. И при превышении пределов контейнера строка не будет обрываться.
Если вы используете табы, то вы можете управлять их размером в пробелах с помощью свойства . Оно принимает значение в виде целого числа.
Свойство поддерживают , но если вы уверены, что вам это надо, используйте полифилл.
Значение
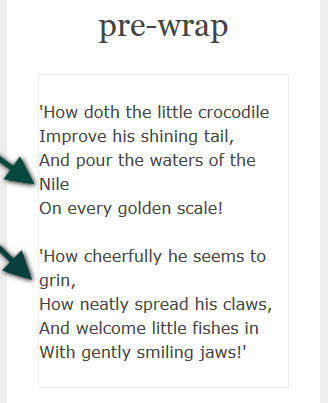
Это значение позволяет сохранить все множественные пробелы на месте, но если строка не вмещается в контейнер, она автоматически переносится.
Ключевое слово позволяет вам достигнуть желаемого результата.
Отметьте, как каждая строка, выведенная в браузере, повторяет все переводы строки из исходника при наличии места в контейнере.
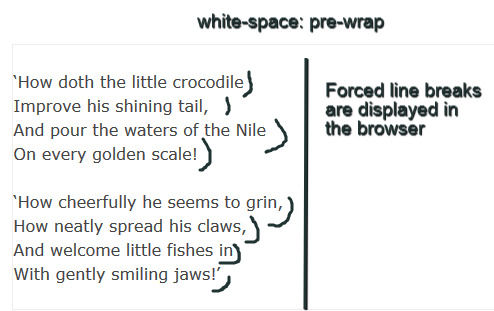
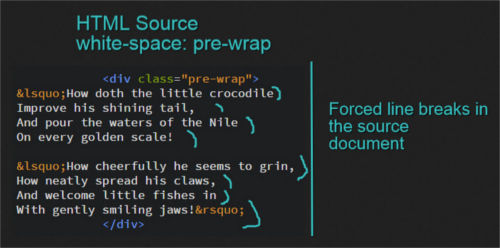
Однако, если вы уменьшите ширину браузера, вы заметите, что все строки ограничены шириной контейнера.
Значение
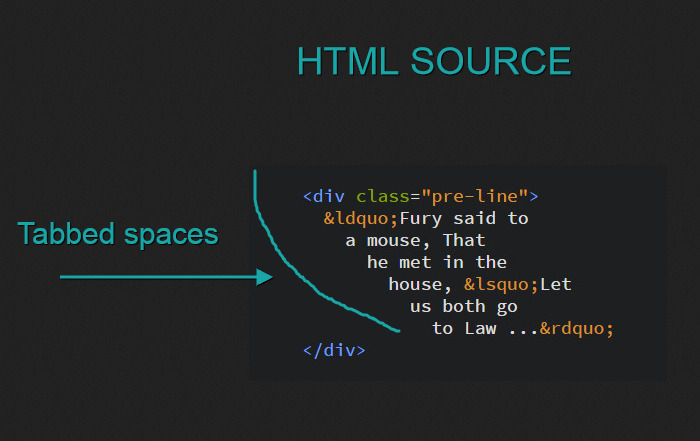
И, наконец, еще одно интересное значение свойства — . Оно действует как дефолтное в части схлопывания пробелов в один и ограничения строки размером контейнера. Однако оно отрабатывает все форсированные переводы строки.

Значение
это, возможно, самое известное значение для . Сталкивались вы с необходимостью задать какому-либо элементу дизайна неразрывность вне зависимости от ширины контейнера? Это делается с помощью .
Луис Лазарис указывает на следующий случай использования этого значения.
На примере выше ссылка обозначена символом и переносить его на следующую линию не желательно.
В этом и подобных случаях поможет значение .
Другой интересный случай использования описан Сарой Суайдан в справочнике по CSS от Codrops. Сара указывает, что это значение можно применять к любому строчному контенту, включая изображения.
Я проиллюстрирую это предложение, создав с использованием . Вот демо:
Misconceptions
One possible problem for beginners using this property (as I already alluded to above) is that they assume that setting on an element will prevent that element from dropping to the next line if it is part of a group of floated boxes. The property, however, will only apply to the inline elements inside of the element it’s applied to, and will not affect block elements or the spacing of the element itself.
As mentioned, you’ll most often use this property when you set it to the value , since that particular value has some practical use. Since the values and don’t work with Internet Explorer, they will not likely be used very often, but they do seem to offer practical value if they become more widely supported.
Please offer comments on other possible uses, or on problems that can occur with the property. I’m sure it has numerous practical benefits and potential drawbacks that I haven’t mentioned here.
Используем overflow
Чтобы свойство overflow показало себя с текстом во всей красе, надо отменить перенос текста с помощью white-space со значением nowrap. Если это не сделать, то нужного нам эффекта не будет, в тексте добавятся переносы и он будет отображаться весь целиком. В примере 1 показано, как обрезать длинный текст указанным набором стилевых свойств.
Пример 1. overflow для текста
HTML5CSS3IECrOpSaFx
Результат данного примера показан на рис. 1.
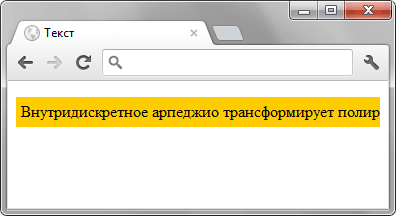
Рис. 1. Вид текста после применения свойства overflow
Как видно из рисунка, недостаток в целом один — не очевидно что текст имеет продолжение, так что надо дать об этом понять пользователю. Для этого обычно применяется градиент или многоточие.
CSS Reference
CSS ReferenceCSS Browser SupportCSS SelectorsCSS FunctionsCSS Reference AuralCSS Web Safe FontsCSS Font FallbacksCSS AnimatableCSS UnitsCSS PX-EM ConverterCSS ColorsCSS Color ValuesCSS Default ValuesCSS Entities
CSS Properties
align-content
align-items
align-self
all
animation
animation-delay
animation-direction
animation-duration
animation-fill-mode
animation-iteration-count
animation-name
animation-play-state
animation-timing-function
backface-visibility
background
background-attachment
background-blend-mode
background-clip
background-color
background-image
background-origin
background-position
background-repeat
background-size
border
border-bottom
border-bottom-color
border-bottom-left-radius
border-bottom-right-radius
border-bottom-style
border-bottom-width
border-collapse
border-color
border-image
border-image-outset
border-image-repeat
border-image-slice
border-image-source
border-image-width
border-left
border-left-color
border-left-style
border-left-width
border-radius
border-right
border-right-color
border-right-style
border-right-width
border-spacing
border-style
border-top
border-top-color
border-top-left-radius
border-top-right-radius
border-top-style
border-top-width
border-width
bottom
box-decoration-break
box-shadow
box-sizing
break-after
break-before
break-inside
caption-side
caret-color
@charset
clear
clip
clip-path
color
column-count
column-fill
column-gap
column-rule
column-rule-color
column-rule-style
column-rule-width
column-span
column-width
columns
content
counter-increment
counter-reset
cursor
direction
display
empty-cells
filter
flex
flex-basis
flex-direction
flex-flow
flex-grow
flex-shrink
flex-wrap
float
font
@font-face
font-family
font-feature-settings
font-kerning
font-size
font-size-adjust
font-stretch
font-style
font-variant
font-variant-caps
font-weight
grid
grid-area
grid-auto-columns
grid-auto-flow
grid-auto-rows
grid-column
grid-column-end
grid-column-gap
grid-column-start
grid-gap
grid-row
grid-row-end
grid-row-gap
grid-row-start
grid-template
grid-template-areas
grid-template-columns
grid-template-rows
hanging-punctuation
height
hyphens
@import
isolation
justify-content
@keyframes
left
letter-spacing
line-height
list-style
list-style-image
list-style-position
list-style-type
margin
margin-bottom
margin-left
margin-right
margin-top
max-height
max-width
@media
min-height
min-width
mix-blend-mode
object-fit
object-position
opacity
order
outline
outline-color
outline-offset
outline-style
outline-width
overflow
overflow-x
overflow-y
padding
padding-bottom
padding-left
padding-right
padding-top
page-break-after
page-break-before
page-break-inside
perspective
perspective-origin
pointer-events
position
quotes
resize
right
scroll-behavior
tab-size
table-layout
text-align
text-align-last
text-decoration
text-decoration-color
text-decoration-line
text-decoration-style
text-indent
text-justify
text-overflow
text-shadow
text-transform
top
transform
transform-origin
transform-style
transition
transition-delay
transition-duration
transition-property
transition-timing-function
unicode-bidi
user-select
vertical-align
visibility
white-space
width
word-break
word-spacing
word-wrap
writing-mode
z-index
Some HTML Background
In (X)HTML, anytime you string together a bunch of spaces in your code, the actual page output in your browser will, by default, trim (or collapse) all those spaces down to a single space. This comes in handy, because it allows us to correctly indent and seperate the elements in our (X)HTML so it will be readable and maintainable without creating extra unwanted space and line breaks in the browser output.
If you want to allow all space and line breaks to occur naturally, then you can use the big ugly cousin of the property the tag. All non-tag content inside of the tag will output virtually identically to what you have in the code. It will even cause a single line to push the boundaries of its parent if no explicit line breaks are used in the markup. So, while the default in HTML is to ignore multiple spaces and line breaks, you can override this using the tag.
(X)HTML also allows the use of the non-breaking space (). If you want to string together multiple spaces that you don’t want to collapse, you can use the non-breaking space. The older method of doing this involves using the tag, but that tag is now deprecated, so it should not be used.
The property is the cleaner CSS answer to the aforementioned (X)HTML methods of controlling white space.
Управляем переносом строки с разбитием слов
Иногда дизайн портиться из-за отдельных очень длинных слов, не переносящихся на следующую строку и переполняющих контейнер. Это может быть длинный URL или комментарий с зажатой клавишей.
Для таких случаев у нас есть специальные свойства CSS.
Свойство
Свойство (раннее известное как и до сих пор ) работает, если свойство допускает перенос в соответствии с размером строки. Возможные значения — и .
Со значением слова разбиваются на всех традиционных маркерах — пробелы, дефисы и т.д.
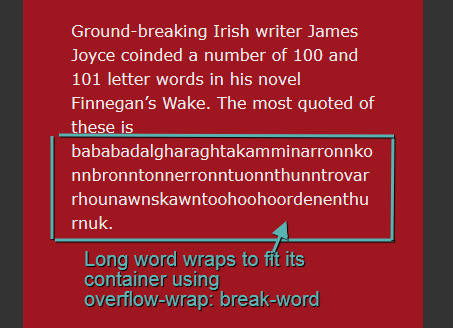
Значение позволяет разбить длинные слова, если иначе строка будет превышать доступный размер.
На картинке ниже изображен пример длинного слова, выходящего за пределы контейнера:

Теперь зададим этому элементу свойство (и свойство для совместимости) в значение :
Теперь сверхдлинное слово разбито на несколько строк, заполняющих всю ширину контейнера.
Свойство
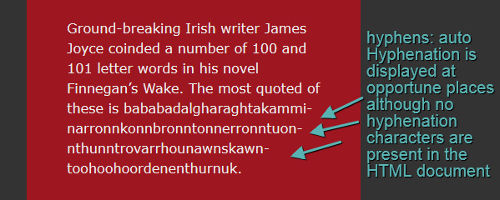
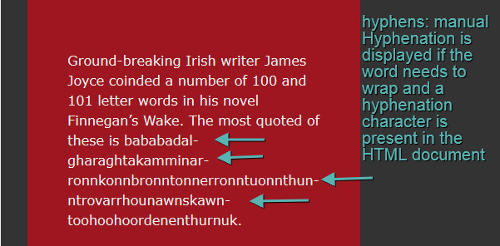
Разбитие длинных слов это, конечно, хорошо. Однако, полученный текст может смутить читателей. Лучше будет, если разбитие слова будет сопровождаться установкой дефиса. Таким образом, читателям сразу становится ясно, что это одно слово, разделенное между строками. Этого можно достичь используя свойство , его можно сочетать с .
Конкретно это значит, что значение свойства позволяет вывести дефис на месте разбития слова, если язык документа позволяет это делать в имеющемся источнике HTML. Чтобы это сработало, не забудьте задать правильный атрибут своему документу:
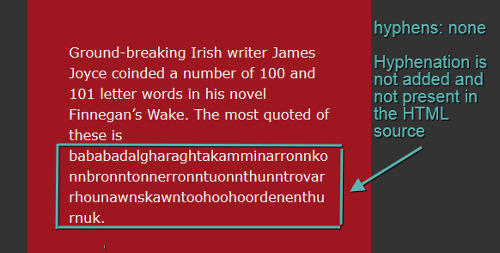
Вы также можете отключить вывод дефисов, задав значение :
Также у вас есть возможность вывести дефисы на разрывах строки там, где вы поставили их в разметке. Это делается с помощью значения :

Основные браузеры , но в реализации есть некоторые различия. Последние на момент написания статьи версии Chrome (44) и Opera (30) не поддерживали значение .
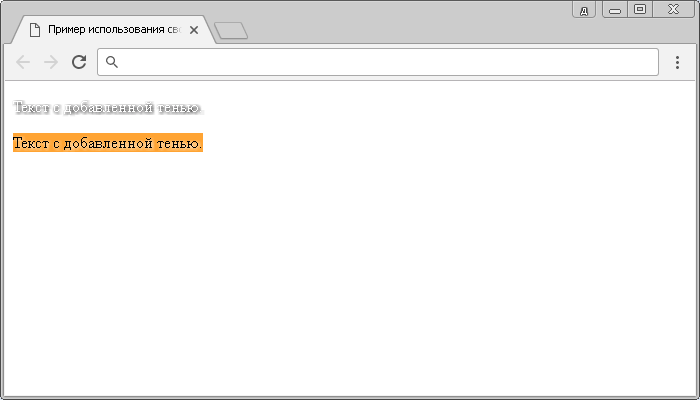
Добавляем градиент к тексту
Чтобы стало понятнее, что текст справа не заканчивается, поверх него можно наложить градиент от прозрачного цвета к цвету фона (рис. 2). При этом будет создаваться эффект постепенного растворения текста.

Рис. 2. Текст с градиентом
В примере 2 показано создание этого эффекта. Стиль самого элемента практически останется прежним, сам же градиент будем добавлять с помощью псевдоэлемента ::after и CSS3. Для этого вставляем пустой псевдоэлемент через свойство content и к нему применяем градиент с разными префиксами для основных браузеров (пример 2). Ширину градиента легко изменять через width, также можно регулировать степень прозрачности, заменив значение 0.2 на своё.
Пример 2. Градиент поверх текста
HTML5CSS3IE 8IE 9+CrOpSaFx
Данный метод не работает в браузере Internet Explorer до версии 8.0 включительно, потому что в нём нет поддержки градиентов. Но можно отказаться от CSS3 и сделать градиент по старинке, через картинку в формате PNG-24.
Этот метод сочетается только с однотонным фоном и в случае фоновой картинки градиент поверх текста будет бросаться в глаза.
Отступы в тексте: text-indent
Отступы в тексте обычно делаются в первой строке параграфа, хотя и не являются распространенной практикой на веб-сайтах. Вместо этого обычно помещается пустая строка, разделяющая параграфы.
Тем не менее, иногда отступ в первой строке иногда используется, например, для имитации классических книжных дизайнов.
Если вы хотите использовать эту технику в своем дизайне, в CSS есть свойство . Рассмотрим его возможные значения.
Числовое значение можно задать в пикселях, em’aх и других поддерживаемых единицах:
В том числе и в процентах от ширины контейнера:
Значение добавляет отступ не только первой строке, но и любой строке после разрыва строки ( или ). На строки, переносимые по причине заполнения контейнера эти отступы не распространяются.
Значение добавляет отступ ко всем строкам, кроме первой.
Два последних значения: и являются экспериментальными и не реализованы на данный момент ни в одном из браузеров.
Свойство word-wrap
В HTML для разделения строк существует специальный тег <br>. Но его слишком частое использование считается среди разработчиков дурным тоном и зачастую свидетельствует о непрофессионализме. Как доказательство, представьте, что у вас есть логотип и вы хотите, чтобы каждая буква начиналась с новой строки:
Получился громоздкий и уродливый код, от которого у любого разработчика случится культурный шок. И как поступить, если вы захотите, чтобы в десктопной версии логотип располагался горизонтально, а при ширине экрана менее 550 пикселей вертикально? Поэтому для настройки внешнего вида элементов всегда используйте каскадные таблицы стилей. Тем более с помощью инструментов CSS перенос строки осуществляется более элегантным способом. При этом не возникает избыточной разметки, которая только уменьшает скорость загрузки страниц.

Первое свойство, к которому стоит обратиться для обработки текста, — это word-wrap. Принимает три значения: normal, break-all и keep-all. Вам для работы понадобится запомнить только break-all. Normal стоит по умолчанию, и его нет смысла указывать. Keep-all означает в документе CSS запрет переноса строки. Разработано специально для китайских, японских и корейских иероглифов. Поэтому, если вы не собираетесь вести блог на каком-то из этих языков, свойство вам не пригодится. А также оно не поддерживается браузером Safari и мобильными телефонами на базе iOS.
Чтобы логотипу из предыдущего примера назначить с помощью CSS перенос на новую строку каждой буквы, нужно прописать следующий код:
Ширина и размер шрифта подбирается таким образом, чтобы места хватало только для одной буквы. Word-wrap со значением break-all сообщает браузеру, что слово нужно каждый раз переносить на новую строку. Незаменимым это свойство назвать нельзя. Но оно пригодится при оформлении небольших блоков с текстом, например полей для ввода комментариев.

Управляем пространством между словами и буквами
Читаемость фрагмент текста зачастую зависит от нескольких факторов. В некоторых случаях, уменьшение или увеличение пространства между словами или буквами, то есть трекинг существенно улучшает читаемость.
В CSS есть свойства и для управления расстоянием между словами и буквами соответственно.
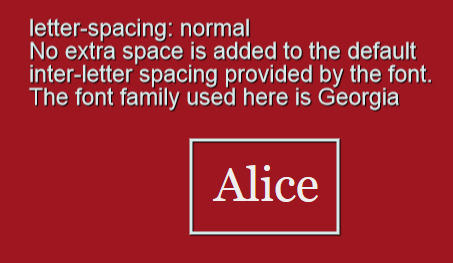
Свойство
Это свойство может принимать следующие значения:
- (задание непосредственно числового значения в абсолютных единицах)
- (задание значения в процентах)
выводит заданное по умолчанию расстояние между буквами. Это расстояние зависит от используемого шрифта и браузера.
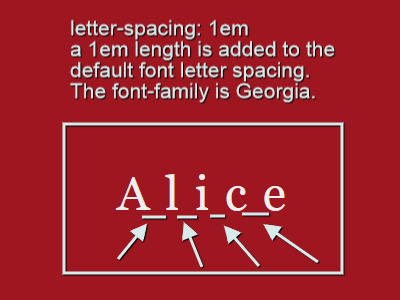
Числовое значение добавляет указанный промежуток к дефолтному ( вычитает, если задано отрицательное значение):
Значение в процентах работает также как и числовое. На данный момент оно не поддерживается браузерами и, скорее всего, будет удалено из будущих черновиков спецификации.
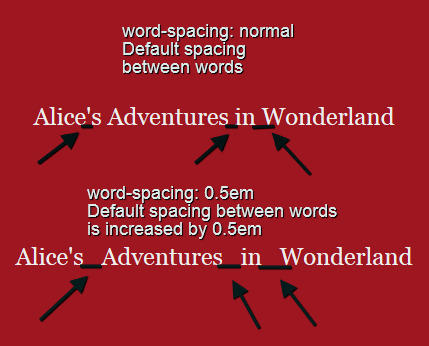
Свойство
Свойство принимает два вида значений: или числовое значение с единицами измерения.
Свойство сбрасывает любое раннее установленное значение на дефолтное. Например, если вы задали родительскому элементу в , вы можете отменить это для дочерних с помощью .
Числовое значение задается в единицах исчисления, например в или в пикселях, вы можете увеличить расстояние дефолтное расстояние или уменьшить задав отрицательное значение.
Дополнение
применимо не только к словам — его можно использовать с любым строчным или строчно-блочным содержимым.
Также вы можете анимировать и . Однако в CSS-переходах значение в не работает в Firefox (39), просто замените значение на .
Вот , использующей и :
CSS Properties
align-contentalign-itemsalign-selfallanimationanimation-delayanimation-directionanimation-durationanimation-fill-modeanimation-iteration-countanimation-nameanimation-play-stateanimation-timing-functionbackface-visibilitybackgroundbackground-attachmentbackground-blend-modebackground-clipbackground-colorbackground-imagebackground-originbackground-positionbackground-repeatbackground-sizeborderborder-bottomborder-bottom-colorborder-bottom-left-radiusborder-bottom-right-radiusborder-bottom-styleborder-bottom-widthborder-collapseborder-colorborder-imageborder-image-outsetborder-image-repeatborder-image-sliceborder-image-sourceborder-image-widthborder-leftborder-left-colorborder-left-styleborder-left-widthborder-radiusborder-rightborder-right-colorborder-right-styleborder-right-widthborder-spacingborder-styleborder-topborder-top-colorborder-top-left-radiusborder-top-right-radiusborder-top-styleborder-top-widthborder-widthbottombox-decoration-breakbox-shadowbox-sizingbreak-afterbreak-beforebreak-insidecaption-sidecaret-color@charsetclearclipclip-pathcolorcolumn-countcolumn-fillcolumn-gapcolumn-rulecolumn-rule-colorcolumn-rule-stylecolumn-rule-widthcolumn-spancolumn-widthcolumnscontentcounter-incrementcounter-resetcursordirectiondisplayempty-cellsfilterflexflex-basisflex-directionflex-flowflex-growflex-shrinkflex-wrapfloatfont@font-facefont-familyfont-feature-settingsfont-kerningfont-sizefont-size-adjustfont-stretchfont-stylefont-variantfont-variant-capsfont-weightgridgrid-areagrid-auto-columnsgrid-auto-flowgrid-auto-rowsgrid-columngrid-column-endgrid-column-gapgrid-column-startgrid-gapgrid-rowgrid-row-endgrid-row-gapgrid-row-startgrid-templategrid-template-areasgrid-template-columnsgrid-template-rowshanging-punctuationheighthyphens@importisolationjustify-content@keyframesleftletter-spacingline-heightlist-stylelist-style-imagelist-style-positionlist-style-typemarginmargin-bottommargin-leftmargin-rightmargin-topmax-heightmax-width@mediamin-heightmin-widthmix-blend-modeobject-fitobject-positionopacityorderoutlineoutline-coloroutline-offsetoutline-styleoutline-widthoverflowoverflow-xoverflow-ypaddingpadding-bottompadding-leftpadding-rightpadding-toppage-break-afterpage-break-beforepage-break-insideperspectiveperspective-originpointer-eventspositionquotesresizerightscroll-behaviortab-sizetable-layouttext-aligntext-align-lasttext-decorationtext-decoration-colortext-decoration-linetext-decoration-styletext-indenttext-justifytext-overflowtext-shadowtext-transformtoptransformtransform-origintransform-styletransitiontransition-delaytransition-durationtransition-propertytransition-timing-functionunicode-bidiuser-selectvertical-alignvisibilitywhite-spacewidthword-breakword-spacingword-wrapwriting-modez-index
Why don’t we see white spaces in devtools?
We’ve seen in the previous section how white space was often ignored when rendering the layout, but we’ve said that it still played a role in the DOM tree. Text nodes are still being created in the DOM tree of the page, so the following code:
<body>⏎⇥<div>◦◦Hello◦◦</div>⏎⏎◦◦◦<div>◦◦World!◦◦</div>◦◦⏎</body>
still generates the following tree:
element node: <body> ∟ text node: ⏎⇥ ∟ element node: div ∟ text node: ◦◦Hello◦◦ ∟ text node: ⏎⏎◦◦◦ ∟ element node: div ∟ text node: ◦◦World!◦◦ ∟ text node: ◦◦⏎
And the primary job of any inspector panel in any devtools out there is to display the DOM tree, but if you try for yourself, you’ll see that these text nodes are just not there.
Text nodes are ignored in Firefox
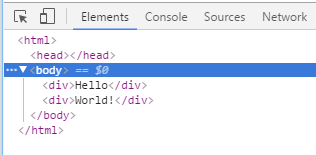
And also ignored in Chrome
The reason being that if the browser engine ignores these white space only text nodes when creating the layout, then it’s probably safe for devtools to ignore them too. After all, authors only use them for formatting, and visitors don’t see them. So there’s no real need for devtools to show them.
Now, there are in fact cases where showing white space text nodes in devtools could be useful. The following sections will describe what they are.
Properties
|
Gets all the child nodes of the current element. (Inherited from OpenXmlElement) |
|
|
Gets all extended attributes (attributes not defined in the schema) of the current element. (Inherited from OpenXmlElement) |
|
|
Gets the first child of the OpenXmlElement element. Returns null (Nothing in Visual Basic) if there is no such OpenXmlElement element. (Inherited from OpenXmlElement) |
|
|
Gets a boolean value that indicates whether the current element has any attributes. (Inherited from OpenXmlElement) |
|
|
Gets a value that indicates whether the current element has any child elements. (Inherited from OpenXmlLeafElement) |
|
|
Gets the concatenated values of the node and all of its children. (Inherited from OpenXmlElement) |
|
|
Gets or sets the markup that only represents child elements of the current element. (Inherited from OpenXmlLeafElement) |
|
|
Gets the last child of the OpenXmlElement element. Returns null (Nothing in Visual Basic) if there is no such OpenXmlElement element. (Inherited from OpenXmlElement) |
|
|
Gets the local name of the element. |
|
|
Sets the markup compatibility attributes. Returns null if no markup compatibility attributes are defined for the current element. (Inherited from OpenXmlElement) |
|
|
Gets all the namespace declarations defined in the current element. Returns an empty enumerator if there is no namespace declaration. (Inherited from OpenXmlElement) |
|
|
Gets the namespace URI of the current element. (Inherited from OpenXmlElement) |
|
|
Gets the OpenXmlEementContext of the current element. (Inherited from OpenXmlElement) |
|
|
Gets the markup that represents the current element and all of its child elements. (Inherited from OpenXmlElement) |
|
|
Gets the parent element of the current element. (Inherited from OpenXmlElement) |
|
|
Gets the namespace prefix of current element. (Inherited from OpenXmlElement) |
|
|
val.Represents the following attribute in the schema: w:val (Inherited from OnOffOnlyType) |
|
|
Gets the qualified name of the current element. (Inherited from OpenXmlElement) |
|
|
Gets the qualified name of the current element. (Inherited from OpenXmlElement) |
Управление регистром букв: text-transform
Иногда возникает необходимость вывести слова или первые символы слов с заглавной буквы. В CSS для управления регистром буквы есть свойство .
Дефолтное значение равно , то есть по умолчанию регистр букв не изменяется.
Значение
Если вы хотите сделать заглавной первую букву каждого слова, оставив все остальные в первоначальном виде, то этого можно достичь задав значение .
Разметка:
Стили:
Отметьте, что не следует традиционным правилам — оно делает заглавными первые буквы всех слов, включая предлоги. И если вы хотите следовать нормам английского языка, вам придется делать это вручную.
Значение
Если ваша цель — сделать все буквы заглавными, то подходящим значением будет :
Разметка:
Стили:
Значение
Это значение наоборот делает все символы строчными. Естественно, оно не оказывает никакого воздействия на уже имеющиеся строчные буквы.
Разметка:
Стили:
Значение
Это значение появилось в спецификации недавно. Это значение ограничивает символ внутри квадрата, аналогично иероглифам. И применение этого свойство облегчает выравнивание латинских символов с идеографическими.
Не у всех символов есть соответствующая форма, и, значит, не на все символы будет влиять это значение:
Разметка:
Стили:
Это свойство на данный момент поддерживается только в Firefox.
Дополнительная информация
Браузеры отлично поддерживают свойство , у всех основных браузеров с ним нет проблем.
Единственное исключение это значение , которое работает пока только в Firefox. И такая непопулярность вполне может повлечь исключение этого значения из спецификаций.
Также есть небольшое отличие в обработке у Firefox и остальных браузеров.
Вот, например, Firefox:
Заметьте, что первая буква после дефиса не капитализируется. А вот тот же самый пример в Chrome:
В Chrome не делается исключений для первых букв после дефисов — они переводятся в заглавный регистр также как остальные. И это является дефолтным поведением для всех браузеров, кроме упомянутого выше Firefox.
И, наконец, не забывайте о каскадировании. Задание свойства для элемента-контейнера будет унаследовано всеми его потомками. Чтобы избежать неожиданных результатов, задавайте дочерним элементам в значение .
A Few Common Uses
Probably the most common reason to use the property is when applying it to a link that you don’t want to drop to the next line. Look at the screen capture below from the zaBox “confirm details” page:
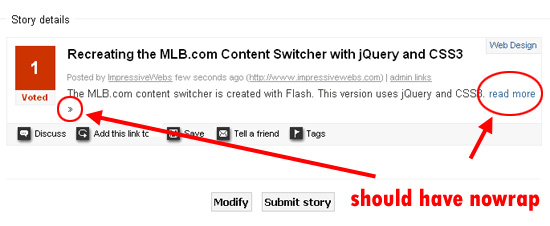
The “read more” link has the (») character next to it, but because there wasn’t enough room, it dropped to the next line. This would have been avoided if the link had its property set to . The link would then naturally fall to the next line as a single unit, and wouldn’t be broken up. This point helps emphasize the fact that the property only affects the content inside the element to which it’s applied. So, while the link itself will drop to the next line, the text inside the link will not be separated via line breaks.
Another use for this property is when you want to prevent a row of inline boxes from wrapping to the next line. I mentioned this in a previous article discussing how to center multiple block-level elements on a single line.
Property Values
| Value | Description | Play it |
|---|---|---|
| normal | Sequences of whitespace will collapse into a single whitespace. Text will wrap when necessary. This is default | Play it » |
| nowrap | Sequences of whitespace will collapse into a single whitespace. Text will never wrap to the next line. The text continues on the same line until a <br> tag is encountered |
Play it » |
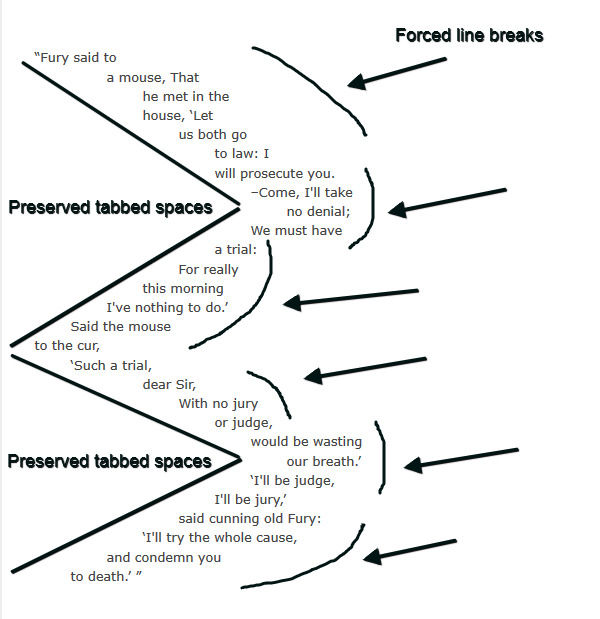
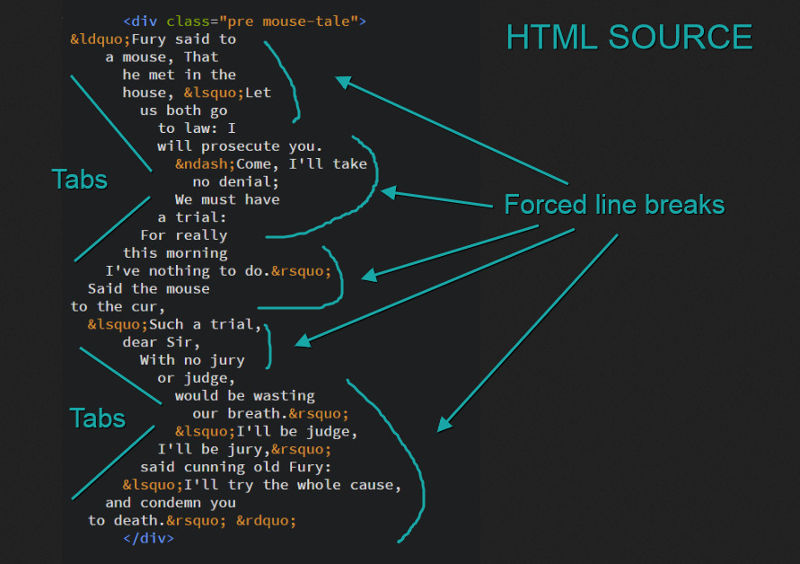
| pre | Whitespace is preserved by the browser. Text will only wrap on line breaks. Acts like the <pre> tag in HTML |
Play it » |
| pre-line | Sequences of whitespace will collapse into a single whitespace. Text will wrap when necessary, and on line breaks | Play it » |
| pre-wrap | Whitespace is preserved by the browser. Text will wrap when necessary, and on line breaks | Play it » |
| initial | Sets this property to its default value. Read about initial | Play it » |
| inherit | Inherits this property from its parent element. Read about inherit |
Опции CSS для выравнивания текста: text-align
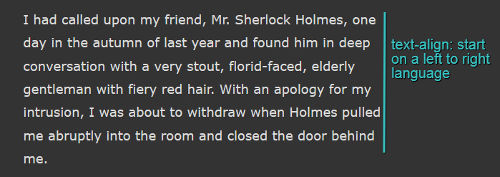
Свойство используется в вебе уже давно. Оно контролирует выравнивание строчного контента (текста или изображений) внутри блочного контейнера. Ключевые слова и выравнивают содержимое по соответствующим краям контейнера. — выравнивает по центру, а делает все строки одинаковой длины (кроме последней в абзаце).
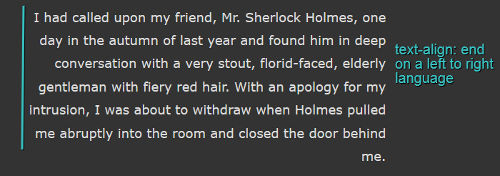
В спецификации появилась пара новых значений, полезных для сайтов,использующих написание справа налево (RTL): и .
Для обычных языков (LTR) они соответствуют и соответственно. А для языков (RTL) соответствует , а — .
Применение к дочернему элементу вынудит его унаследовать тоже выравнивание, что и у родительского элемента. И значения и в таком случае будут расчитаны исходя из направления языка родительского элемента.
CSS Properties
align-contentalign-itemsalign-selfallanimationanimation-delayanimation-directionanimation-durationanimation-fill-modeanimation-iteration-countanimation-nameanimation-play-stateanimation-timing-functionbackface-visibilitybackgroundbackground-attachmentbackground-blend-modebackground-clipbackground-colorbackground-imagebackground-originbackground-positionbackground-repeatbackground-sizeborderborder-bottomborder-bottom-colorborder-bottom-left-radiusborder-bottom-right-radiusborder-bottom-styleborder-bottom-widthborder-collapseborder-colorborder-imageborder-image-outsetborder-image-repeatborder-image-sliceborder-image-sourceborder-image-widthborder-leftborder-left-colorborder-left-styleborder-left-widthborder-radiusborder-rightborder-right-colorborder-right-styleborder-right-widthborder-spacingborder-styleborder-topborder-top-colorborder-top-left-radiusborder-top-right-radiusborder-top-styleborder-top-widthborder-widthbottombox-decoration-breakbox-shadowbox-sizingbreak-afterbreak-beforebreak-insidecaption-sidecaret-color@charsetclearclipclip-pathcolorcolumn-countcolumn-fillcolumn-gapcolumn-rulecolumn-rule-colorcolumn-rule-stylecolumn-rule-widthcolumn-spancolumn-widthcolumnscontentcounter-incrementcounter-resetcursordirectiondisplayempty-cellsfilterflexflex-basisflex-directionflex-flowflex-growflex-shrinkflex-wrapfloatfont@font-facefont-familyfont-feature-settingsfont-kerningfont-sizefont-size-adjustfont-stretchfont-stylefont-variantfont-variant-capsfont-weightgridgrid-areagrid-auto-columnsgrid-auto-flowgrid-auto-rowsgrid-columngrid-column-endgrid-column-gapgrid-column-startgrid-gapgrid-rowgrid-row-endgrid-row-gapgrid-row-startgrid-templategrid-template-areasgrid-template-columnsgrid-template-rowshanging-punctuationheighthyphens@importisolationjustify-content@keyframesleftletter-spacingline-heightlist-stylelist-style-imagelist-style-positionlist-style-typemarginmargin-bottommargin-leftmargin-rightmargin-topmax-heightmax-width@mediamin-heightmin-widthmix-blend-modeobject-fitobject-positionopacityorderoutlineoutline-coloroutline-offsetoutline-styleoutline-widthoverflowoverflow-xoverflow-ypaddingpadding-bottompadding-leftpadding-rightpadding-toppage-break-afterpage-break-beforepage-break-insideperspectiveperspective-originpointer-eventspositionquotesresizerightscroll-behaviortab-sizetable-layouttext-aligntext-align-lasttext-decorationtext-decoration-colortext-decoration-linetext-decoration-styletext-indenttext-justifytext-overflowtext-shadowtext-transformtoptransformtransform-origintransform-styletransitiontransition-delaytransition-durationtransition-propertytransition-timing-functionunicode-bidiuser-selectvertical-alignvisibilitywhite-spacewidthword-breakword-spacingword-wrapwriting-modez-index