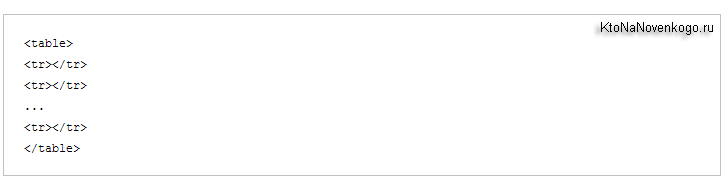
Свойство margin
Содержание:
Margin Collapse
Top and bottom margins of elements are sometimes collapsed into a single
margin that is equal to the largest of the two margins.
This does not happen on horizontal (left and right) margins! Only vertical
(top and bottom)
margins!
Look at the following example:
Example
p.a { margin: 30px 0;}p.b { margin: 20px 0;}
In the example above, the <p class=»a»> element has a top and bottom margin of 30px. The <p
class=»b»>
element has a top and bottom margin of 20px.
This means that the vertical margin between <p class=»a»> and <p class=»b»>
should be 50px (30px + 20px). But due to margin collapse, the actual margin ends
up being 30px!
More Examples
Set the left padding
This example demonstrates how to set the left padding of a <p> element.
Set the right padding
This example demonstrates how to set the right padding of a <p> element.
Set the top padding
This example demonstrates how to set the top padding of a <p> element.
Set the bottom padding
This example demonstrates how to set the bottom padding of a <p> element.
All CSS Padding Properties
| Property | Description |
|---|---|
| padding | A shorthand property for setting all the padding properties in one declaration |
| padding-bottom | Sets the bottom padding of an element |
| padding-left | Sets the left padding of an element |
| padding-right | Sets the right padding of an element |
| padding-top | Sets the top padding of an element |
❮ Previous
Next ❯
Значения margin
В качестве значений margin используются любые допустимые единицы длины, к примеру, пиксели, проценты, em, rem и др. В отличие от padding свойство margin может быть отрицательным (например: -10px), а также принимать значение auto. В остальном margin похоже на padding, у него также может быть от одного до четырёх значений.
Одно значение — определяет отступы для всех сторон блока.
Два значения — первое определяет отступы сверху и снизу для элемента, второе слева и справа для элемента.
Три значения — первое задаёт отступ сверху для элемента, второе одновременно слева и справа, а третье снизу.
Четыре значения — первое определяет отступ сверху, второе справа, третье снизу, четвёртое слева. Для запоминания последовательности можно представить часы — значения идут по часовой стрелке, начиная с 12 часов.
Значение auto
Свойство margin позволяет выравнивать элемент по центру горизонтали, если использовать значение auto и задать ширину элемента через width (пример 1).
Пример 2. Значение auto
<!DOCTYPE html>
<html>
<head>
<meta charset=»utf-8″>
<title>margin</title>
<style>
.dialog {
width: 80%; /* Ширина блока */
background: #D4E3A5; /* Цвет фона */
border: 2px solid #7D9B3D; /* Параметры рамки */
padding: 1rem; /* Поля */
margin: auto; /* Выравниваем по центру */
}
</style>
</head>
<body>
<div class=»dialog»>
Полинезийцы называют Млечный путь Манго-Роа-И-Ата,
что в переводе с маори означает «Длинная акула на рассвете».
</div>
</body>
</html>
Результат данного примера показан на рис. 3.
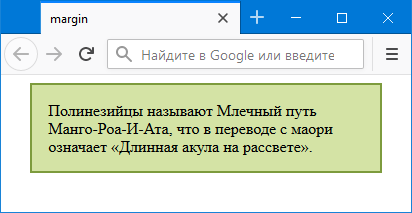
Рис. 3. Выравнивание блока по центру
Вместо margin: auto можно использовать комбинацию margin-left: auto и margin-right: auto.
Выравнивание блока по центру через значение auto работает только в сочетании с width.
Аналогично можно выровнять по центру горизонтали изображение, для этого даже не надо указывать ширину картинки, поскольку браузер получает её автоматически. Следует только превратить изображение в блочный элемент через свойство display, как показано в примере 3.
Пример 3. Значение auto
<!DOCTYPE html>
<html>
<head>
<meta charset=»utf-8″>
<title>margin</title>
<style>
.center {
display: block; /* Блочный элемент */
margin: auto; /* Выравниваем по центру */
}
</style>
</head>
<body>
<img src=»image/html-128.png» alt=»HTML5″ class=»center»>
</body>
</html>
Результат данного примера показан на рис. 4.

Рис. 4. Выравнивание картинки по центру
Проценты
В качестве значения margin можно использовать процентную запись, с которой связаны следующие особенности.
- По горизонтали проценты считаются от ширины всего блока.
- По вертикали проценты считаются от ширины всего блока.
Таким образом, margin в процентах берётся от ширины всего блока, даже для margin-top и margin-botom.
Отрицательный margin
margin может быть задан с отрицательным значением, тем самым элемент сдвигается в противоположном направлении. К примеру, margin-top:-10px поднимает блок вверх на 10 пикселей, а margin-left:-10px сдвигает блок влево.
В примере 4 показан сдвиг блока с классом stat вверх, если он располагается сразу после элемента <p>.
Пример 4. Использование отрицательного значения
<!DOCTYPE html>
<html>
<head>
<meta charset=»utf-8″>
<title>margin</title>
<style>
p + .stat {
margin-top: -1rem; /* Поднимаем текст вверх */
}
.stat {
font-size: 3rem; /* Размер текста */
}
</style>
</head>
<body>
<p>Продано ёлок</p>
<p class=»stat»>64</p>
</body>
</html>
Результат данного примера показан на рис. 5. Без отрицательного margin строки располагаются далеко друг от друга.
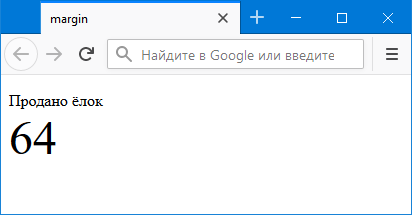
Рис. 5. Поднимаем блок вверх через margin-top
CSS Properties
align-contentalign-itemsalign-selfallanimationanimation-delayanimation-directionanimation-durationanimation-fill-modeanimation-iteration-countanimation-nameanimation-play-stateanimation-timing-functionbackface-visibilitybackgroundbackground-attachmentbackground-blend-modebackground-clipbackground-colorbackground-imagebackground-originbackground-positionbackground-repeatbackground-sizeborderborder-bottomborder-bottom-colorborder-bottom-left-radiusborder-bottom-right-radiusborder-bottom-styleborder-bottom-widthborder-collapseborder-colorborder-imageborder-image-outsetborder-image-repeatborder-image-sliceborder-image-sourceborder-image-widthborder-leftborder-left-colorborder-left-styleborder-left-widthborder-radiusborder-rightborder-right-colorborder-right-styleborder-right-widthborder-spacingborder-styleborder-topborder-top-colorborder-top-left-radiusborder-top-right-radiusborder-top-styleborder-top-widthborder-widthbottombox-decoration-breakbox-shadowbox-sizingbreak-afterbreak-beforebreak-insidecaption-sidecaret-color@charsetclearclipclip-pathcolorcolumn-countcolumn-fillcolumn-gapcolumn-rulecolumn-rule-colorcolumn-rule-stylecolumn-rule-widthcolumn-spancolumn-widthcolumnscontentcounter-incrementcounter-resetcursordirectiondisplayempty-cellsfilterflexflex-basisflex-directionflex-flowflex-growflex-shrinkflex-wrapfloatfont@font-facefont-familyfont-feature-settingsfont-kerningfont-sizefont-size-adjustfont-stretchfont-stylefont-variantfont-variant-capsfont-weightgridgrid-areagrid-auto-columnsgrid-auto-flowgrid-auto-rowsgrid-columngrid-column-endgrid-column-gapgrid-column-startgrid-gapgrid-rowgrid-row-endgrid-row-gapgrid-row-startgrid-templategrid-template-areasgrid-template-columnsgrid-template-rowshanging-punctuationheighthyphens@importisolationjustify-content@keyframesleftletter-spacingline-heightlist-stylelist-style-imagelist-style-positionlist-style-typemarginmargin-bottommargin-leftmargin-rightmargin-topmax-heightmax-width@mediamin-heightmin-widthmix-blend-modeobject-fitobject-positionopacityorderoutlineoutline-coloroutline-offsetoutline-styleoutline-widthoverflowoverflow-xoverflow-ypaddingpadding-bottompadding-leftpadding-rightpadding-toppage-break-afterpage-break-beforepage-break-insideperspectiveperspective-originpointer-eventspositionquotesresizerightscroll-behaviortab-sizetable-layouttext-aligntext-align-lasttext-decorationtext-decoration-colortext-decoration-linetext-decoration-styletext-indenttext-justifytext-overflowtext-shadowtext-transformtoptransformtransform-origintransform-styletransitiontransition-delaytransition-durationtransition-propertytransition-timing-functionunicode-bidiuser-selectvertical-alignvisibilitywhite-spacewidthword-breakword-spacingword-wrapwriting-modez-index
CSS Reference
CSS ReferenceCSS Browser SupportCSS SelectorsCSS FunctionsCSS Reference AuralCSS Web Safe FontsCSS Font FallbacksCSS AnimatableCSS UnitsCSS PX-EM ConverterCSS ColorsCSS Color ValuesCSS Default ValuesCSS Entities
CSS Properties
align-content
align-items
align-self
all
animation
animation-delay
animation-direction
animation-duration
animation-fill-mode
animation-iteration-count
animation-name
animation-play-state
animation-timing-function
backface-visibility
background
background-attachment
background-blend-mode
background-clip
background-color
background-image
background-origin
background-position
background-repeat
background-size
border
border-bottom
border-bottom-color
border-bottom-left-radius
border-bottom-right-radius
border-bottom-style
border-bottom-width
border-collapse
border-color
border-image
border-image-outset
border-image-repeat
border-image-slice
border-image-source
border-image-width
border-left
border-left-color
border-left-style
border-left-width
border-radius
border-right
border-right-color
border-right-style
border-right-width
border-spacing
border-style
border-top
border-top-color
border-top-left-radius
border-top-right-radius
border-top-style
border-top-width
border-width
bottom
box-decoration-break
box-shadow
box-sizing
break-after
break-before
break-inside
caption-side
caret-color
@charset
clear
clip
clip-path
color
column-count
column-fill
column-gap
column-rule
column-rule-color
column-rule-style
column-rule-width
column-span
column-width
columns
content
counter-increment
counter-reset
cursor
direction
display
empty-cells
filter
flex
flex-basis
flex-direction
flex-flow
flex-grow
flex-shrink
flex-wrap
float
font
@font-face
font-family
font-feature-settings
font-kerning
font-size
font-size-adjust
font-stretch
font-style
font-variant
font-variant-caps
font-weight
grid
grid-area
grid-auto-columns
grid-auto-flow
grid-auto-rows
grid-column
grid-column-end
grid-column-gap
grid-column-start
grid-gap
grid-row
grid-row-end
grid-row-gap
grid-row-start
grid-template
grid-template-areas
grid-template-columns
grid-template-rows
hanging-punctuation
height
hyphens
@import
isolation
justify-content
@keyframes
left
letter-spacing
line-height
list-style
list-style-image
list-style-position
list-style-type
margin
margin-bottom
margin-left
margin-right
margin-top
max-height
max-width
@media
min-height
min-width
mix-blend-mode
object-fit
object-position
opacity
order
outline
outline-color
outline-offset
outline-style
outline-width
overflow
overflow-x
overflow-y
padding
padding-bottom
padding-left
padding-right
padding-top
page-break-after
page-break-before
page-break-inside
perspective
perspective-origin
pointer-events
position
quotes
resize
right
scroll-behavior
tab-size
table-layout
text-align
text-align-last
text-decoration
text-decoration-color
text-decoration-line
text-decoration-style
text-indent
text-justify
text-overflow
text-shadow
text-transform
top
transform
transform-origin
transform-style
transition
transition-delay
transition-duration
transition-property
transition-timing-function
unicode-bidi
user-select
vertical-align
visibility
white-space
width
word-break
word-spacing
word-wrap
writing-mode
z-index
Padding and Possible Values
CSS padding refers to space on all four sides of an element. Specifically, it is the area between the border and the content. Therefore, padding is within elements.
Adding HTML Space Between Texts
To add spaces between texts, you can use special HTML symbols. For better results, we recommend using padding or margins to add blank space elements.
In the following example, we are using internal CSS, class, and to add HTML space between text.
Example Copy
Similarly, you can add HTML space between lines by using . Look at this example:
Example Copy
CSS padding vs margin
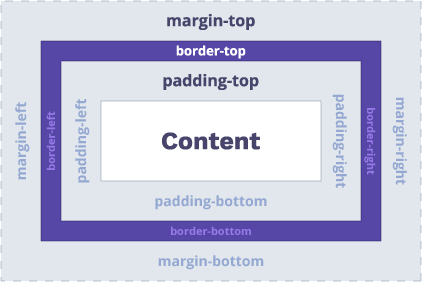
The padding and margin are a part of the Box Model.
The main idea of CSS padding vs margin is that padding is the innermost part of the box model (it is inside an element). Margins add space around elements.
Use of the padding Shorthand
The shorthand allows defining four properties in one declaration.
In the example, we assign property to a <p> element and describe all four values individually.
Example Copy
I have a padding!
| Property | Description |
|---|---|
| padding-top | Sets the top padding of an element |
| padding-right | Specifies the right padding of an element |
| padding-bottom | Sets the bottom padding of an element |
| padding-left | Specifies the left padding of an element |
If you include values for two or three properties, the CSS padding order of values changes:
- One value — sets the same padding to all four sides.
- Two values — the first value applies the padding on top and bottom. The second adds padding to the left and right sides of an element.
- Three values — the first value applies padding to the top. The second adds padding to the right and left sides. The third value adds padding to the bottom.
padding-top
The CSS property indicates the height of the padding area above an element.
In this example, we assign property to a element.
I have a top padding!
Example Copy
You can specify values for this property in two ways:
- — use a number and a unit (for example, em, px, cm).
- — use percentages to indicate percentage value relative to the element.
padding-right
The CSS property specifies the width of the padding area on the right side of an element.
In the example below, we specify that the element will have space equal to on the right side.
Example Copy
I have a right padding!
 Pros
Pros
- Simplistic design (no unnecessary information)
- High-quality courses (even the free ones)
- Variety of features
Main Features
- Nanodegree programs
- Suitable for enterprises
- Paid certificates of completion
100% FREE  Pros
Pros
- Professional service
- Flexible timetables
- A variety of features to choose from
Main Features
- Professional certificates of completion
- University-level courses
- Multiple Online degree programs
100% FREE  Pros
Pros
- Great user experience
- Offers quality content
- Very transparent with their pricing
Main Features
- Free certificates of completion
- Focused on data science skills
- Flexible learning timetable
100% FREE
padding-bottom
CSS property specifies the height of the padding area below an element.
The example shows how to create a padding equal to below the element.
Example Copy
I have a bottom padding!
padding-left
CSS property specifies the width of the padding area on the left side of an element.
In the example, we assign a left padding to the element.
Example Copy
I have a left padding!
CSS Reference
CSS ReferenceCSS Browser SupportCSS SelectorsCSS FunctionsCSS Reference AuralCSS Web Safe FontsCSS Font FallbacksCSS AnimatableCSS UnitsCSS PX-EM ConverterCSS ColorsCSS Color ValuesCSS Default ValuesCSS Entities
CSS Properties
align-content
align-items
align-self
all
animation
animation-delay
animation-direction
animation-duration
animation-fill-mode
animation-iteration-count
animation-name
animation-play-state
animation-timing-function
backface-visibility
background
background-attachment
background-blend-mode
background-clip
background-color
background-image
background-origin
background-position
background-repeat
background-size
border
border-bottom
border-bottom-color
border-bottom-left-radius
border-bottom-right-radius
border-bottom-style
border-bottom-width
border-collapse
border-color
border-image
border-image-outset
border-image-repeat
border-image-slice
border-image-source
border-image-width
border-left
border-left-color
border-left-style
border-left-width
border-radius
border-right
border-right-color
border-right-style
border-right-width
border-spacing
border-style
border-top
border-top-color
border-top-left-radius
border-top-right-radius
border-top-style
border-top-width
border-width
bottom
box-decoration-break
box-shadow
box-sizing
break-after
break-before
break-inside
caption-side
caret-color
@charset
clear
clip
clip-path
color
column-count
column-fill
column-gap
column-rule
column-rule-color
column-rule-style
column-rule-width
column-span
column-width
columns
content
counter-increment
counter-reset
cursor
direction
display
empty-cells
filter
flex
flex-basis
flex-direction
flex-flow
flex-grow
flex-shrink
flex-wrap
float
font
@font-face
font-family
font-feature-settings
font-kerning
font-size
font-size-adjust
font-stretch
font-style
font-variant
font-variant-caps
font-weight
grid
grid-area
grid-auto-columns
grid-auto-flow
grid-auto-rows
grid-column
grid-column-end
grid-column-gap
grid-column-start
grid-gap
grid-row
grid-row-end
grid-row-gap
grid-row-start
grid-template
grid-template-areas
grid-template-columns
grid-template-rows
hanging-punctuation
height
hyphens
@import
isolation
justify-content
@keyframes
left
letter-spacing
line-height
list-style
list-style-image
list-style-position
list-style-type
margin
margin-bottom
margin-left
margin-right
margin-top
max-height
max-width
@media
min-height
min-width
mix-blend-mode
object-fit
object-position
opacity
order
outline
outline-color
outline-offset
outline-style
outline-width
overflow
overflow-x
overflow-y
padding
padding-bottom
padding-left
padding-right
padding-top
page-break-after
page-break-before
page-break-inside
perspective
perspective-origin
pointer-events
position
quotes
resize
right
scroll-behavior
tab-size
table-layout
text-align
text-align-last
text-decoration
text-decoration-color
text-decoration-line
text-decoration-style
text-indent
text-justify
text-overflow
text-shadow
text-transform
top
transform
transform-origin
transform-style
transition
transition-delay
transition-duration
transition-property
transition-timing-function
unicode-bidi
user-select
vertical-align
visibility
white-space
width
word-break
word-spacing
word-wrap
writing-mode
z-index
Внешние отступы (margin)
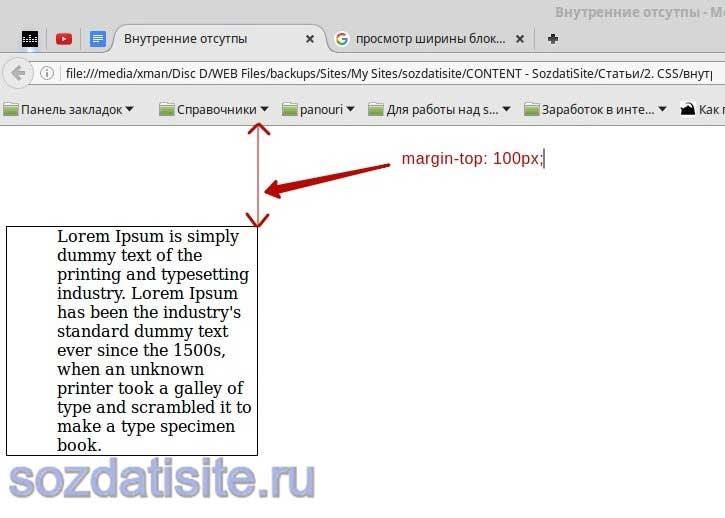
Аналогично, как и для внутренних отступов, внешние отступы задаются с помощью правил margin-top, margin-right, margin-bottom, margin-left. То или иное правило также используется в зависимости, от какой стороны хотите задать отступ.
Как я уже показал выше, внешние отступы формируются за предела рамки текущего блока, до рамки родительского блока. Для примера, возьмем уже созданный нами блок div и зададим ему верхний внешний отступ в размере 100px. Для этого в его свойствах добавим правило margin-top: 100px;.
div{
    padding-left: 50px;
    width: 200px;
    border: 1px solid #000;
    margin-top: 100px;
}
Смотрим в браузере на результат:
Также можно задать и отрицательный отступ, только в этом случае результат будет другим. То есть если задать такой отступ блоку div то он выйдет за предела рамки своего родительского блока на то расстояние которая равно значение отрицательного отступа. Например, если блоку div задать margin-top: -100px; то он выйдет за пределом body на 100px.
Вот результат отрицательного отступа:

Более подробно об отрицательном отступе Вы можете прочитать в этой статье Отрицательные значения внешних полей в CSS
Для внутренних отступов (padding) отрицательное значение не имеет никакого смысла.
Сокращенные записи margin и padding
В CSS существуют сокращенные правила для добавления внешних (правило margin) и внутренних (правило padding) отступов. Это очень удобно, когда нужно задать сразу несколько значений для разных сторон, плюс к этому такие правила значительно сокращает CSS код.
Перейдем к делу. Допустим нужно задать какому-то блоку верхний отступ в 10px, правый отступ в 30px, нижний отступ 15px и левый отступ 50px. Для того чтобы не писать отдельное правило для каждой стороны, таким образом:
div{
    margin-top: 10px;
    margin-right: 30px;
    margin-bottom: 15px;
    margin-left: 50px;
}
Лучше воспользоваться сокращенным правилом и написать вот так:
div{
    margin: 10px 30px 15px 50px;
}
Результат в браузере будет тот же, но CSS код будет более оптимизированным.
Значения задаются поочередно по часовой стрелке для каждой стороны. Сначала для верхней стороны (top), потом для правой(right), для нижней(bottom) и для левой(left).
Аналогично задается и для внутренних отступов.
Еще пару вариантов сокращения свойств margin и padding
Для того чтобы задать одинаковый отступ, к примеру 10px, сразу всем сторонам лучше всего написать так:
div{
    padding: 10px;
}
Если вы хотите задать одинаковые значения для верхней и нижней стороны, а также другое значение, которое будет одинаковым для левой и правой стороны, то напишите так:
div{
    padding: 20px 15px;
}
С начало задается значение для вертикальных сторон (вверх и вниз) потом для горизонтальных сторон (влево и вправо).
Таким образом, можно выровнять автоматически блок div по центру окна браузера. Для этого, этому блоку задаем такое правило:
div{
    width: 500px;
    margin: 0 auto;
}
Сверху и снизу отступы будут нулевыми, а слева и справа будут подставляться автоматически.
Ширину естественно можно изменить, главное чтобы она была указана.
Как выровнять блок по центру другим способом (более сложным) вы можете прочитать в этой статье Выравнивание сайта по центру экрана
И последний вариант сокращения, это когда хотим чтобы горизонтальные отступы были одинаковыми, а вертикальные разные. В таком случае правило пишется так:
div{
    margin: 15px 43px 0;
}
Сначала задается верхний отступ (в примере 15px) потом задаем одинаковое значения для левого и правого отступа (в примере 43px) и третье значение отвечает за нижний отступ.
Вот и все что я хотел Вам сказать про внутренние (padding) и внешние (margin) отступы в CSS. Теперь Вы знаете, как их использовать при верстке или доработки сайта. Желаю Вам успехов!
Тогда поделитесь ею с друзьями и подпишитесь на новые интересные статьи.
Поделиться с друзьями:
Подписаться на новые статьи:
Поддержите пожалуйста мой проект!
Добавляйтесь ко мне в друзья в:
-
— ВКонтакте
- — Одноклассниках
Добавляйтесь в мои группы:
- — Группа в ВКонтакте
- — Группа в Facebook
- — Группа в Одноклассниках
Подпишитесь на мои каналы:
- — Мой канал на Youtube
- — Мой канал на Google+
Автор статьи: Мунтян Сергей
Копирование материалов с сайта sozdatisite.ru ЗАПРЕЩЕНО!!!
Дата добавления: 2016-05-05 04:50:03
Отмена схлопывания margin
Схлопывание не всегда требуется при вёрстке страницы, а в некоторых случаях вообще «ломает» дизайн. Поэтому следует знать, в каких случаях схлопывание не работает.
Схлопывание margin не срабатывает:
- для элементов с абсолютным позиционированием, т. е. таких, у которых position установлено как absolute или fixed;
- для обтекаемых элементов (для них свойство float задано как left или right);
- для строчных или строчно-блочных элементов (для них свойство display задано как inline или inline-block);
- для флекс-элементов (у родителя которых свойство display задано как flex или inline-flex);
- для элемента <html>.
Схлопывание не действует на дочерние элементы:
- если у родителя значение overflow задано как auto, hidden или scroll;
- если у родителя на стороне схлопывания задано свойство padding;
- если у родителя на стороне схлопывания задано свойство border.
Учтите, что свойства padding и border должны иметь размер больше нуля, к примеру, 1px.
Возьмём пример 4 и доработаем его, чтобы margin у заголовка работал внутри блока. Для этого к родительскому блоку добавляем свойство padding со значением 0.1px. На экране такая величина будет незаметна, но браузеры её понимают и схлопывание margin отменяют (пример 5).
Пример 5. Отмена схлопывания margin
<!DOCTYPE html>
<html>
<head>
<meta charset=»utf-8″>
<title>margin</title>
<style>
.block {
background: #FCE3EE; /* Цвет фона блока */
padding: 0.1px 0; /* Отменяем схлопывание */
}
h1 {
background: #E2EDC1; /* Цвет фона заголовка */
}
</style>
</head>
<body>
<div class=»block»>
<h1>Заголовок</h1>
</div>
<p>Текст снизу</p>
</body>
</html>
Результат данного примера показан на рис. 9.
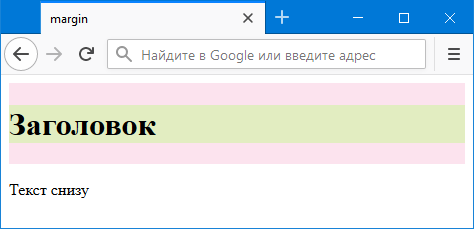
Рис. 9. margin у дочернего элемента
Для отмены схлопывания у дочерних элементов можно использовать один из вариантов.
Для соседних элементов схлопывание margin отменять, как правило, нет необходимости, поскольку результат достаточно предсказуем — надо только помнить о поведении margin или включать margin-top или margin-bottom лишь для одного элемента. В примере 6 расстояние между блоков регулируется значением margin-bottom у block1. Здесь этот margin единственный, поэтому никакого объединения не происходит и вертикальный промежуток между блоков равен значению margin-bottom.
Пример 6. Расстояние между блоков
<!DOCTYPE html>
<html>
<head>
<meta charset=»utf-8″>
<title>margin</title>
<style>
.block {
padding: 20px; /* Поля вокруг текста */
border: 1px solid #666; /* Параметры рамки */
}
.block1 {
background: #E2EDC1; /* Цвет фона первого блока */
margin-bottom: 30px; /* Отступ снизу */
}
.block2 {
background: #FCE3EE; /* Цвет фона второго блока */
}
</style>
</head>
<body>
<div class=»block block1″>Первый блок</div>
<div class=»block block2″>Второй блок</div>
</body>
</html>
Для полноты картины приведём несколько вариантов, когда схлопывание margin у соседних блоков не работает. Данный стиль можно добавить к каждому блоку или только к одному. Ширина элемента с float определяется содержимым элемента, поэтому надо явно задать ширину блока, равную 100%. За счёт этого не ломается вёрстка, потому что нет места для обтекания элемента.
Ширина строчно-блочных элементов также определяется их содержимым, поэтому данный вариант похож на предыдущий.
Класс parent надо добавить к родителю наших блоков.