Routerlogin.net login
Содержание:
- Частые вопросы по администрированию роутера через 192.168.1.1
- Here are the steps to connect the Netgear router with the Canon printer.
- Using www.routerlogin.net login for Reinstall Firmware for Netgear Wireless Router
- Инструкция по настройке роутера NETGEAR WGR614 WNR1000
- Set up the Wireless Schedule for Nighthawk Router | 192.168.1.1 Netgear
- Routers:
- Как зайти в настройки роутера
- HTML верстка и анализ содержания сайта
- Входим в веб интерфейс
- Update your Netgear Router Firmware steps:
- How to setup Dynamic DNS in your Netgear AX6000 8 stream router?
- Wifi Radio Configuration for Netgear Wireless Router Setup
Частые вопросы по администрированию роутера через 192.168.1.1
Адрес роутера 192.168.1.1 доступен, но не пускает по admin | admin
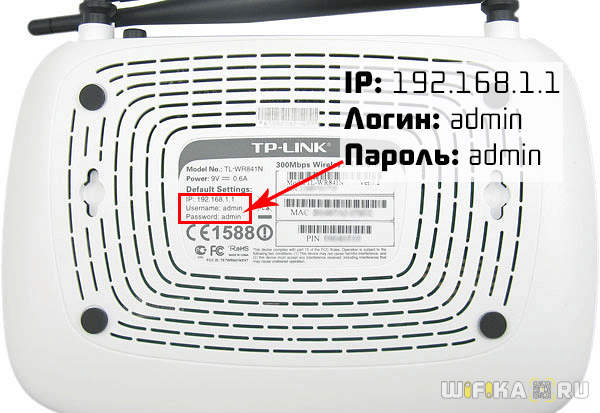
После перехода на сайт модема появляется окно авторизации, которое запрашивает login и password. Необходимо указать логин и пароль для входа в панель управления
Важно помнить: это не доступ к сети интернет от провайдера или пароль на WiFi. Если пароль и логин не менялись, то их можно узнать на наклейке роутера или в документации
Когда оборудование предоставляет провайдер, данные для входа, как правило, прилагаются отдельным приложением в договоре.
Важно: прошитые провайдером устройства могут предоставлять доступ к административной панели только через локальную сеть, а заводские настройки будут подменены или заблокированы. Могут иметь обрезанный функционал или какой-то другой веб-адрес настроек
Если ничего не получилось, ищите решение проблемы у провайдера!
Это происходит по двум причинам: либо у роутера другие параметры входа по умолчанию, либо пароль и | или логин менялись. В первом случае решение — найти документацию на роутер у себя или в интернете и убедиться, что вход происходит по admin | admin. Во втором случае либо вспоминайте код, узнавайте логин и пароль у того, кто доступ изменил, либо сделайте жёсткий сброс настроек (Hard-reset).
Что сделать в 192.168.1.1 чтобы настроить интернет
Параметры подключения у провайдеров отличаются и предоставляются в договоре или приложением к нему. Простой вариант — позвонить в техническую поддержку, ТП на этом корову съели. И не одну.
Как установить или сменить пароль личного кабинета 192.168.1.1
Веб-интерфейс предоставляет возможность сменить логин и пароль для последующей авторизации. На вкладке «настройка» есть под вкладка «приватность», там указывается логин и доступ к личному кабинету. Меню у производителей отличается и универсального рецепта нет. После сохранения новой пары «User Name» — «password», последующая авторизация осуществляется уже с новой парой. Возможно, маршрутизатор сразу попросит ввести новые данные. Будьте внимательны, убедитесь, что не ошиблись в написание и запишите логин и пароль, прикрепите к договору на оказание услуг или к другому документу, связанного с интернетом. Забыв комбинацию доступа, для новых изменений настроек придётся возвращать роутер к заводскому состоянию.
Как установить или сменить пароль на Wi-Fi
Пароль на доступ к беспроводной сети Вай-Фай устанавливается во вкладке: беспроводные подключения. Если роутер работает в двухканальном режиме (2.4Мг и 5Мг) для каждого режима ставится отдельный ключ безопасности сети. Пароль по умолчанию, если он установлен, пишется в документации и наклейке внизу маршрутизатора.
Here are the steps to connect the Netgear router with the Canon printer.
- Connect the cable of your Ethernet with one end to the available port on your router and other end to an available port to your printer. These are the support USB connections.
- Plug in your printer to the power outlet using the power cable of the Canon printer.
- Turn on your printer and just wait till the startup procedure of your device starts.
- Unplug the power to your Netgear router and wait for few seconds. Plug back your printer and startup the Network settings within your printer.
- Go to your system. Click on Start button.
- Select Devices and Printers or in some case Printers only.
- Click on the name of your Printer and click on it.
- Click on Next button
- Click on Install Drivers and enter the username and the password.
- Carry on with the instructions and follow the prompts in the wizard and finally click on Next button.
- You are done with the manual connection of your router with the Canon printer.
Parental control feature– Feature with so many abilities and functionalities that protect your router with the Trojans. The feature gives the prominent control to the user to block the users from interacting with the illegal and restricted websites. The feature also acts as the security characteristic within your device which strictly prohibits the use of illegal content within your system.
This kind of feature will not only save your system from threats but also keep away the bugs from your router which will successfully maintain the performance of your router. The user is adapted with the power to control the feature within the device in an efficient manner. An individual can disable and enable this functionality through www.routerlogin.net . Through the web management of the Netgear router, the user has total control over other features of the device also.
Steps to enable the Parental control feature within your system
- Launch a browser with www.rotuerlogin.net as the URL of the browser.
- Go through the Login credentials. Type default username and the password. Both credentials are case-sensitive.
- On Basic Home page, Select Parental Control feature.
- The parental control web page is going to display.
- Click on the app you want to download or use.
- Follow the instructions to download the genie app within your Android.
- After installation, open the Genie app and go to Parental control feature.
- Parental control will itself start.
- Click on Parental control button.
- Click the Next button.
- You will be prompted to login or create a new account.
- Enter your login credentials.
- The filter level page is going to display.
- Click on Take me to the status page screen button. The status page is going to display.
- Parental control feature is now setup for your router.
- To enable it, simply click on Enable Parental control button.
Advantages of Parental control feature
Parental control feature showers us with a whole lot of features which gives us the whole lot of advantages. It’s hard to find any disadvantage within this feature as it only carries advantages
Here are the advantages of the Parental control feature
Using www.routerlogin.net login for Reinstall Firmware for Netgear Wireless Router
Updating the firmware for routerlogin.net web address is very simple. You will need to follow some very simple steps for updating firmware for your Netgear router. In any case if your firmware update gets failure then you can easily recover the firmware file for your routerlogin.net Netgear router. We are going to explain the steps you will need to follow so that you can easily recover the lost firmware file for your Netgear router. You can also visit the blog page so you can get details regarding router Netgear login, http www routerlogin net, routerlogin net start, www routerlogin net setup, Netgear router setup and 192.168.1 Netgear router setup.
Recovering the Lost Firmware File for Netgear WiFi Router
- First you will need to download the firmware file for your Netgear router. Downloading the firmware file for your Netgear router is not a big task. You can download the firmware for your Netgear router from the official website of Netgear.
- After that you will need to download the TFTP software and that software can also be downloaded free of cost from the official website.
- You will need to connect your Netgear WiFi router with the computer system you will use for www.routerlogin.net login the configurations.
- You can make sure the correct connections between your Netgear router and computer system using the ping command.
- If you are getting replies for the ping command then that means the connections you have made are correct.
- You will need to fill the default IP address of your router in the given field.
- You can also specify the password for your device. Make sure to fill a strong password for your device.
- You will need to reboot your Netgear router after making all these configurations.
These are the simple steps you will need to follow.
8,204 total views, 0 views today
Инструкция по настройке роутера NETGEAR WGR614 WNR1000
Рекомендации.
1. По умолчанию, Логин admin, пароль password. 2. Курьеры-настройщики должны в настройках изменять пароль на Серийный номер, указанный на коробке (S/N). При перенастройке рекомендуется также использовать в качестве пароля на роутер и wi — fi S/N (серийный номер). 3. Сброс настроек роутера производится путем нажатия и удержания кнопки Reset на задней панели роутера в течении 10 секунд.
Авторизация.
Для того, что бы попасть в веб-интерфейс роутера, необходимо открыть ваш Интернет браузер и в строке адреса набрать http://192.168.1.1, User Name admin , Password – password (при условии, что роутер имеет заводские настройки, и его IP не менялся).
Смена заводского пароля. В целях безопасности рекомендуется сменить заводской пароль. По умолчанию: Логин admin, пароль password Курьеры-настройщики должны в настройках изменять пароль на Серийный номер, указанный на коробке (S/N). При перенастройке рекомендуется также использовать в качестве пароля на роутер и wi-fi S/N (серийный номер). В интерфейсе роутера необходимо зайти во вкладку Установить пароль. В поле Старый пароль введите пароль c помощью которого вы попали в настройки роутера В поле «Установить пароль и Повторить новый пароль введите новый пароль.
Настройка Wi-Fi на роутере.
В интерфейсе роутера необходимо выбрать вкладку слева «Параметры беспроводного соединения.
Выставляем параметры следующим образом:
1. Поле «SSID»: вводим название беспроводной сети. 2. Регион: Россия 3. Канал: Авто 4. Режим: до 54 Мбит/с 5. Ставим галочку напротив: WPA2-PSK 6. Фраза-пароль: должны ввести любой набор цифр, длиной от 8 до 63. Их также необходимо запомнить, чтобы Вы могли указать их при подключении к сети. Рекомендуется использовать в качестве ключа серийный номер устройства. 7. Нажимаем ниже кнопку «Применить»
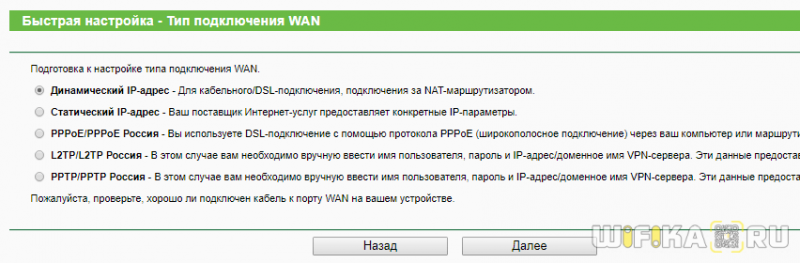
Настройка подключения к Интернет.
Настройка PPPoE подключения.
1. Требуется ли при подключении к Интернету ввести имя пользователя и пароль?: Да 2. Тип подключения: PPPoE 3. Имя пользователя: Ваш логин из договора 4. Пароль: Ваш пароль из договора 5. Режим подключения: Всегда включено 6. Ставим точку напротив Использовать MAC-адрес компьютера 7. Нажимаем кнопку «Применить»
Настройка PPtP (VPN) при автоматическом получении локального IP адреса (DHCP).
1. Требуется ли при подключении к Интернету ввести имя пользователя и пароль?: Да 2. Тип подключения: PPTP 3. Имя пользователя: Ваш логин из договора 4. Пароль: Ваш пароль из договора 5. Режим подключения: Всегда включено 6. Адрес сервера: ppp.lan 7. Ставим точку напротив Использовать MAC-адрес компьютера 8. Нажимаем кнопку «Применить»
Настройка PPtP (VPN) при статическом локальном IP адресе.
1. Требуется ли при подключении к Интернету ввести имя пользователя и пароль?: Да 2. Тип подключения: PPTP 3. Имя пользователя: Ваш логин из договора 4. Пароль: Ваш пароль из договора 5. Мой IP адрес вбиваем ваш IP по договору 6. Маска подсети: вбиваем маску подсети по договору 7. Адрес сервера: ppp.lan 8. IP-адрес шлюза: вбиваем IP адрес шлюза по договору 9. Ставим точку напротив Использовать следующие DNS сервера 10. Предпочитаемый DNS сервер: 212.1.224.6 Альтернативный: 212.1.244.6 11. Нажимаем кнопку «Применить»
NAT при автоматическом получении IP адреса (DHCP).
1. Требуется ли при подключении к Интернету ввести имя пользователя и пароль?: Нет 2. Ставим точку напротив Получить динамически от поставщика Интернета 3. Ставим точку напротив Получить автоматически от поставщика Интернета 4. Ставим точку напротив «Использовать MAC адрес компьютера» 5. Сохраняем настройки кнопкой «Применить».
Set up the Wireless Schedule for Nighthawk Router | 192.168.1.1 Netgear
This is true that you do not need internet WiFi signals 24/7 so you always want to turn off your Netgear router for the time you do not need to Wifi access. As we know that there are many advance configurations you can make for your Netgear router and one such advance configurations is that, you can schedule the working hours for your Netgear router. That means your Netgear router will automatically get turn off when you do not need the Wifi access for your home network. We are going to explain the steps for setting up the wireless schedule for your Netgear routers.
- First, using Ethernet cable you will need to connect your Netgear router with the computer system and modem you are using at your home.
- Now, you will need to open the web browser and in the address bar you will need to fill Netgear router login address. Default web address 192.168.1.1 Netgear is use to access Netgear router login page.
- You will get redirect to router login page where you will need to fill the login user name and password for your Netgear router.
- If the login details are correct then you will need to go for the “Advanced” option for your Netgear router smart setup wizard.
- Under “Advanced Setup” select “Wireless Settings”.
- Here you will need to choose “Add a New Period”.
- Select “Start and End” option.
You can select the days you want to allow the WiFi access.
At last click on “Apply” option to save all the settings you have made.
This is the process for scheduling the WiFi access for your Netgear Wifi routers and you can very easily manage all these simple steps. You can for sure visit the website and get details regarding routerlogin.net 192.168.0.1, www routerlogin.net, www.routerlogin.net admin, www.routerlogin.net login, http //www.routerlogin.net, 192.168.1.1 Netgear, http //routerlogin.net,. routerlogin net, www.routerlogin.net and Netgear router login.
Routers:
Routers are the devices that router the data packets between the computer networks. They are the devices that manage the internet traffic. Their purpose is to route the data packets between two or more computer networks. In internet the data is transferred in the form of data packets. Each data packet has it’s own destination address. The router reads the data’s destination and forwards the data packet to the right destination.
 Router Login
The data packet reaches to every node or the every router that is in the place so that it can find the correct router to get used. Each router has a routing table to verify the address that is carried by each data packet and routes it to the perfect destination.
These routing tables are of two types. They are either manual or dynamic.
Dynamic routing table:
These routing tables are modified with each requests and updated frequently by contacting with other routers in the network and enables the fast transferring of the data packets from one network to the other.
Also there are many types of routers that are deployed in many different types. They are as listed below.
- Core Router
- Edge Router
- Branch Router
- Logical Router
The above are the most commonly used router types and they are explained as below.
Core Router:
Core routers are the routers that are used by the Internet service providers. They are the most powerful form of routers and they are at the center forwarding the data from one end to the fiber optics backbone. These routers are the core routers of big enterprises and they forward data packets much faster than any other traditional routers.
Edge Router:
Edge routers are not as powerful as any core routers. They are used mostly at the verge end of the LAN network devices where are connected to the public network connection. These routers are the most used commercial routers and also know as subscriber edge routers.
Branch Router:
Branch routers, as the name suggests they connect two different office locations of a same office to WAN. They act as an intermediate between two edge routers and connect them via branch routers.
Logical Router:
Logical routers are the configured part of the hardware router. It copies the functionality of the hardware and enables you to replicate it’s functionalities. It helps you to mimic many router domains with in the same router.
Wireless Router:
Wireless routers are just as like the traditional routers but gives you the great mobility for notebook laptops and mobile devices. They allow you to access the public network or the internet within their accessible range without wire connection.
Here we gonna look at the edge routers that we are using in our home and small office. We can log in to the home or office router using their default gateway IP address.
Some of the default IP address gateways are:
- 192.168.1.1
- 192.168.2.1
- 192.168.1.254
- 192.168.0.1
- 192.168.254.254
- 10.0.0.1
Using the above IP address you can easily log in to the router device. The ip address and their default router login details are given below.
Как зайти в настройки роутера
Сначала вам нужно проверить, правильно ли подключен роутер к кабелю, поэтому следуйте инструкциям, чтобы убедиться в следующем:
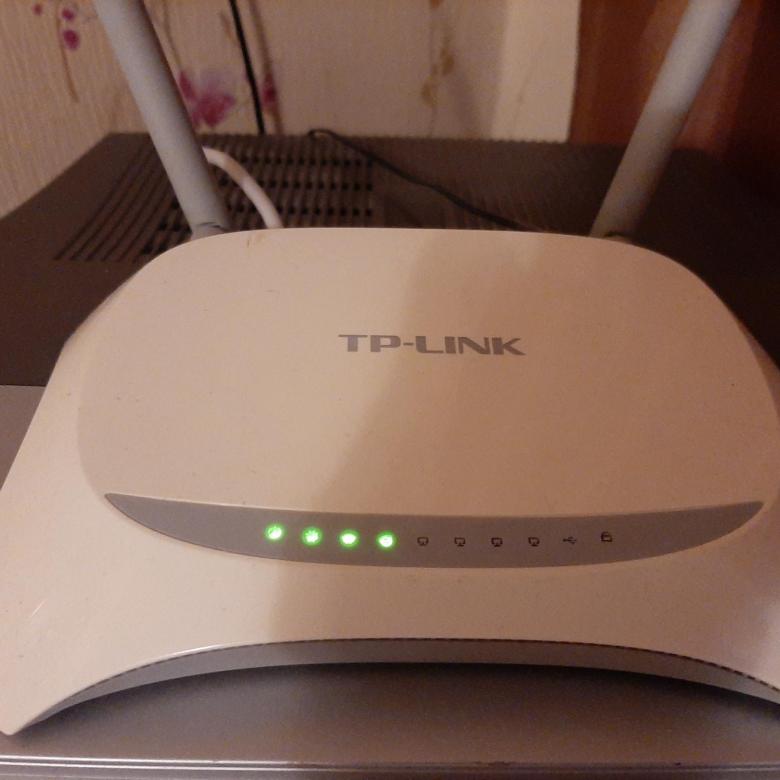
Маршрутизатор должен быть подключен к вилке и включаться кнопкой «Питание». Если все будет правильно, загорится индикатор питания.
Маршрутизатор подключается к компьютеру с помощью сетевого кабеля. Проверьте, правильно ли это выполнено, и обратите внимание на состояние кабеля — возможно, он был поврежден при подключении или неправильно соединен с вилкой, возможно был перекручен или имеет перерывы или порезы. Если это так, его следует заменить новым кабелем. Чтобы убедиться, что с кабелем нет проблем, просто подключите маршрутизатор к системе с помощью другого кабеля.
После подключения кабеля один из индикаторов LAN маршрутизатора должен загореться, обычно это зеленый или желтый свет. Он может гореть непрерывно или часто мигать.
Подключение должно быть распознано компьютером. («Рабочий стол → Сетевое подключение → Центр управления данными») для Windows, вы также можете проверить это с помощью Центра уведомлений, он расположен справа.
HTML верстка и анализ содержания сайта
Размещённая в данном блоке информация используется оптимизаторами для контроля наполнения контентом главной страницы сайта, количества ссылок, фреймов, графических элементов, объёма теста, определения «тошноты» страницы.
Отчёт содержит анализ использования Flash-элементов, позволяет контролировать использование на сайте разметки (микроформатов и Doctype).
IFrame – это плавающие фреймы, которые находится внутри обычного документа, они позволяет загружать в область заданных размеров любые другие независимые документы.
Flash — это мультимедийная платформа компании для создания веб-приложений или мультимедийных презентаций. Широко используется для создания рекламных баннеров, анимации, игр, а также воспроизведения на веб-страницах видео- и аудиозаписей.
Микроформат — это способ семантической разметки сведений о разнообразных сущностях (событиях, организациях, людях, товарах и так далее) на веб-страницах с использованием стандартных элементов языка HTML (или XHTML).
Входим в веб интерфейс
Подключение к роутеру и последующий вход в настройки выполняются по-разному, в соответствии с выбранным типом интернет-соединения.
По Wi-Fi
Для сопряжения по Wi-Fi потребуется мобильное устройство с исправным Wi-Fi-приемником.
Инструкция:
- Запустить роутер, перевернуть и найти на нем наклейку. На ней размещен ключ (SSID) и пароль к сети.
- Активировать поиск Wi-Fi на телефоне, найти сеть, подключиться, ввести код доступа.
- Открыть браузер.
- Зайти в роутер по адресу: https://192.168.0.1.
В окне входа заполнить имя пользователя и внести пароль. Чаще всего на заводе-производителе устанавливаются значения «admin» и «admin».
По проводу
Порядок действий по подключению роутера кабелем:
- Включить маршрутизатор, дождаться, когда начнут светиться индикаторы.
- Кабелем Ethernet соединить разъемы LAN роутера и сетевой карты ноутбука или системного блока компьютера.
- Подождать, пока операционная система сформирует локальное подключение. До этого момента в трее видна иконка с изображением монитора с крестиком.
- После установки соединения запустить браузер Google, Microsoft Edge или иной и ввести адрес входа 192.168.0.1.
- На экране отобразится окно ввода данных для доступа в личный кабинет. На заводе-производителе устанавливаются значения «admin» и «admin», реже – другие кодовые слова.
Инструкции по подключению и использованию этого IP-адреса актуальны для техники любого производителя, будь то Tenda, TP-Link или Zyxel.
Если после этих действий на экране отображается уведомление о том, что страница недоступна, это говорит об ошибке.
Update your Netgear Router Firmware steps:
It’s possible that the firmware for your Netgear router has been outdated and you forgot to perform maintenance or upgrade your software on the wireless router.
- Login through your web browser by entering http://www.routerlogin.net from your device which is connected to the network.Note: it is recommended to use an Ethernet cable to connect your computer to your router for upgrading the firmware.
- Enter your Default user name and your password; admin & password.
- Go to the router settings, Click on ADVANCED > Administration.
- Then select and click Firmware Update or Router Update.
- Click on Check, This asks the router to search for new firmware information. If any update is available, it then displays a message enquiring if you want to download and install it.
- Click on Yes button and the router downloads the firmware and begins the new update.
- After the completion of the upload, your router will restart and your router firmware has been finally updated.
How to setup Dynamic DNS in your Netgear AX6000 8 stream router?
The IP address is a group of digits that your Internet Service Provider provides to identify the Internet account, a user is signed with. Most of the users use a dynamic IP address which means that their IP address can be changed at any time. Most people don’t know when their IP address changes or what it is, because of this inconvenience, they won’t be able to access their network remotely.
To solve the above problem, Experts came with the smart solution according to which the user has to set up a DNS service account, that will let the user know about the IP address which is going to be used as a domain to access the home network. The user must set up his DNS account to get notified about the IP address that got changed. When you log in to your DNS account, the service automatically finds the IP address your device is using and connect you to its network.
- Open a browser on your device connect to your Wi-Fi. Before performing the process, make sure of one thing that your device should have a wired connection to the Internet.
- Now to get to the default gateway of your router, you need to type the LAN IP address on the address bar of your browser. You can also mention www.routerlogin.net, in case the previous one wouldn’t work.
- Type the username as well as password on both the credentials of the Netgear Router login page. Mention “admin” as the default username and type the password you assigned to your router during the Netgear Router setup. If you haven’t change the default password yet then type “password” as a default password of your login page.
- Bring your cursor to the “Advanced” tab, then click on USB functions and click on Read Share storage tab. Page of USB storage displays on your screen.
- Select the FTP checkbox to enable Dynamic DNS service.
- Click on the Apply button and the settings you made will get saved.
- You also can limit the access of the admin user. You need to select the device in Available Network Folder’s section. If there is a single device connection, it will automatically get selected.
- Click on the Edit option, Edit page will get displayed on your screen.
- Select admin 10 option in Reading Access menu and select admin 11 in the writing access menu.
- Once you are done with the above settings, click on the Apply button and your settings will get saved.
Wifi Radio Configuration for Netgear Wireless Router Setup
Netgear WiFi routers can serve you with high speed internet connections for each and every corner of your house and best thing is that you will receive complete user manual for with your Netgear Wifi router. Using this manual you will able to configure all advance settings for your Netgear WiFi router. In this article we are going to explain the steps you will need to follow so that you can configure the Wifi radio configurations for your wireless routers setup.
Here are the Steps you will Need to Follow
- Using the web browser at your computer system you will need to access Netgear Router login page. In the address bar you will need to fill routerlogin.net setup web address.
- Hit the enter key and you will need to fill the login user name and password for your device.
- If you are accessing Netgear router for the first time then you can fill the default login details for your router.
- Default user name is “admin” and password is “password” for Netgear router login page.
- After successful login for your Netgear router setup you will need to go for “Advanced” option.
- Under “Advanced Setup” option go for “Wireless Settings”.
- Here you can easily enable or disable the router radio option.
- At last you will need to click on “Apply” button and save all the settings you have made.
These are the simple step you can follow and manage the router radio for your Netgear router. Following is the list of issues we have discussed in this website.
routerlogin.net | Netgear router login | www.routerlogin.net
routerlogin net | http //routerlogin.net | 192.168.1.1 Netgear setup
http //www.routerlogin.net setup | www.routerlogin.net login | www.routerlogin.net admin
www routerlogin.net | routerlogin.net 192.168.0.1 | Netgear router setup sign in
log into Netgear router | arlo.netgear.com | 192.168.1 Netgear router setup
Netgear router setup | www routerlogin net setup | routerlogin net start
http www routerlogin net | router Netgear login setup