Настройка wi-fi роутера tp-link tl-wr842nd
Содержание:
- Подключение компьютера для установки роутера TP-Link 842ND
- To Upgrade
- Настройка WAN для установки подключения TP-Link 842ND к интернету
- Open Source Code For Programmers (GPL)
- To Upgrade
- To Upgrade
- Настройка Wi-Fi и установка пароля на TP-LINK TL-WR842ND
- To Upgrade
- Подключение TP-LINK 842ND к компьютеру по кабелю или WiFi
- Open Source Code For Programmers (GPL)
- Back to stock firmware
- Open Source Code For Programmers (GPL)
- To Upgrade
- Внешний вид и комплектация маршрутизатора TP-LINK WR842ND
- To Upgrade
- Поиск прошивки
- Unbrick WR842ND V2.x
- Процедура прошивки
- TP-LINK TL-WR842ND: настройка интернета (WAN)
- Подготовка маршрутизатора к работе
Подключение компьютера для установки роутера TP-Link 842ND
Поскольку раньше у нас интернет шел напрямую на компьютер, если у вас тип подключения «Статический IP», то на нем тоже остались настройки, которые будут мешать подключению к роутеру. Посмотреть это можно в разделе «Панели управления» Windows — «Центр управления сетями — Изменение параметров адаптера». Заходим в «Свойства» подключения по локальной сети и выбираем «Подключение к интернету TCP-IP версии 4». Указанные там данные понадобятся при последующей настройке маршрутизатора, поэтому перед их очисткой переписываем в блокнот.
После чего ставим все флажки на «Автоматическое получение» и сохраняем.

To Upgrade
IMPORTANT: To prevent upgrade failures, please read the following before proceeding with the upgrade process
- Please upgrade firmware from the local TP-Link official website of the purchase location for your TP-Link device, otherwise it will be against the warranty. Please click here to change site if necessary.
- Please verify the hardware version of your device for the firmware version. Wrong firmware upgrade may damage your device and void the warranty. (Normally V1.x=V1)How to find the hardware version on a TP-Link device?
- Do NOT turn off the power during the upgrade process, as it may cause permanent damage to the product.
- To avoid wireless disconnect issue during firmware upgrade process, it’s recommended to upload firmware with wired connection unless there is no LAN/Ethernet port on your TP-Link device.
- It’s recommended that users stop all Internet applications on the computer, or simply disconnect Internet line from the device before the upgrade.
- Use decompression software such as WinZIP or WinRAR to extract the file you download before the upgrade.
| TL-WR842ND(UN)_V2_150514 | ||
|---|---|---|
| Published Date: 2015-09-06 | Language: English | File Size: 4.94 MB |
|
| TL-WR842ND_V2_130628 | ||
|---|---|---|
| Published Date: 2013-06-28 | Language: English | File Size: 5.25 MB |
|
Настройка WAN для установки подключения TP-Link 842ND к интернету
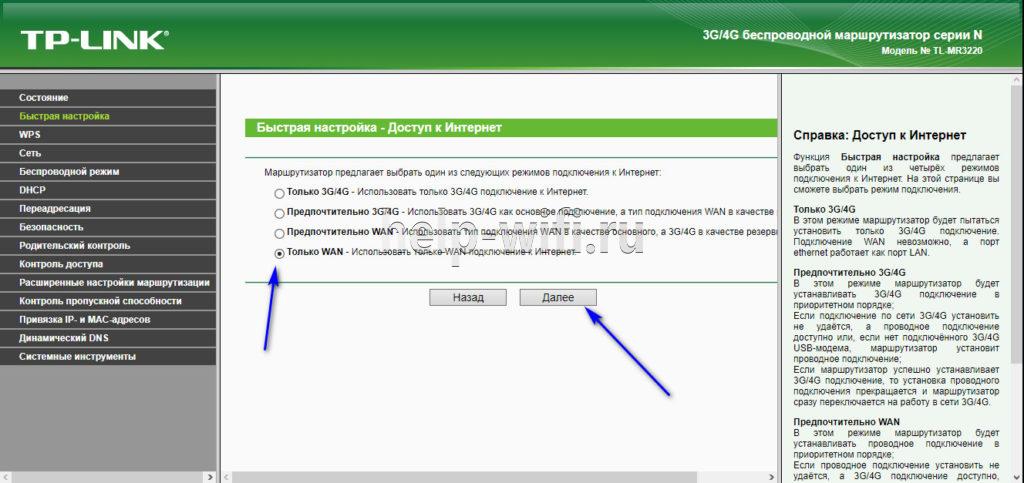
На первом этапе производится установка связи с интернетом. В TP-Link TL-WR84 реализовано очень удобно, поскольку конфигурации для всех провайдеров уже имеются в прошивке. Нам нужно только выбрать:
- Страну
- Город
- Поставщика Интернет-услуг
- Тип подключения — если у одного и того же провайдера их несколько, то вам нужно посмотреть свой договор.

Если же в списке вашего провайдера нет, то ставим флажок на «Я не нашел подходящих настроек» и жмем «Далее»
Здесь нужно будет вручную выбрать тип подключения WAN, то есть к Интернету — Статический или Динамический IP, PPPoE, L2TP, PPTP. И далее прописать те параметры, которые требует ваш оператор. Для Статического указываем те самые параметры, которые я в самом начале просил переписать и сохранить с компьютера.

L2TP
Например, для подключения роутера TP-Link к Билайн, выбираем L2TP, и прописываем логин, пароль и адрес хоста для подключения.

Для Ростелеком — PPPoE, в котором требуется ввести только логин и пароль.

Есть также вариант статического IP, в котором настраивается ip, маска и шлюз — все это выдает провайдер.

Динамический IP
Если же динамический, то ничего дополнительно вводить не нужно — можно сразу после этого перейти к настройке wifi на маршрутизаторе.
Далее при необходимости клонируем MAC адрес с компьютера — в принципе, это необходимо не всегда и тоже зависит от провайдера, но можно и скопировать, чтобы не задаваться лишними вопросами.

Open Source Code For Programmers (GPL)
Please note: The products of TP-Link partly contain software code developed by third parties, including software code subject to the GNU General Public Licence (“GPL“), Version 1/Version 2/Version 3 or GNU Lesser General Public License («LGPL»). You may use the respective software condition to following the GPL licence terms.
You can review, print and download the respective GPL licence terms here. You receive the GPL source codes of the respective software used in TP-Link products for direct download and further information, including a list of TP-Link software that contain GPL software code under GPL Code Center.
To Upgrade
IMPORTANT: To prevent upgrade failures, please read the following before proceeding with the upgrade process
- Please upgrade firmware from the local TP-Link official website of the purchase location for your TP-Link device, otherwise it will be against the warranty. Please click here to change site if necessary.
- Please verify the hardware version of your device for the firmware version. Wrong firmware upgrade may damage your device and void the warranty. (Normally V1.x=V1)How to find the hardware version on a TP-Link device?
- Do NOT turn off the power during the upgrade process, as it may cause permanent damage to the product.
- To avoid wireless disconnect issue during firmware upgrade process, it’s recommended to upload firmware with wired connection unless there is no LAN/Ethernet port on your TP-Link device.
- It’s recommended that users stop all Internet applications on the computer, or simply disconnect Internet line from the device before the upgrade.
- Use decompression software such as WinZIP or WinRAR to extract the file you download before the upgrade.
| TL-WR842ND(UN)_V2_150514 | ||
|---|---|---|
| Published Date: 2015-09-06 | Language: English | File Size: 4.94 MB |
|
| TL-WR842ND_V2_130628 | ||
|---|---|---|
| Published Date: 2013-06-28 | Language: English | File Size: 5.25 MB |
|
Настройка Wi-Fi и установка пароля на TP-LINK TL-WR842ND
Значит, интернет мы настроили. Нужно еще сменить название Wi-Fi сети, если вас не устраивает стандартное, и установить хороший пароль на Wi-Fi. Сделать это можно в настройках, на вкладке Wireless (Беспроводной режим).
Здесь, мы в поле SSID1 (Имя беспроводной сети) придумываем и записываем название для нашей беспроводный сети.
Я в начале статьи писал, что этот роутер может раздавать до 4 Wi-Fi сетей. И все эти сети будут с разными именами и паролями. Если вам нужно сделать более одной беспроводной сети, то установите галочку напротив SSID2, SSID3 и т. д. И если нужно, то смените их название.
Дальше, выберите свой регион, где вы живете, и нажмите на кнопку Save (Сохранить).

Для установки пароля на Wi-Fi перейдите на вкладку Wireless – Wireless Security (Беспроводной режим — Защита беспроводного режима).
На этой странице первым делом включаем тип защиты «WPA-PSK/WPA2-PSK». Напротив Version (Версия) выбираем WPA2-PSK. И в поле PSK Password (Пароль PSK) придумываем и записываем пароль, который будет использоваться для подключения к нашему Wi-Fi. Пароль должен быть минимум из 8-ми символов.

Не забудьте сохранить настройки нажав на кнопку Save.
Смена пароля входа в настройки (admin)
Интернет и беспроводную сеть мы уже настроили. Я рекомендую еще сменить стандартный пароль admin, который нужно вводить при входе в настройки вашего роутера. Это нужно для того, что бы защитить настройки маршрутизатора. Ведь к ним будут иметь доступ все, кто подключится к роутеру по Wi-Fi.
Перейдите на вкладку System Tools – Password (Системные инструменты – Пароль). Укажите там старое имя пользователя и пароль (по умолчанию: admin и admin). И задайте новое имя пользователя и два раза укажите новый пароль.

Сохраните изменения нажав на кнопку Save. Если вы после настройки еще не перезагружали роутер, то перезагрузите. Сделать это можно на вкладке «System Tools» – «Reboot» (Системные инструменты – Перезагрузка). Нажав на кнопку «Reboot». Можно просто отключить и включить питание.
На этом настройка маршрутизатора TL-WR842ND (TL-WR842ND(RU)) закончена. Мы задали только основные настройки, которых достаточно для работы роутера. Постарайтесь не забыть пароль от Wi-Fi сети, и от настроек маршрутизатора. Желательно, записать их где-то.
192
Сергей
TP-Link
To Upgrade
IMPORTANT: To prevent upgrade failures, please read the following before proceeding with the upgrade process
- Please upgrade firmware from the local TP-Link official website of the purchase location for your TP-Link device, otherwise it will be against the warranty. Please click here to change site if necessary.
- Please verify the hardware version of your device for the firmware version. Wrong firmware upgrade may damage your device and void the warranty. (Normally V1.x=V1)How to find the hardware version on a TP-Link device?
- Do NOT turn off the power during the upgrade process, as it may cause permanent damage to the product.
- To avoid wireless disconnect issue during firmware upgrade process, it’s recommended to upload firmware with wired connection unless there is no LAN/Ethernet port on your TP-Link device.
- It’s recommended that users stop all Internet applications on the computer, or simply disconnect Internet line from the device before the upgrade.
- Use decompression software such as WinZIP or WinRAR to extract the file you download before the upgrade.
| TL-WR842ND(UN)_V2_150514 | ||
|---|---|---|
| Published Date: 2015-09-06 | Language: English | File Size: 4.94 MB |
|
| TL-WR842ND_V2_130628 | ||
|---|---|---|
| Published Date: 2013-06-28 | Language: English | File Size: 5.25 MB |
|
Подключение TP-LINK 842ND к компьютеру по кабелю или WiFi
Пришло время подключить к компьютеру wifi роутер TP-LINK TL-WR842ND. Я рекомендую настраивать по кабелю, хотя есть возможность выполнить все настройки сразу по WiFi
Обратите внимание, в комплект к любому маршрутизатору TP-Link всегда кладут сетевой кабель Ethernet, именно его нужно использовать для связи с компьютером или ноутбуком
Итак, вставляем кабель интернета в синий порт WAN, а в один из желтых подключаем прилагающийся патчкорд к компьютеру в его сетевой разъем на задней части корпуса.
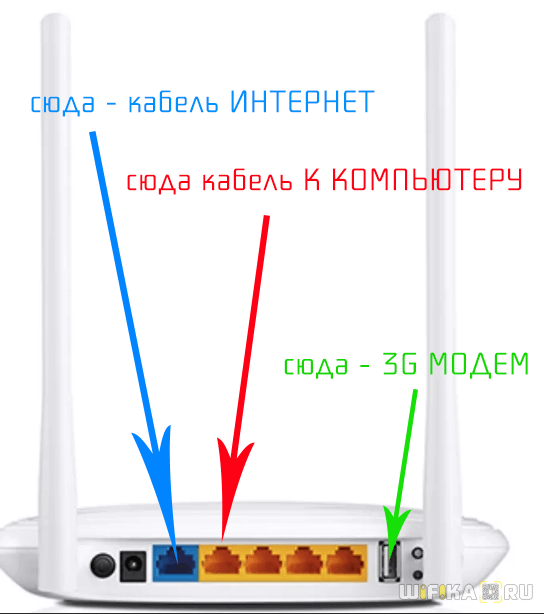
Втыкаем шнур питания в сеть и включаем роутер кнопкой на задней панели. Если маршрутизатор мигнет светодиодами, значит он включился и можно начинать настройку.
Поскольку в данном маршрутизаторе имеется USB порт, мы можем использовать для подключения к интернету мобильный модем. Если хотите задействовать именно этот тип, то кабель в WAN разъем вставлять не надо, а вместо этого вставляем в USB 3g/4g модем.
Кстати, данный порт можно использовать также для подключения принтера или флешки — этим темам посвящены отдельные статьи на нашем сайте.
Open Source Code For Programmers (GPL)
Please note: The products of TP-Link partly contain software code developed by third parties, including software code subject to the GNU General Public Licence (“GPL“), Version 1/Version 2/Version 3 or GNU Lesser General Public License («LGPL»). You may use the respective software condition to following the GPL licence terms.
You can review, print and download the respective GPL licence terms here. You receive the GPL source codes of the respective software used in TP-Link products for direct download and further information, including a list of TP-Link software that contain GPL software code under GPL Code Center.
Back to stock firmware
→ generic.uninstall
Warning!
This section describes actions that might damage your device or firmware. Proceed with care!
With the TL-WR842ND router, there is a catch: the stock firmware is obtained from the OEM: http://www.tplink.com/en/support/download/?model=TL-WR842ND
- in case the file name of this firmware file does not contain the word “boot” in it, you can simply revert back to original firmware
- in case the file name of this firmware file does contain the word “boot” in it, you need to cut off parts of the image file before flashing it:
The following method applies for the V1, V2, V3(EU) and V5(RU) since the bootloader is the same size.
An example of an image file with the word “boot” in it is .
Cut the first 0x20200 (that is 131,584 = 257*512) Bytes from original firmware:
dd if=orig.bin of=tplink.bin skip=257 bs=512
You should transfer the firmeware image to the /tmp folder and revert back to original firmware (if availlable you can flash the firmware via the webinterface as well):
Via the safer method using sysupgrade:
sysupgrade /tmp/tplink.bin
Or you use the mtd method:
mtd -r write /tmp/tplink.bin firmware
It is also possible to revert to the stock firmware using the method with tftp described in “recovery”. (you still need the firmware image without the boot part).
OEM TP-Link firmware for the TL-WR842ND with the boot part removed to revert to the original OEM firmware:
-
TL-WR842ND V1 TL-WR842ND-V1-stripped.zip
-
TL-WR842ND V2 TL-WR842ND-V2-stripped.zip
Open Source Code For Programmers (GPL)
Please note: The products of TP-Link partly contain software code developed by third parties, including software code subject to the GNU General Public Licence (“GPL“), Version 1/Version 2/Version 3 or GNU Lesser General Public License («LGPL»). You may use the respective software condition to following the GPL licence terms.
You can review, print and download the respective GPL licence terms here. You receive the GPL source codes of the respective software used in TP-Link products for direct download and further information, including a list of TP-Link software that contain GPL software code under GPL Code Center.
To Upgrade
IMPORTANT: To prevent upgrade failures, please read the following before proceeding with the upgrade process
- Please upgrade firmware from the local TP-Link official website of the purchase location for your TP-Link device, otherwise it will be against the warranty. Please click here to change site if necessary.
- Please verify the hardware version of your device for the firmware version. Wrong firmware upgrade may damage your device and void the warranty. (Normally V1.x=V1)How to find the hardware version on a TP-Link device?
- Do NOT turn off the power during the upgrade process, as it may cause permanent damage to the product.
- To avoid wireless disconnect issue during firmware upgrade process, it’s recommended to upload firmware with wired connection unless there is no LAN/Ethernet port on your TP-Link device.
- It’s recommended that users stop all Internet applications on the computer, or simply disconnect Internet line from the device before the upgrade.
- Use decompression software such as WinZIP or WinRAR to extract the file you download before the upgrade.
| TL-WR842ND(UN)_V2_150514 | ||
|---|---|---|
| Published Date: 2015-09-06 | Language: English | File Size: 4.94 MB |
|
| TL-WR842ND_V2_130628 | ||
|---|---|---|
| Published Date: 2013-06-28 | Language: English | File Size: 5.25 MB |
|
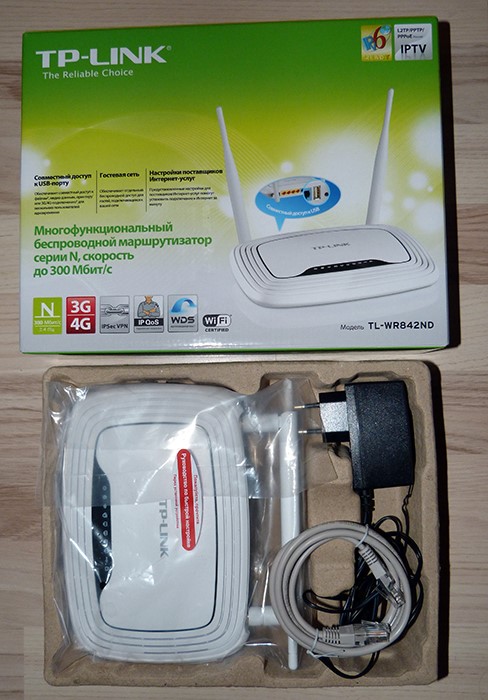
Внешний вид и комплектация маршрутизатора TP-LINK WR842ND
Комплект поставки стандартный:
По внешнему виду роутер TL-WR842ND (RU) мало чем отличается от своих собратьев — это небольшой закругленной формы корпус с двумя антеннами, мощность которых равна 5 децибелам.
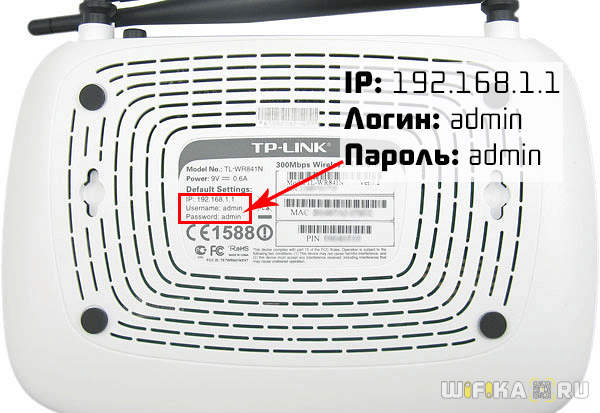
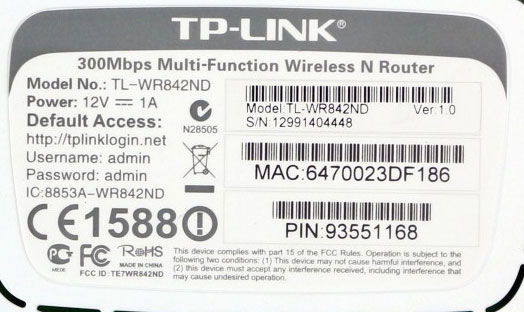
На днище корпуса имеется наклейка с информацией о версии прошивки и данными для доступа в админку — адрес, логин и пароль.
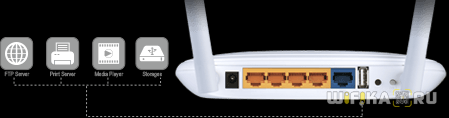
На задней панели тоже все, как всегда — 4 желтых порта LAN для подключения устройств и синий порт WAN для подключения кабеля интернета не дадут шансов новичку перепутать, куда вставляется интернет-кабель, а куда подключается ПК. Также имеется USB порт для флешек, принтера и мобильных модемов и есть кнопка WPS для быстрого автоматического подключения к нему устройств, совмещенная с функцией сброса настроек.
Отдельно вынесена кнопка для отключения WiFi — удобно, если вы хотите его задействовать как чисто кабельный маршрутизатор.
To Upgrade
IMPORTANT: To prevent upgrade failures, please read the following before proceeding with the upgrade process
- Please upgrade firmware from the local TP-Link official website of the purchase location for your TP-Link device, otherwise it will be against the warranty. Please click here to change site if necessary.
- Please verify the hardware version of your device for the firmware version. Wrong firmware upgrade may damage your device and void the warranty. (Normally V1.x=V1)How to find the hardware version on a TP-Link device?
- Do NOT turn off the power during the upgrade process, as it may cause permanent damage to the product.
- To avoid wireless disconnect issue during firmware upgrade process, it’s recommended to upload firmware with wired connection unless there is no LAN/Ethernet port on your TP-Link device.
- It’s recommended that users stop all Internet applications on the computer, or simply disconnect Internet line from the device before the upgrade.
- Use decompression software such as WinZIP or WinRAR to extract the file you download before the upgrade.
| TL-WR842ND_V1_130322 | ||
|---|---|---|
| Published Date: 2013-03-22 | Language: English | File Size: 5.35 MB |
|
| TL-WR842ND_V1_130110 | ||
|---|---|---|
| Published Date: 2013-01-30 | Language: English | File Size: 5.56 MB |
|
| TL-WR842ND_V1_120424 | ||
|---|---|---|
| Published Date: 2012-05-04 | Language: English | File Size: 5.61 MB |
|
Поиск прошивки
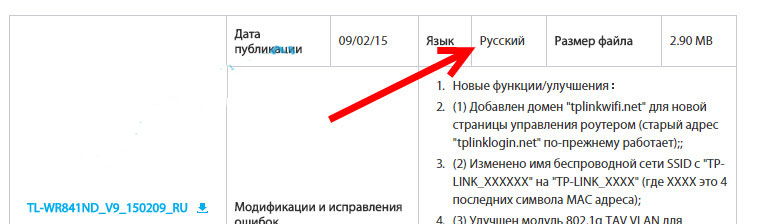
Существует несколько правил, без знания которых прошивка TP-LINK TL-WR842ND невозможна. Итак, никогда не качайте файлы обновления со сторонних сайтов, используйте исключительно официальные ресурсы фирмы-производителя. В нашем случае это сайт TP-LINK.
Также важно понимать, какая аппаратная версия TP-LINK TL-WR842ND у вас на руках. Узнать это можно, перевернув изделие и изучив наклейку на нём
При использовании файлов, предназначенных для других версий, могут возникнуть проблемы с работоспособностью устройства. Если на этикетке написано ver 6.1, то вам следует качать прошивку для шестой версии маршрутизатора.
Узнав точное название модели, перейдите на сайт девелопера и впишите её название в строке поиска. Далее, следуйте в пункт «Загрузки» — «ПО». Именно здесь хранятся материалы, разработанные для вашего роутера. Осталось перейти во «Встроенное ПО» и выбрать самый свежий вариант микропрограммы. Новые файлы расположены вверху списка. В каждом блоке с прошивкой есть информация о дате публикации, особенностях программы, ОС, для которой она предназначена, язык микропрограммы.
Unbrick WR842ND V2.x
Once you are connected via serial cable to router you will see this prompt
wasp>
Then type “printenv” to see environment variables:
wasp> printenv
bootargs=console=ttyS0,115200 root=31:02 rootfstype=squashfs init=/sbin/init mtdparts=ath-nor0:128k(u-boot),1024k(kernel),6912k(rootfs),64k(config),64k(art)
bootcmd=bootm 0x9f020000
bootdelay=1
baudrate=115200
ethaddr=0xba:0xbe:0xfa:0xce:0x08:0x41
ipaddr=192.168.1.111
serverip=192.168.1.100
dir=
bc=ap123
lu=tftp 0x81000000 ${dir}u-boot.bin&&erase 0x9f000000 +$filesize;cp.b $fileaddr 0x9f000000 $filesize
lf=tftp 0x81000000 ${dir}${bc}-squashfs&&erase 0x9f120000 +$filesize;cp.b $fileaddr 0x9f120000 $filesize
stdin=serial
stdout=serial
stderr=serial
ethact=eth0
wasp> setenv serverip <TFTP server IP>
wasp> setenv ipaddr <Temp IP address on my network>
wasp> tftpboot 0x80000000 openwrt-15.05-ar71xx-generic-tl-wr842n-v2-squashfs-factory.bin
done
Bytes transferred = 8126464 (7c0000 hex)
Note the hex value in brackets — “(7c0000 hex)”. If you get different value use your value in lines below, otherwise you may irreversibly brick your device.
wasp> erase 0x9f020000 +0x7c0000
wasp> cp.b 0x80000000 0x9f020000 0x7c0000
wasp> bootm 0x9f020000
Flash/Recovery (v5)
Using the integrated tftp capability of the router.
- Turn off the router.
- Connect pc to one of the router LAN ports.
- Set your PC IPv4 address to .
- Run any TFTP server on the PC.
-
Put the recovery firmware on the root directory of TFTP server and name the file
-
Start the router by pressing power button while holding the WPS/Reset button (or both WPS/Reset and WIFI buttons)
- Router connects to your PC with IPv4 address , downloads the firmware, installs it and reboots. LEDs are flashing. Now you have OpenWrt installed.
- Change your IPv4 PC address to something in network or use DHCP to get an address from your OpenWrt router.
- Done! You can login to your router via ssh.
Процедура прошивки
Обновлять программу для TP-LINK TL-WR842ND можно, только подсоединив прибор через кабель к ПК, в противном случае вы можете навсегда потерять работоспособное устройство. Также не советуем отключать маршрутизатор в процессе обновления.
Важный момент: если есть Wi-Fi на компьютере, отключите его. Не забудьте вытянуть провод фирмы-провайдера из WAN-гнезда устройства на время прошивки.
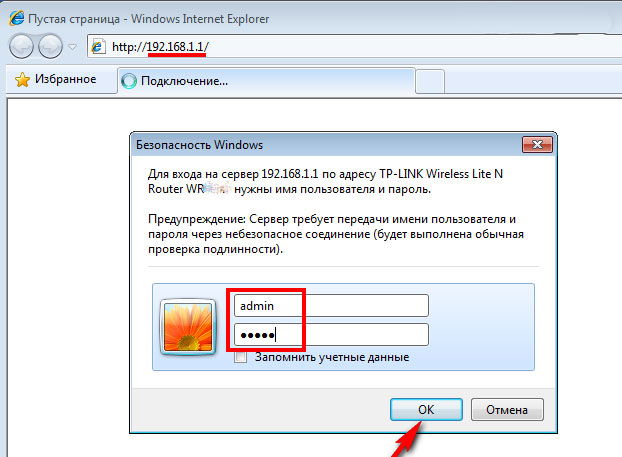
Чтобы быстро возобновить конфигурацию маршрутизатора TP-LINK TL-WR842ND, сохраните существующие настройки, воспользовавшись интерфейсом. Как в него попасть? Впишите в браузере 192.168.1.1. Данные admin/admin являются стандартными и подходят при авторизации для нового оборудования.
Настройки можно сохранить в пункте Backup & Restore в меню системных инструментов. Система предложит сохранить файл config.bin на вашем ПК. После выполнения прошивки через этот же пункт меню конфигурацию можно восстановить.

Итак, порядок действий при обновлении TP-LINK TL-WR842ND выглядит следующим образом:
- распакуйте скачанный с сайта TP-Link архив;
- перейдите в пункт Firmware Upgrade в меню интерфейса;
- пропишите путь к микропрограмме, нажав клавишу «Обзор»;
- запустите процесс обновления.

Процедура занимает определённое время, не трогайте ничего и не выключайте маршрутизатор. После того как закончится процедура, TP-LINK TL-WR842ND перезагрузится без посторонней помощи.

Теперь войдите в интерфейс, воспользовавшись стандартными данными, и загрузите ранее сохранённый файл конфигурации. Всё готово для проверки функциональности прошивки.
Интересно, что специалисты неоднозначно относятся к самым свежим прошивкам. Бывает так, что новое обновление ещё не апробировано на 100%, потому некоторые опции в нём работают не так, как задумывалось. Если после прошивки TP-LINK TL-WR842ND у вас возникли какие-либо трудности (невозможно подключиться к беспроводной сети, внезапно обрывается соединение, сеть есть, но при этом попасть во всемирную паутину не удаётся), рекомендуем скачать более старую программу обновления и установить её. Такое решение обычно помогает наладить работу маршрутизатора.
Как видим, прошить устройство TL-WR842ND не так уж трудно, главное, чётко придерживаться инструкций, представленных здесь. Надеемся, эти рекомендации помогли вам эффективно настроить свой роутер.
TP-LINK TL-WR842ND: настройка интернета (WAN)
Первым делом, нам нужно настроить интернет. Что бы роутер смог подключаться к провайдеру, и раздавать интернет на ваши устройства
Это очень важно. Если роутер не сможет подключится к провайдеру, то на ваших устройствах, которые вы подключите по кабелю, или по беспроводной сети, интернет работать не будет
Подключение будет со статусом «Без доступа к интернету». Получается, что Wi-Fi маршрутизатор раздавать будет, а доступа в интернет не будет.
Перед настройкой вы обязательно должны узнать, какой тип соединения использует ваш провайдер. И если это PPPoE, L2TP, или PPTP, то так же нужно узнать имя пользователя, пароль, и в некоторых случаях еще адрес сервера. Всю эту информацию можно узнать у интернет-провайдера, или в документах, которые вам выдали при подключении.
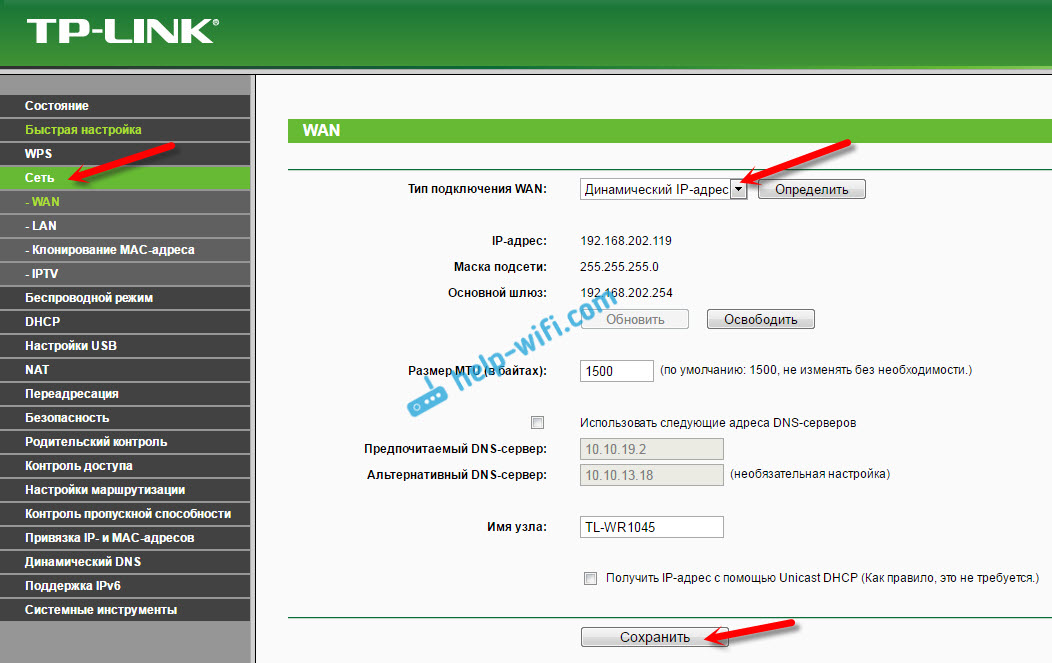
Настройка подключения Динамический IP
Если провайдер предоставляет вам интернет по технологии Динамический IP, то настраивать практически ничего не нужно. Интернет скорее всего заработает сразу после подключения. Но, давайте проверим.
На роутерах TP-LINK, настройки подключения к провайдеру можно изменить на вкладке Network (Сеть) – WAN. Тип подключения выбираем в выпадающем меню WAN Connection Type (Тип подключения WAN). Соответственно, если у нас подключение Динамический IP, то выбираем эту технологию, и сохраняем настройки.

Если интернет не заработает, то может быть, что провайдер использует привязку по MAC-адресу. В таком случае, смотрите статью как клонировать (сменить) MAC-адрес роутера.
Настройка других подключений:
Если у вас провайдер использует тип соединения PPPoE, то выбираем соответствующие соединение, затем указываем имя пользователя и пароль, который выдает провайдер. Дальше, выбираем пункт «Connect Automatically» (Подключить автоматически).
Нажимаем на кнопку Connect (Подключить), роутер должен подключиться к интернету. И интернет уже должен работать на устройстве, с которого вы настраиваете. Для сохранения настроек нажимаем Save (Сохранить).

Здесь все точно так же. Выбираем соответствующий тип соединения, задаем имя пользователя, пароль, и IP-адрес/имя сервера (эту информацию выдает провайдер). Затем, ставим переключатель возле пункта «Connect Automatically» (Подключить автоматически).
Нажимаем на кнопку Save, и перезагружаем роутер. Либо, нажимаем на кнопку Connect (Подключить), что бы проверить, подключится ли маршрутизатор к интернету.

Многие после установки маршрутизатора запускают на компьютере соединение с провайдером (высокоскоростное). И получается так, что интернет через роутер работает до той поры, пока подключение запущено на компьютере. Выключаем компьютер, интернет через роутер не работает.
После установки роутера, на компьютере не нужны никакие соединения. Роутер будет подключаться к провайдеру сам, его нужно только настроить. Если возникнут какие-то проблемы с настройкой на этом этапе, то вам поможет статья: при настройке роутера пишет «Без доступа к интернету», или «Ограничено».
Только после того, как интернет через роутер заработает, можно продолжать настройку нашего TP-LINK TL-WR842ND.
Подготовка маршрутизатора к работе
Перед непосредственно настройкой роутер следует надлежащим образом подготовить. Процедура включает в себя несколько этапов.
- Начинать следует с размещения устройства. Лучшим решением будет расположить девайс приблизительно в центре зоны предполагаемого использования, чтобы добиться максимального покрытия. Следует также иметь в виду наличие на пути сигнала металлических преград, из-за которых приём сети может оказаться нестабильным. Если вы часто используете Bluetooth-периферию (геймпады, клавиатуры, мыши и т. п.), то роутер нужно разместить подальше от них, поскольку частоты Wi-Fi и Bluetooth могут перекрывать друг друга.
- После размещения устройство нужно подключить к питанию и сетевому кабелю, а также соединить его с компьютером. Все основные разъёмы расположены на тыльной стороне роутера и промаркированы разным цветом для удобства пользователей.

Далее перейдите к компьютеру и откройте свойства сетевого подключения. У подавляющего большинства интернет-провайдеров действует автоматическая раздача IP-адресов и такого же типа адрес DNS-сервера – установите соответствующие настройки, если они не активны по умолчанию.
Подробнее:
На этом этап подготовки окончен и можно переходить к собственно настройке TL-WR842ND.