Как сделать прелоадер
Содержание:
- Default Loaders
- Reviews
- How To Create a Loader
- Initial server response time
- Удалите неиспользуемый код CSS
- Как сделать прелоадер для landing page
- Журнал изменений
- Work with GIF and SVG files
- Прелоадер в виде анимированной svg иконки
- Reviews
- Examples
- Устраните ресурсы, блокирующие отображение
- Examples
- Description
- Processing
- How to use it:
- Changelog
- Privacy and Security
Default Loaders
As listed above, Loading.css ships with 7 pure css shapes so you don’t have to craft loaders by yourself. To use those shapes, just add CSS class of the desired shape along with an additional class to a element. For example, adding to a :
<div class=»ld ld-hourglass«></div>
You can customize its appearence by tweaking css styles and . For example, here is a big green hourglass:
<div class=»ld ld-hourglass»
style=»font-size:64px;color:#8da«>
</div>
And of course we want to animate it, with loading.css’s animation classes:
<div class=»ld ld-hourglass ld-spin-fast»
style=»font-size:64px;color:#8da»>
</div>
Reviews
http-equiv=»Content-Type» content=»text/html;charset=UTF-8″>lass=»plugin-reviews»>
After save, first is loaded the website, than in flash is loaded the preloader, which have 50% transparency and than never go away the preloading screen. Useless…
This plugin was a waste of time. It does not work correctly. The preloader appears after the page is loaded :S The use of a preloader image is a bad idea use an icon or svg instead…
It is easy to use and allows you to choose load image.
It really is the best app for what it offers, it’s strange how it doesn’t have many reviews. Keep up the great work!
Great plugin and Excellent job!
Simple plugin very easy to use! Excellent job!
It is just what I was looking for.
Thank you very much!
How To Create a Loader
Step 1) Add HTML:
Example
<div class=»loader»></div>
Step 2) Add CSS:
Example
.loader { border: 16px solid #f3f3f3; /* Light grey */
border-top: 16px solid #3498db; /* Blue */ border-radius: 50%;
width: 120px; height: 120px; animation:
spin 2s linear infinite;}@keyframes spin {
0% { transform: rotate(0deg); } 100% { transform:
rotate(360deg); }}
Example Explained
The property specifies the border size and the border color of the loader.
The property transforms the loader into a circle.
The blue thing that spins around inside the border is specified with the
property. You can also include , and/or
if you want more «spinners» (see example below).
The size of the loader is specified with the and properties.
At last, we add an that makes the blue thing spin forever with a 2
second animation speed.
Note: You should also include a -webkit- prefix for
browsers that do not support animation and transform properties. Click on the
example to see how.
Initial server response time
Время ответа сервера — важнейший параметр, не только для Google Page Speed. В 2021 году тот же самый Гугл вводит новый фактор для ранжирования сайтов — Page Experience, который включает в себе метрики Web Vitals. Они изменяют оценку удобства пользования сайта. Конкретно оцениваются те факторы, которые присутствуют в Google Page Speed. Речь про Largest Contentful Paint (LCP) и Cumulative Layout Shift (CLS)
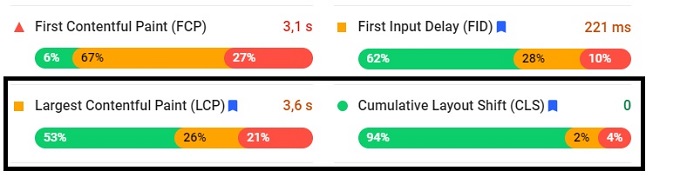
Причем тут скорость загрузки сайта? При том, что LCP и CLS непосредственно относятся к параметрам отрисовки и верстки страницы
Что может тормозить рендеринг на стороне сервера?
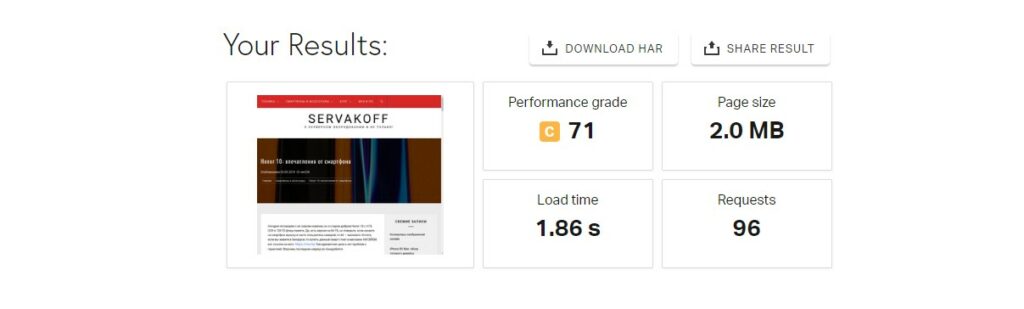
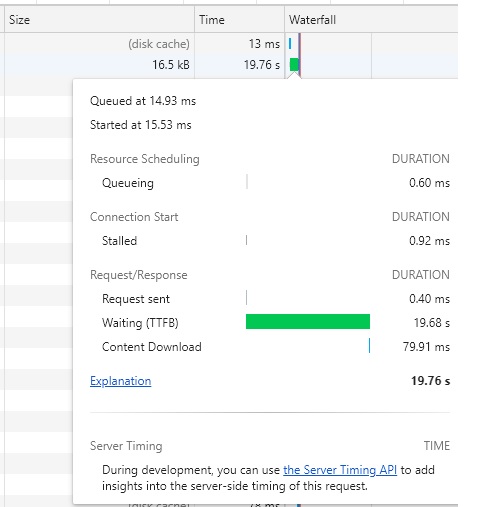
Официальная справка Google Page Speed гласит о том, что на время отклика сервера в WordPress влияют темы и плагины. Если точнее, то их CSS, HTML, JS-код. Но как точно узнать, что именно из всей плеяды установленных дополнений так сильно тормозит прорисовку? В этом поможет режим разработчика в Google Chrome. Запускаем браузер, нажимаем F12. Переходим в открывшемся окне на вкладку Network (чуть ниже должно стоять All). Теперь зайдите на страницу вашего сайта — на вкладке Network отобразятся все элементы и время их выполнения

Смотрим на последний столбик Watterfall: какой-то запрос обрабатывается целых 19(!) секунд. Об этом свидетельствует метрика TTFB — time to first byte, т.е. время, которое проходит от запроса пользователя, до начала отдачи страницы сервером. Получение первого TCP пакета с сервера в качестве ответа – является именно получение первого байта.
Как уменьшить TTFB?
Время TTFB включает в себя доставку пакетов до пользователя и генерацию страницы. Первое можно решить с помощью CDN (см. следующий пункт). Про генерацию страницы мы написали выше — это темы, плагины, скрипты, база данных. Чем выше значение TTFB, тем медленнее обработка ресурсов сервером.
Проблема здесь в том, что со своей стороны (пользовательской) что-либо сделать представляется мало возможным, кроме оптимизации темы и плагинов. TTFB может проседать даже из-за таких файлов как wp-login.php, favicon.ico или даже из-за админки (wp-admin/admin-ajax.php). В целом, советы по уменьшению этого времени выглядят так:
- Использование CDN для изображений, скриптов и т.д. (об этом ниже)
- Поменять хостинг или улучшить тарифный план на текущем. Возможно, ваш веб-сервер не успевает обрабатывать запросы, после чего они встают «в очередь». Если они не получат ответ во время, то сервер выдаст ошибку 504 gateway timeout. Попросите своего хостера добавить вам оперативной памяти и увеличить количество процессов httpd (если используется Apache)
- Использовать кеширование (см. пункт 7. Задайте правила эффективного использования кеша для статических объектов)
- Приведите в порядок базу данных (для WP есть соответствующие плагины)
- Если в качестве веб-сервера используется ngnix, то попробуйте увеличить время ожидания при проксировании: для изменения времени ожидания в конфиг надо добавить следующие параметры в файле /etc/nginx/conf.d/timeout.conf:
proxy_connect_timeout 600; proxy_send_timeout 600; proxy_read_timeout 600; send_timeout 600; Также рекомендуется увеличить max_execution_time в php.ini:
max_execution_time 300
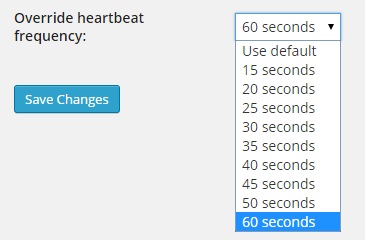
Проблема с файлом admin-ajax.php
Если у вас проседает параметр на файле admin-ajax.php, то это тоже признак того, что какой-то плагин работает некорректно. Причём этот файл всё равно загружается вместе с остальным контентом, даже если вы не авторизованы. Фактически, советы будут те же, что и описаны выше. Но есть еще один лайфхак. Отчасти проблему может решить плагин Heartbeat control, который контролирует частоты AJAX запросов из браузера для админки, который генерирует большое количество вызовов PHP.
Удалите неиспользуемый код CSS
Совет только на первый взгляд кажется странным, хотя, казалось бы, если код есть, то значит он уж как-то, но используется? Однако, некоторые установленные плагины действительно подгружают свой CSS-код, который может никогда не выполняться, но давать дополнительную нагрузку. Это сильно тормозит процесс рендеринга, ведь по дефолту браузеру необходимо обработать все CSS-стили, прежде чем отобразиться основной контент. Оптимальным решением будет удалить ненужные правила из таблиц стилей и/или отложить загрузку кода CSS, который не используется в верхней части страницы
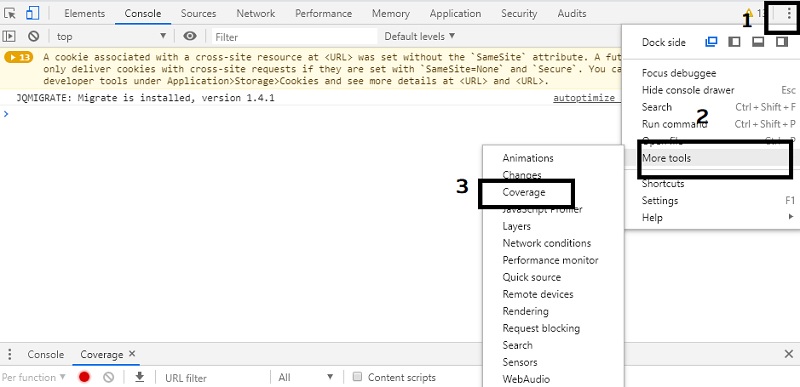
Окей, но как его обнаружить? Для этого существует инструмент Code coverage, который запускается через панель разработчика (F12 в браузере Google Chrome). Это инструмент анализа покрытия кода, который видит, какие строки из JS/CSS-кода выполняются, а какие нет. Чтобы его запустить в окне devtools нажмите на More tools -> Coverage
Браузер выдаст вам разбивку файлов JavaScript и CSS, которые были использованы на странице. Каждая полоса имеет вес и цвет — красный — неиспользованный код, а зеленый — код, который запускался.

Побродите по вашему сайте в режиме «записи» (браузер будет генерировать данные) — узнаете много нового. В том числе, что CSS может не использоваться до 90% от всего его кода.
Как сделать прелоадер для landing page
Прежде чем начать делать preloader, нужно немножко уяснить суть того, как браузер загружает страницу
Не буду расписывать весь цикл, так как у самого довольно абстрактное представление, но важно понять, что в целях экономии времени, браузер грузит (отображает) код поэтапно и не дожидается полной загрузки страницы, а в случае подключения js, так вообще прекращает загрузку, пока не выполнит подключаемый файл. Это значит, что загрузка (отображение) остального контента приостанавливается до полной загрузки js файла
В общем, проблем достаточно, давайте теперь попробуем их решить при помощи прелоадера.
Теперь пару слов для понимания того, что мы делаем:
- В самом начале размещаем div c прелоадером
- Скрываем прелодером содержимое сайта до момента полной загрузки страницы
- Скрываем прелоадер и показываем страницу
Теперь, сразу после открытия тега body разместим следующий div:
<div class="loaderArea">
   <div class="loader"></div>
</div>
Скорее всего, если у вас проблемы с загрузкой сайта, значит у вас много качественных изображений и различных тяжеловесных скриптов, а значит, вы наверняка используете и jQuery, поэтому для того, чтобы наш preloader исчез после того, как загрузится основное содержимое, воспользуемся следующим скриптом:
<script>
  $(window).on('load', function () {
    $preloader = $('.loaderArea'),
      $loader = $preloader.find('.loader');
    $loader.fadeOut();
    $preloader.delay(350).fadeOut('slow');
  });
</script>
Размещайте его где-нибудь после подключения jQuery.
Немного поясню html. LoaderArea — фоновая область, которая перекрывает основной контент. CSS этого дива такой:
.loaderArea {
  background: linear-gradient(90deg, #FF4E50 10%, #F9D423 90%);
  overflow: hidden;
  position: fixed;
  left: 0;
  top: 0;
  right:0;
  bottom:0;
  z-index: 100000;
}
Loader — это активная область (сам прелоадер). Так как я решил делать его при помощи только CSS, то у него такие стили:
.loader {
  height: 40px;
  width: 40px;
  position: absolute;
  left: 50%;
  margin-left: -20px;
  top: 50%;
  margin-top: -20px;
}

.loader:before,
.loader:after {
  content: "";
  height: 40px;
  width: 40px;
  border: 8px solid rgba(255,255,255,.5);
  border-radius: 10px;
  position: absolute;
  top: 0;
}

.loader:before {
  animation: animate 2s infinite linear;
}

@keyframes animate {
  0% {
    transform: rotate(0) skew(0);
  }

  100% {
    transform: rotate(180deg) skew(360deg);
  }
}


.loader:after {
  animation: animate2 2s infinite linear;
}

@keyframes animate2 {
  0% {
    transform: rotate(0) skew(0);
  }

  100% {
    transform: rotate(-180deg) skew(-360deg);
  }
}
Исходник прелоадера я взял с Codepeen. Вот ссылки на несколько интересных вариантов:
А вы пользуетесь прелоадереми на своих сайтах. Я вот, впервые его использовал. Какие у вас интересные примеры есть?
Журнал изменений
Release Date: September 14, 2020
Changed a deprecated filter and the timing to show the rate reminder notice.
Release Date: August 11, 2020
Added option to show the preloader only on the first visit.
Release Date: July 7, 2020
Changed PHP short open tags with full open tags in built-in icons files to avoid parsing issues.
Release Date: July 1, 2020
Fixes a bug that triggers an error on plugins update.
Release Date: June 23, 2020
- Added rate reminder notice in the admin section.
- Update live demo url.
Release Date: April 3, 2020
Deleted Freemius function.
Release Date: April 2, 2020
- Freemius has been removed.
- I Added the premium features to the free version. ENJOY!
1.1.1
Release Date: April 4, 2018
- Fixed a bug triggering a php notice on plugin upgrade.
- Changed premium version url.
- Added target attribute to show premium version on another page.
- Added link to demo page in readme description
1.1
Release Date: April 3, 2018
- Added new options to arrange the elements inside the preloader using drag and drop functionality.
- Added new options to show or hide elements clicking on an eye icon.
- Added new video tutorials.
- Minor style and script changes.
Release Date: March 23, 2018
- Added custom image options to the free version.
- Added progress bar options to the free version.
- Minor style changes.
Release Date: March 21, 2018
Updated Freemius SDK to version 2.0.
Release Date: March 20, 2018
Add an option to show the preloader only on front page.
Release Date: March 2, 2018
Added video tutorials and a link to the WordPress forum.
Release Date: March 1, 2018
Added an if statement to avoid a fatal error on premium installation.
Work with GIF and SVG files
Sometimes we need GIF for optimizing browser compatibility or for advanced animation. While Loading.css provides simple, predefined animation types, it’s used in loading.io to provide image generation with more sophisticated animation, includes:
- Upload Animation Generator — build animated icons in SVG / GIF / PNG by uploading your own images. Also support layered animation with SVG files.
- Text Animation Editor — build GIF / SVG / APNG files with customizable text, style and animation with your choice.
- Loading.io’s Animated Icon Library — a complete icon library with the ability to customize style and animation of chosen icons, and output SVG / GIF / APNG format.
With the GIF Builder You can upload PNG, JPG, SVG and even another animated GIF. SVG is also supported; in addition, you can animate SVG by layers and save it sa SVG file again. We suggest you to use SVG since it keeps good quality after resizing. Here are two examples from the GIF Builder:
Прелоадер в виде анимированной svg иконки
Процесс создания прелоадера в виде анимированной svg иконки не будет сильно отличаться от примера с использованием CSS-анимации.
1. Создадим HTML-разметку прелоадера и разместим её сразу же после открывающего тега :
<div class="preloader">
  <svg class="preloader__image" role="img" xmlns="http://www.w3.org/2000/svg" viewBox="0 0 512 512">
    <path fill="currentColor"
      d="M304 48c0 26.51-21.49 48-48 48s-48-21.49-48-48 21.49-48 48-48 48 21.49 48 48zm-48 368c-26.51 0-48 21.49-48 48s21.49 48 48 48 48-21.49 48-48-21.49-48-48-48zm208-208c-26.51 0-48 21.49-48 48s21.49 48 48 48 48-21.49 48-48-21.49-48-48-48zM96 256c0-26.51-21.49-48-48-48S0 229.49 0 256s21.49 48 48 48 48-21.49 48-48zm12.922 99.078c-26.51 0-48 21.49-48 48s21.49 48 48 48 48-21.49 48-48c0-26.509-21.491-48-48-48zm294.156 0c-26.51 0-48 21.49-48 48s21.49 48 48 48 48-21.49 48-48c0-26.509-21.49-48-48-48zM108.922 60.922c-26.51 0-48 21.49-48 48s21.49 48 48 48 48-21.49 48-48-21.491-48-48-48z">
    </path>
  </svg>
</div>
В качестве svg можно использовать любое другое изображение.
2. Добавим CSS:
.preloader {
  position: fixed;
  left: 0;
  top: 0;
  right: 0;
  bottom: 0;
  overflow: hidden;
  /* фоновый цвет */
  background: #e0e0e0;
  z-index: 1001;
}

.preloader__image {
  position: relative;
  top: 50%;
  left: 50%;
  width: 70px;
  height: 70px;
  margin-top: -35px;
  margin-left: -35px;
  text-align: center;
  animation: preloader-rotate 2s infinite linear;
}

@keyframes preloader-rotate {
  100% {
    transform: rotate(360deg);
  }
}

.loaded_hiding .preloader {
  transition: 0.3s opacity;
  opacity: 0;
}

.loaded .preloader {
  display: none;
}
3. Поместим на страницу следующий сценарий:
<script>
  window.onload = function () {
    document.body.classList.add('loaded_hiding');
    window.setTimeout(function () {
      document.body.classList.add('loaded');
      document.body.classList.remove('loaded_hiding');
    }, 500);
  }
</script>
Этот сценарий на чистом JavaScript. Но его можно написать с использованием библиотеки jQuery.
В этом случае он будет выглядеть следующим образом:
<script>
  $(window).on('load', function () {
    $('body').addClass('loaded_hiding');
    window.setTimeout(function () {
      $('body').addClass('loaded');
      $('body').removeClass('loaded_hiding');
    }, 500);
  }
</script>
Демо прелоадера
Пример прелоадера с градиентным фоном:
Демо прелоадера
Reviews
http-equiv=»Content-Type» content=»text/html;charset=UTF-8″>lass=»plugin-reviews»>
It will not save my settings in the widgets screen. So it’s useless for me.
Definitely considering upgrading to premium, but the base version is a stellar performer.
I’ve found this very useful on a website with logged-in members at different levels, as the plugin I use to restrict access to posts and pages does not cover widgets.
Thanks for this useful plugin, you rock!
Best widget control I have encountered in 12 years of creating WordPress based website. Thank you very much!
This plugin is one of my favorites, really useful.
Thanks a lot for your hard work!
Examples
webpack.config.js
module.exports={ module{ rules{ test\.css$i, use'style-loader','css-loader',},{ test\.(png|jpe?g|gif|svg|eot|ttf|woff|woff2)$i, loader'url-loader', options{ limit8192,},},,},};
For production builds it’s recommended to extract the CSS from your bundle being able to use parallel loading of CSS/JS resources later on.
When you have pure CSS (without CSS modules), CSS modules and PostCSS in your project you can use this setup:
webpack.config.js
module.exports={ module{ rules{ test\.((c|sa|sc)ss)$i, use'style-loader',{ loader'css-loader', options{ importLoaders1, modules{ autotrue},},},{ loader'postcss-loader', options{plugins()=>postcssPresetEnv({ stage})},},{ loader'sass-loader',},,},{ test\.(png|jpe?g|gif|svg|eot|ttf|woff|woff2)$i, loader'url-loader', options{ limit8192,},},,},};
index.css
.class{backgroundurl(/assets/unresolved/img.png);}
webpack.config.js
module.exports={ module{ rules{ test\.css$i, use'style-loader','css-loader',},,}, resolve{ alias{'/assets/unresolved/img.png'path.resolve(__dirname,'assets/real-path-to-img/img.png'),},},};
The following setup is an example of allowing features only (such as and ) without using further functionality by setting option for all files that do not match naming convention. This is for reference as having features applied to all files was default behavior before v4.
Meanwhile all files matching are treated as in this example.
An example case is assumed where a project requires canvas drawing variables to be synchronized with CSS — canvas drawing uses the same color (set by color name in JavaScript) as HTML background (set by class name in CSS).
webpack.config.js
module.exports={ module{ rules{ test\.scss$, exclude\.module\.scss$, use{ loader'style-loader'},{ loader'css-loader', options{ importLoaders1, modules{ compileType'icss'}}},{ loader'sass-loader'},,},{ test\.module\.scss$, use{ loader'style-loader'},{ loader'css-loader', options{ importLoaders1, modules{ compileType'module'}}},{ loader'sass-loader'},,},},};
variables.scss
File treated as -only.
$colorBackgroundred;:export {colorBackgroundCanvas$colorBackground;}
Component.module.scss
File treated as .
@import'variables.scss';.componentClass{background-color$colorBackground;}
Component.jsx
Using both functionality as well as SCSS variables directly in JavaScript.
import svars from'variables.scss';import styles from'Component.module.scss';ctx.fillStyle=`${svars.colorBackgroundCanvas}`;
Устраните ресурсы, блокирующие отображение
Чем больше на вашем сайте CSS и JS-кода, тем дольше браузер будет его отрисовывать. Поэтому рекомендуется загрузку менее важные скриптов и стилей отложить «в долгий ящик», чтобы они грузились в самую последнюю очередь. Самый лучший вариант — вообще убрать неиспользуемый JS-код или перенести его в футер — чем меньше такого кода будет в <head>, тем выше будет показатель Page Speed. Если вы подключаете Jquery в <head>, то это блокирует отображение страницы, так как браузер ожидает пока загрузится все что находится в <head>
Сильно тормозит загрузку страницы код Jquery, поэтому, если есть возможность, не стоит использовать его на своем сайте. В крайнем случае, как уже писали выше, jquery библиотеки, лучше поместить в футер сайта (это можно сделать с помощью плагина Hummingbird, см. ниже), из-за блокировки отображения. Google советует искать плагины в библиотеке по ключевым словам: defer css javascript. И мы нашли несколько.
Examples
Extracts CSS into separate files
For production builds it’s recommended to extract the CSS from your bundle being able to use parallel loading of CSS/JS resources later on.
There are two possibilities to extract a style sheet from the bundle:
- mini-css-extract-plugin (use this, when using webpack 4 configuration. Works in all use-cases)
- extract-loader (simpler, but specialized on the css-loader’s output)
webpack.config.js
Source maps
Enables/Disables generation of source maps.
To enable CSS source maps, you’ll need to pass the option to the and the css-loader.
webpack.config.js
If you want to edit the original Sass files inside Chrome, there’s a good blog post. Checkout test/sourceMap for a running example.
Description
An easy to use, with intuitive interface, WordPress plugin that gives you the ability to easily and safely add a preloader (animated loading screen indicator) to your WordPress website.
This plugin give you finer control over preloader, it can be configured on the plugin settings page. You can select where the preloading page will be showed, such as home page or all pages. You can replace default preloader image with your own image. You can change the size of image, and etc. If you want more options, then let us know and we will be happy to add them.
Its purpose is to provide a familiar experience to WordPress users. You don’t need to edit any file of your theme, this plugin will do everything for you. It’s just plug and play, no tedious configurations or hacks, just install, enable and start enjoying your fancy preloader. It’s that simple! In addition, your preloader will be compatible with all major browsers and work with any theme.
Features
- Lightweight and fast
- Secure code with using clear coding standards
- Intuitive interface with many settings
- Cross browser compatible (work smooth in any modern browser)
- Compatible with all WordPress themes
- RTL compatible (right to left)
- Translation ready
Key features include
- Background color changer (Unlimited colors)
- Changeable preloader image
- Have default animated GIF preloader image
- Option to enable/disable preloader
- Option to display preloader in full website or in Home page only
- Option to set the delay before the preloader appears
- And much, much more!
Translation
This plugin is ready for translation and has already been translated into several languages. But If your language is not available then you can make one. It is also possible that not all existing translations are up-to-date or correct, so you are welcome to make corrections. Many of plugin users would be delighted if you share your translation with the community. Thanks for your contribution!
- English (default)
- Russian (translation by Milena Kiseleva)
- German (translation by Michael)
- Spanish (translation by Ramiro Garcés and Patricio Toledo)
- Dutch (translation by Peter Leenders)
- French (translation by Jean-Michel, Theophil Bethel and Hervé Bouzin)
If you want to help translate this plugin, please visit the translation page.
Minimum system requirements:
- WordPress version 4.9 or higher.
- PHP version 5.6 or higher.
- MySQL version 5.0 or higher.
Recommended system requirements:
- WordPress version 5.0 or higher.
- PHP version 7.0 or higher.
- MySQL version 5.6 or higher.
Contribution
Developing plugins is long and tedious work. If you benefit or enjoy this plugin please take the time to:
- Donate to support ongoing development. Your contribution would be greatly appreciated.
- this plugin.
- Share with us or view the GitHub Repo if you have any ideas or suggestions to make this plugin better.
“Best Preloader” is one of the own software projects of Space X-Chimp.
License
This plugin is licensed under the GNU General Public License, version 3 (GPLv3) and is distributed free of charge.
Commercial licensing (e.g. for projects that can’t use an open-source license) is available upon request.
Credits
- The icon of plugin is a copyrighted image created by the Space X-Chimp team. (C) All rights reserved.
- The banner of plugin is a copyrighted image created by the Space X-Chimp team. (C) All rights reserved.
- Bootstrap by Twitter, Inc. released under the MIT license.
- Bootstrap-checkbox is a project of Vasily A., shared under the MIT license.
- Font Awesome is an open source-project created by Dave Gandy. Font released under the SIL OFL 1.1 license. Code released under the MIT License.
Links
Processing
The appropriate times to fetch and process the linked resource
are:
- When the user agent that supports ] creates a Document
and processes `Link` headers that contain a preload link. - When the preload link’s link element is inserted into a
document. - When the preload link is created on a link element that is
already in a document tree. - When the `href` attribute of the link element of a preload
link that is already in a document tree is changed. - When the `crossorigin` attribute of the link element of a
preload link that is already in a document tree is set,
changed, or removed. - When the `as` attribute of the link element of a preload
link that is already in a document tree is set or changed to a
value that does not or no longer matches the request destination of
the previous obtained external resource, if any. - When the `as` attribute of the link element of a preload
link that is already in a document tree but was previously not
obtained due to the `as` attribute specifying an unsupported request
destination is set, removed, or changed. - When the `type` attribute of the link element of a preload
link that is already in a document tree but was previously not
obtained due to the `type` attribute not specifying a parsable MIME
type or specifying an unsupported MIME type for the request
destination is set, removed, or changed. - When the `media` attribute of the link element of a preload
link that is already in a document tree but was not previously
obtained due the `media` attribute’s value being not a valid media
query list or one that does not match the environment is set,
removed, or changed.
The user agent SHOULD abort the current request if the `href`
attribute of the link element of a preload link is changed,
removed, or its value is set to an empty string.
At these times, the user agent must fetch and process the linked resource
given by the link element.
Obtaining the resource given by a preload link element MUST NOT
delay the load event of the element’s node document.
Once a preload resource has been processed,
the user agent must add the response to the preload cache. The user agent must also add
responses that are network errors to the preload cache.
It is important that network errors be added to the preload cache so
that if a preload request results in an error, the erroneous response isn’t re-requested from
the network later. This also has security implications; consider the case where a developer
specifies subresource integrity metadata on a preload request, but not the following
resource request. If the preload request fails
subresource integrity verification
and is discarded, the resource request will fetch and consume a potentially-malicious response from
the network without verifying its integrity ].
In addition to the HTTP cache, all browser implementations provide
one or more levels of additional caches, which sometimes live before
the HTTP cache (e.g. server push responses are typically not
committed to HTTP cache until a client request is made), and after the
HTTP cache (e.g. in-process memory caches). These caches are not
defined today and need to be defined in Fetch API— see (https://github.com/whatwg/fetch/issues/354).
Conceptually, a preloaded response ought to be committed to the HTTP
cache, as it is initiated by the client, and also be available in the
memory cache and be re-usable at least once within the lifetime of a
fetch group.
Link HTTP response header should be processed for all types of request destination.
When the `media` attribute’s value does not match the environment,
the resource will not be preloaded.
The user agent MUST NOT automatically execute or apply the resource
against the current page context.
How to use it:
1. The basic HTML structure for the loading indicator that is consists of 3 animated dots.
<div class="preloader js-preloader flex-center">
  <div class="dots">
    <div class="dot"></div>
    <div class="dot"></div>
    <div class="dot"></div>
  </div>
</div>
2. The required CSS/CSS3 for the loading indicator. Feel free to use your own CSS3 based loading indicator.
.flex-center {
  display: -webkit-box;
  display: -ms-flexbox;
  display: flex;
  -webkit-box-align: center;
  -ms-flex-align: center;
  align-items: center;
  -webkit-box-pack: center;
  -ms-flex-pack: center;
  justify-content: center;
}

.preloader {
  position: fixed;
  top: 0;
  left: 0;
  width: 100%;
  height: 100%;
  background: #60D7A9;
}

.dots .dot {
  display: inline-block;
  width: 35px;
  height: 35px;
  margin: 0 10px 0 10px;
  border-radius: 50%;
  background: #FFF;
  -webkit-animation: dot-dot-dot 1.4s linear infinite;
  animation: dot-dot-dot 1.4s linear infinite;
}

.dots .dot:nth-child(2) {
  animation-delay: .2s;
}

.dots .dot:nth-child(3) {
  animation-delay: .4s;
}

@keyframes dot-dot-dot {
  0%, 60%, 100% {
    -webkit-transform: initial;
      -ms-transform: initial;
        transform: initial;
  }
  30% {
    -webkit-transform: translateY(-25px);
      -ms-transform: translateY(-25px);
        transform: translateY(-25px);
  }
}
3. Insert jQuery JavaScript library and the jQuery preloadinator plugin into the html file.
<script src="https://code.jquery.com/jquery-3.3.1.min.js"
        integrity="sha384-tsQFqpEReu7ZLhBV2VZlAu7zcOV+rXbYlF2cqB8txI/8aZajjp4Bqd+V6D5IgvKT"
        crossorigin="anonymous"></script>
<script src="dist/js/jquery.preloadinator.min.js"></script>
4. Initialize the plugin to display the loading indicator on page load.
$('.js-preloader').preloadinator();
5. Enable/disable the page scrolling when the loading indicator is active.
$('.js-preloader').preloadinator({
  scroll: false
});
6. Set the minTime in milliseconds the loading indicator should display.
$('.js-preloader').preloadinator({
  minTime: 2000
});
7. Config the animation when the loading indicator is closed.
$('.js-preloader').preloadinator({
  animation: 'fadeOut',
  animationDuration: 400
});
8. Callback functions available.
$('.js-preloader').preloadinator({
  afterDisableScroll: function() {},
  afterEnableScroll: function() {},
  afterRemovePreloader: function() {}
});
- Prev: Force Downloading Videos On Page Load — jQuery Blobber
- Next: jQuery Plugin To Handle Element Loading Progress — Loader
Changelog
Release Date: September 14, 2020
Changed a deprecated filter and the timing to show the rate reminder notice.
Release Date: August 11, 2020
Added option to show the preloader only on the first visit.
Release Date: July 7, 2020
Changed PHP short open tags with full open tags in built-in icons files to avoid parsing issues.
Release Date: July 1, 2020
Fixes a bug that triggers an error on plugins update.
Release Date: June 23, 2020
- Added rate reminder notice in the admin section.
- Update live demo url.
Release Date: April 3, 2020
Deleted Freemius function.
Release Date: April 2, 2020
- Freemius has been removed.
- I Added the premium features to the free version. ENJOY!
1.1.1
Release Date: April 4, 2018
- Fixed a bug triggering a php notice on plugin upgrade.
- Changed premium version url.
- Added target attribute to show premium version on another page.
- Added link to demo page in readme description
1.1
Release Date: April 3, 2018
- Added new options to arrange the elements inside the preloader using drag and drop functionality.
- Added new options to show or hide elements clicking on an eye icon.
- Added new video tutorials.
- Minor style and script changes.
Release Date: March 23, 2018
- Added custom image options to the free version.
- Added progress bar options to the free version.
- Minor style changes.
Release Date: March 21, 2018
Updated Freemius SDK to version 2.0.
Release Date: March 20, 2018
Add an option to show the preloader only on front page.
Release Date: March 2, 2018
Added video tutorials and a link to the WordPress forum.
Release Date: March 1, 2018
Added an if statement to avoid a fatal error on premium installation.
Privacy and Security
Preload is a declarative fetch primitive that initiates early fetch of
resources and separates fetching from resource execution. In effect, it is
conceptually similar to initiating a scripted fetch for a resource, but
with additional constraints and benefits:
- The resource declaration is visible via HTTP headers or HTML markup,
which allows the user agent to initiate the fetch earlier, and without
blocking on JavaScript execution. - The response is not executed and there is no callback to retrieve its
payload. The response is retrieved and executed by initiating another
fetch (via script, DOM element, etc) that matches the preloaded
response. - The developer can specify the target context that will consume the
response via `as` attribute, which allows the user agent to enforce the
relevant CSP policies when initiating the preload fetch. If `as` is
omitted, preload defaults to same security and privacy processing as a
call to `fetch()` — i.e. subject to `connect-src`.