Minitool partition wizard для windows
Содержание:
- Clone Disk
- What Exactly Is MiniTool Partition Wizard?
- Guides & Tips
- Для чего нужна утилита MiniTool
- Mount
- About SD Card
- Download MiniTool Partition Wizard 12.1 For Free Now!
- Comprehensive Partition Manager
- Функционал MiniTool Partition Wizard 10.2
- Download & Install FAQ
- Media Builder
- Limitations in Windows 7 Disk Management
- Free Partition Wizard FAQ
- MiniTool PXE Boot
- How to Migrate OS to SSD/HD
- MiniTool Partition Wizard Is Powerful Portable Partition Magic
- Upgrade PA Standard to Professional Edition
- More Editions for You
- Editors’ Review
- Процесс переноса Windows 10 на SSD или HDD
- Remote
- Add Boot Menu
- Guides & Tips
Clone Disk
Clone is another useful feature of MiniTool ShadowMaker, which is significant for hard drive upgrading. A big difference between disk clone and disk image is that when you clone a disk, you can directly use it after the operation, while you will have to restore a disk image before you can use it directly. MiniTool ShadowMaker even can help you to clone the dynamic disk.
Note:
Is it better to make a clone? This depends on the actual situation. If you need to upgrade disk to a larger one without reinstalling OS, cloning is recommended. If you want to back up disk data to an image file, cloning cannot realize it but the backup feature can.
How to Clone Basic Disk
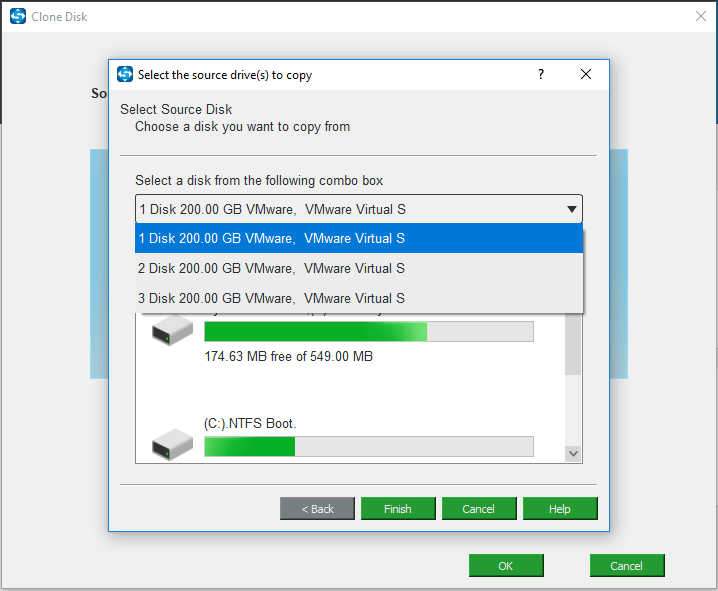
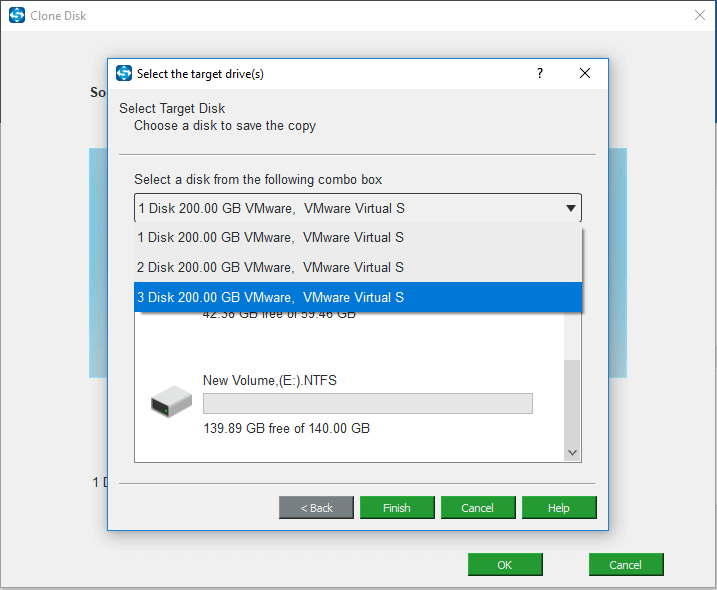
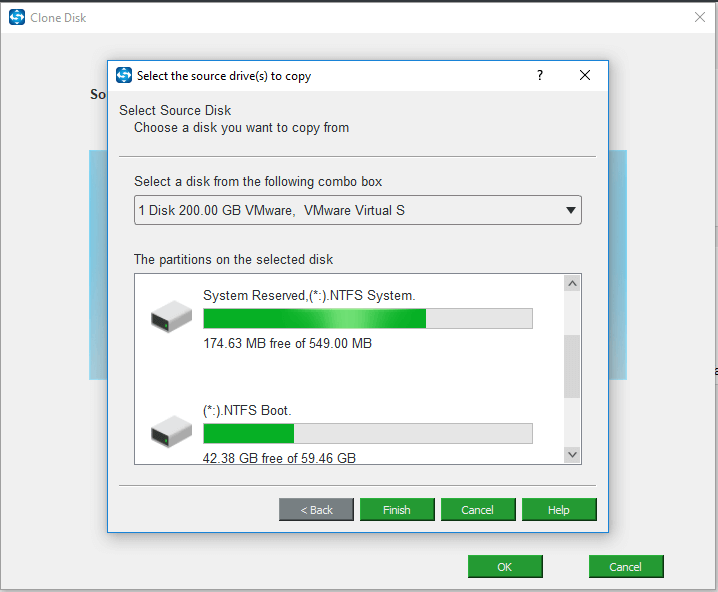
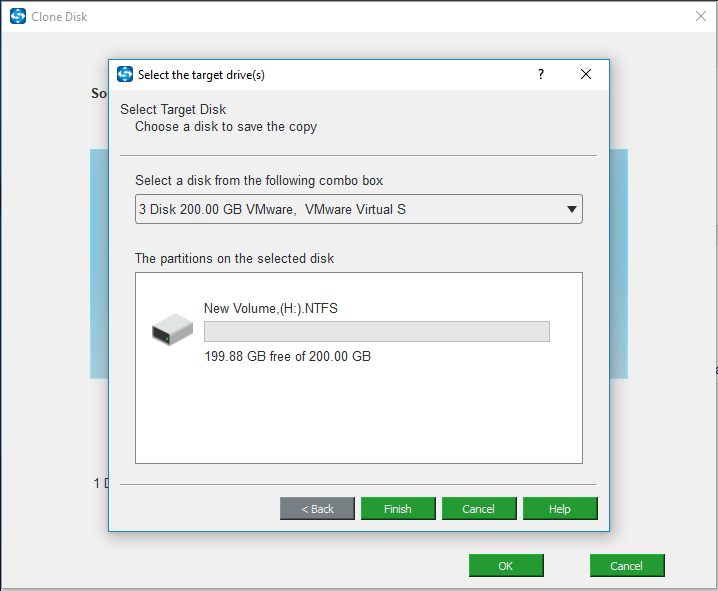
Step 1. Go to Clone Disk under Tools.

Step 2. Choose which disk to clone and where to store the copy.

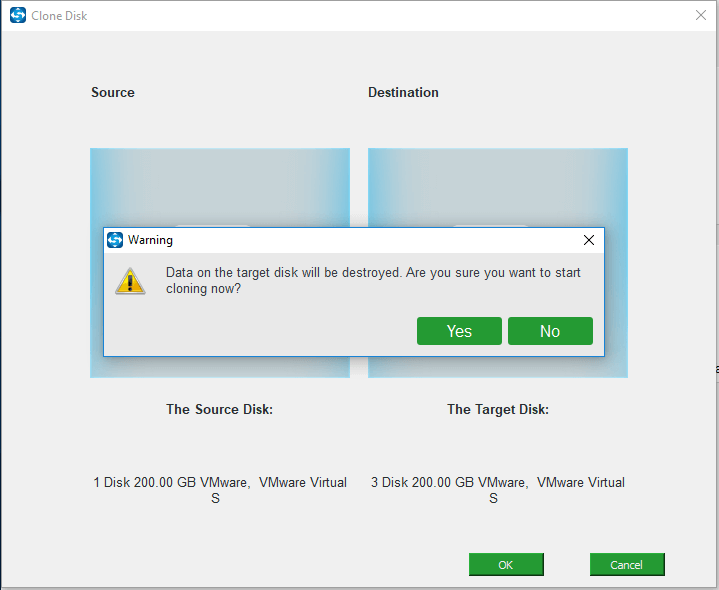
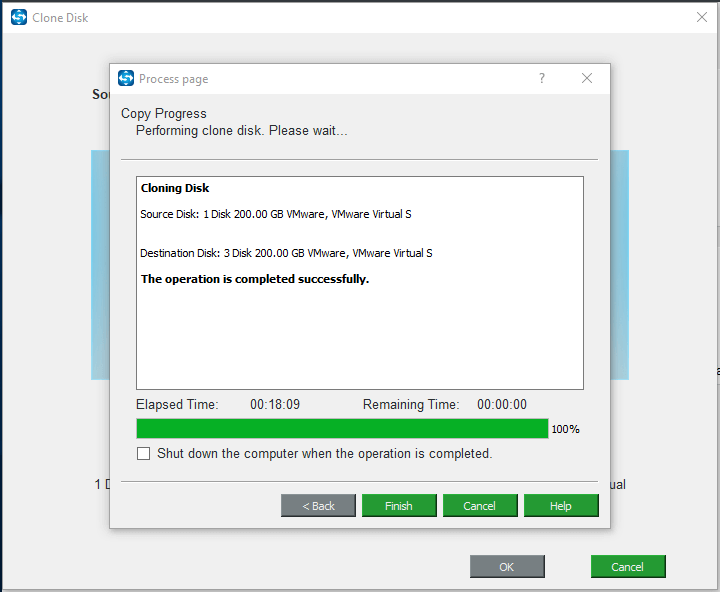
Step 3. Confirm that you want to start the task and wait for the process to finish.


Message you should pay attention to:
When disk cloning is finished successfully, you will see the following message:
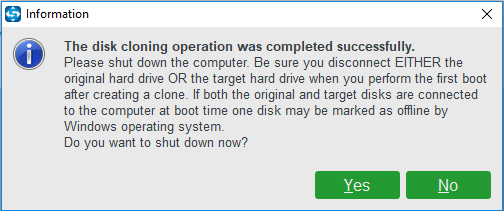
This means both the source disk and the target disk has the same signature, thus one disk is marked as offline by Windows. Just remove one that you don’t need.
Note:
By ticking «Shut down the computer when the operation is completed», you can take either the source disk or the target disk out of computer after the cloning.
How to Clone Dynamic Disk
MiniTool ShadowMaker also enables you to clone the dynamic disk. Now, you can refer to the following instructions.
Tip:
It can only clone the Simple Volume.
Step 1: Go to Clone Disk Under Tools.

Step 2: Choose the clone source by clicking The Source Disk. Here, you need to choose the dynamic disk.
Step 3: Choose the target disk by clicking The Target Disk section.
Step 4: Confirm that you want to start the task.
Tip:
All data on the target disk will be destroyed, so please back up them in advance.
Step 5: Wait for the process to be finished.
Step 6: When the process is finished, you will receive the following message.

This means both the source disk and the target disk has the same signature, thus you need to disconnect or remove either of them. In addition, if you want to boot your computer from the target disk, you need to change the BIOS settings.
What Exactly Is MiniTool Partition Wizard?
All-in-one Disk Partition Manager
As best partition manager for Windows, MiniTool Partition Wizard aims to maximize disk performance. It helps create/resize/format partition flexibly, convert disk between MBR and GPT disks, convert partition between NTFS and FAT32, and convert dynamic disk to basic without data loss in a few clicks.
Effective Data Recovery Program
MiniTool partition manager software offers two perfect solutions for data recovery. Partition Recovery Wizard can quickly find and recover the lost partitions while Data Recovery feature just hits the score when you are struggling to recover deleted files and retrieve lost data from damaged, formatted, and inaccessible drives.
(Which edition should you get for Data Recovery?)
Powerful Disk Clone Tool
Disk clone or system migration is most frequently used to back up and upgrade hard drive. Disk cloning works perfectly when you are forced to make an instant backup. System migration returns you to act on the new disk in a while. No need to spend hours reinstalling operating system and applications.
Striking Disk Diagnostic Master
As comprehensive disk check master, MiniTool Partition Wizard can measure disk read/write speed, analyze disk usage on computer, verify the file system integrity of a volume and fix logical file system errors, and quickly detect if there are bad sectors on the drive.
Guides & Tips
-
4 Ways to Fix PS4 Copying Update File Slow Issue
This post tells you the reason why PS4 updates take so long to copy and gives you several ways to solve the PS4 copying update file slow issue.
→
-
How to Add Google Calendar to Outlook & Do the Reverse
This article will show you how to add Google calendar to Outlook and how to show Outlook calendar in Google with ease. The detailed steps are listed as well.
→
-
How to Stop Microphone Auto Adjusting Windows 10
How to stop microphone auto adjusting Windows 10? A great many people are searching for the answer. This post will shares you several methods to fix it.
→
-
How to Change NAT Type on PlayStation 4?
It is wise to change NAT type on PS4 if you frequently encounter PS4 network problems. This post details how to change NAT type on PlayStation.
→
-
3 Methods to Prevent Apps from Getting Account Information
Sometimes you might want to prevent apps from getting account information on your Windows PC. How to do that? This article provides 3 effective methods for you.
→
-
How to Uninstall Avast Secure Browser with These Methods
Is Avast secure browser good? How to uninstall Avast secure browser? If you don’t know how to do, this Avast secure browser uninstall guide may suit you.
→
Для чего нужна утилита MiniTool
Простой и удобный профессиональный инструмент для работы с носителями MiniTool Partition Wizard приобрёл популярность ещё много лет назад и пользуется спросом всё это время. Применяется утилита для решения различных задач, таких как разметка дисков, изменение размера разделов, создание, удаление, конвертирование файловой системы, клонирование томов, восстановление загрузочной области и многих других операций с накопителями. Существует немало версий программы и доступна она как в платном, так и бесплатном варианте, что для обычного пользователя версия Free будет отличным решением, а если основных функций всё же будет недостаточно, то можно подписаться на лицензию или купить профессиональную редакцию навсегда. Кому-то, например, приходится работать с таким софтом ввиду особенностей деятельности.
Программный продукт нетребователен к ресурсам и подходит MiniTool Partition Wizard для всех версий и редакций операционной системы Windows, включая XP и Vista.
Mount
Mount enables to load images as virtual drives so that you can access them as if they were physical drives. Once an image is mounted, a new disk appears in Windows Explorer.
How to Mount an Image
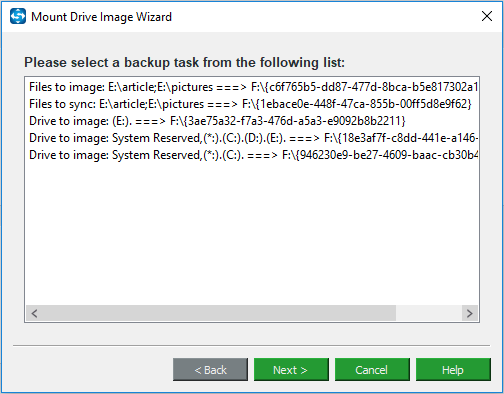
Step 1. Enter Mount under Tools, and then select a backup task from the list window.

Step 2. Select a backup task from the list and then click Next to continue.
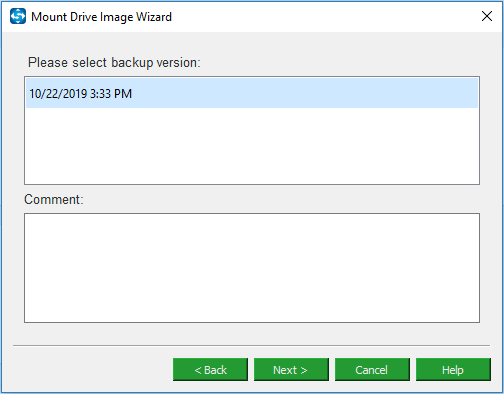
Step 3. Select a backup version and hit Next to go on.
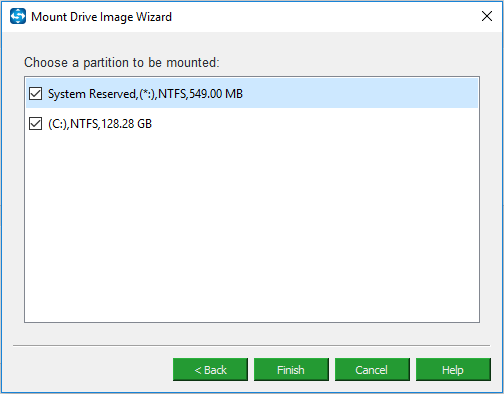
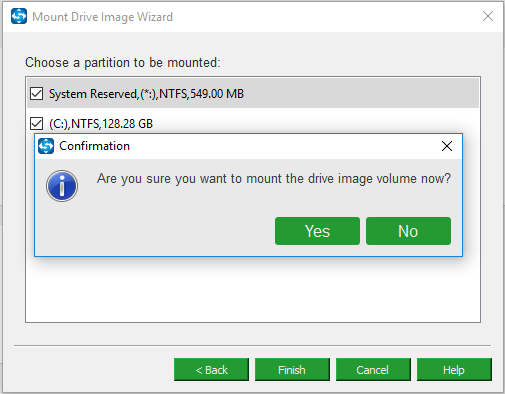
Step 4. Choose a partition to be mounted and click Finish.
Step 5. MiniTool ShadowMaker will ask you whether you want to mount the drive image, click Yes to confirm.
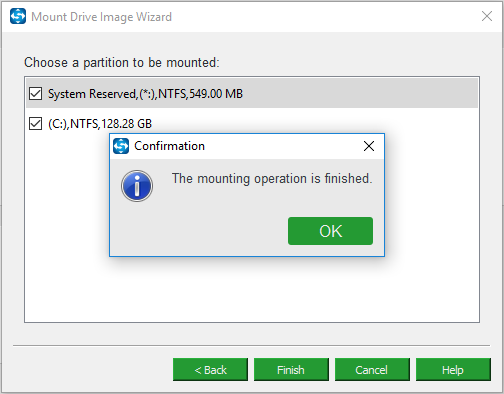
Immediately the mounting operating is finished. Now you can see the new mounted partition under Windows Explorer.
About SD Card
SD card (Secure Digital memory card) is a kind of tiny storage device developed by Matsushita, SanDisk, and Toshiba and is specially designed to use in portable devices. Today SD card has been widely applied in digital cameras, digital camcorders, handheld computers, mobile phones, media players, GPS receivers, video game consoles, and so on.
There are several types of SD cards which can be simply categorized into full SD card, mini SD card, and micro SD card. The capacities of SD card typically can range from 1GB to 2TB (and even larger with time goes by). To help users better understand it, we have made a detailed table related to different SD cards:
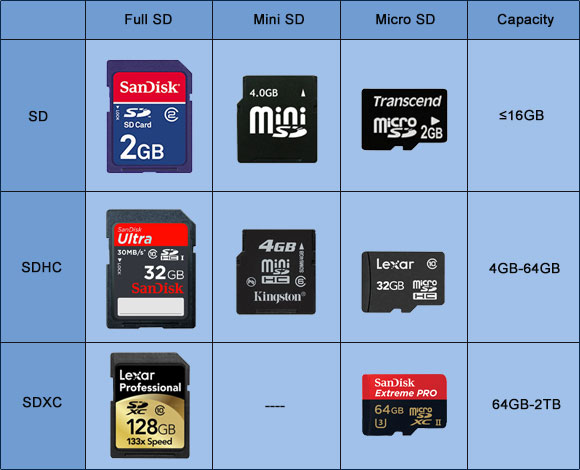
Don’t hesitate to share this table to your friends.
Download MiniTool Partition Wizard 12.1 For Free Now!
Product Information
-
Product Name:
MiniTool Partition Wizard
-
Developer:
MiniTool Software Limited
-
Upgrade Date:
Apr. 1, 2020
-
Category:
Disk Management
-
Operating System:
Windows
Supported languages:
Free Edition
- For average users to manage basic disks including disk check, hard drive repartition and file system conversion.
- Support Windows XP, Windows 7, Windows 8/8.1 and Windows 10 (all editions, 32/64 bit).
Pro Edition — Trial
- For advanced users to manage basic disks and dynamic disks. Covers full features including disk check, hard drive repartition, MBR/GPT disk conversion, dynamic disk management and data recovery.
- Support Windows XP, Windows 7, Windows 8/8.1 and Windows 10 (all editions, 32/64 bit).
Comprehensive Partition Manager
Hunting for an easy-to-use software to fix hard disk partition problems for Windows OS? AOMEI Partition
Assistant Standard is the right one for your PC, guaranteeing you get a full suite of features for
creating,
resizing, deleting, merging, and splitting partitions, and so much more.
Show all features on one page
Resize/Move Partition
Let you adjust the size of partition freely without data loss.
Learn More
Merge Partitions
You can merge two partitions into a larger one to extend space.
Learn More
Clone Disk
Clone a disk to quickly make a duplicate to another for disk upgrading.
Learn More
Migrate OS to SSD
Migrate system drive between MBR and MBR Drives (SSD/HDD supported).
Learn More
Delete Partition
Delete a partition if we don’ t need it anymore and an unallocated space will be
generated as
soon as we delete it.
Learn More
Windows To Go Creator
Create Windows 7/8/10 To Go bootable USB drive without Windows 7, Windows 8 Enterprise or
Windows 10.Build a portable and fully functional Windows 8/10 system on USB flash drive.
Learn More
Make Bootable CD Wizard
Make a Windows PE bootable CD/DVD or USB without installing Windows AIK.
Troubleshoot computer problems and recover data when the native system fails to boot.
Learn More
Integrate to Recovery Environment
Integrate AOMEI Partition Assistant or AOMEI Backupper into Windows built-in recovery
environment.Extend system partition or restore system back without bootale media.
Learn More
Функционал MiniTool Partition Wizard 10.2
Менеджер для работы с разделами дисков для Windows предлагает следующие функциональные возможности:
- Конвертирование диска из формата MBR в GPT и наоборот.
- Преобразование архитектур файловых систем из FAT в NTFS или наоборот.
- Очистка винчестера.
- Создание и сохранение копии диска.
- Перестройка MBR-загрузчика.
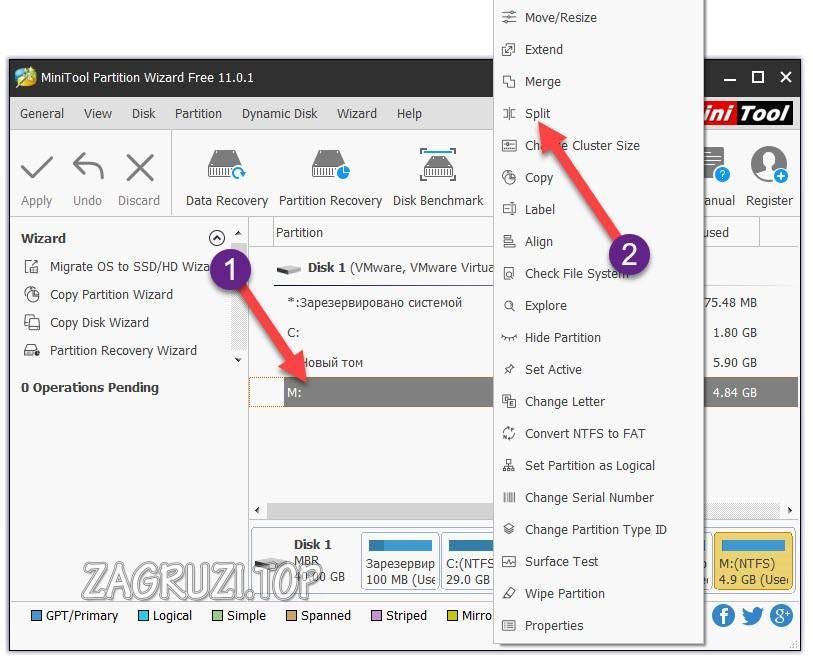
- Расширение раздела, перемещение, изменение размера, выравнивание, разделение и объединение томов.
- Создание, восстановление, копирование, удаление раздела, изменение буквы тома.
- Перемещение ОС на твердотельные накопители SSD.
- Копирование разделов динамического диска, изменение размера, преобразование в основной диск.
- Тестирование поверхности HDD или раздела на предмет «битых» секторов и прочие опции.
- Изменение серийного, идентификационного номера раздела.
Даже версия Free предлагает достаточно широкий функционал, при этом некоторые действия лучше выполнять при наличии навыков работы с разделами.

Бесплатная версия программы
Download & Install FAQ
Failed to download the program — Network Error
Upgrade page for MiniTool Partition Wizard:
https://www.partitionwizard.com/upgrade-service/upgrade-now.php
Upgrade page for MiniTool Power Data Recovery:
https://www.powerdatarecovery.com/upgrade-service/upgrade-now.php
Free home version doesn’t seem to be downloading?
You can download MiniTool Partition Wizard Free version from
Kindly reminder: if you are using Windows Edge, after hitting the download button, please check the download task list. The download will be pending until you select Run, Save or Save To.

Or, please go back to the previous page, you may be asked to Save, Run or Cancel the download.

However, if your system is running another browser, please check if there is a download task which is located at the bottom of the browser page.
Receive the error «the signature of this program corrupt or invalid» when downloading Partition Wizard.
Every time I try to install or open the program, my antivirus software detects it as a virus, malware, or unwanted program. What’s the problem?
This is a false positive mainly reported by ESET, and it appears because we add the shell to prevent our program from being cracked. Please rest assured. Our program is 100% safe, and it is harmless to your data and system.
Can’t install Partition Wizard and receive the error message: An error occuured while trying to rename a file in the destination directory: MoveFile failed; code 5.
Please try the following methods:
- Go to C:\Program Files to delete the folder MiniTool Partition Wizard 10, and install the program again.
- Install the program to another path.
- Choose Ignore.
Received the error «the procedure entry point getlogical processor information could not be located in the dynamic lik l8ibarart KERNAL.32.dll» when installing MiniTool Partition Wizard.
The error message shows Partition Wizard doesn’t support your system. For Windows non-server operating systems, it requires 32 bit XP SP3 and 64 bit SP2 at least. For server operating systems, it requires Windows 2000 SP4 at least.
Received the error «The setup files are corrupted. Please obtain a new copy of the program» when installing MiniTool Partition Wizard.
Could you please try the following methods:
- Install the program as administrator.
- Redownload the program and install it again.
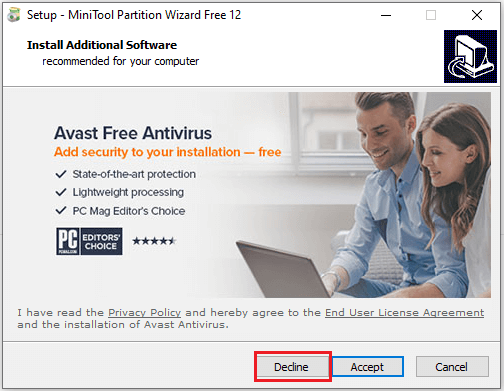
It reports additional software will be installed. Is it safe? Can I remove it?
It reports additional software will be installed. Is it safe? Can I remove it?
Media Builder
MiniTool Media Builder offers a perfect solution to create bootable media based on WinPE, which provides better compatibility with your computer’s hardware. With MiniTool Media Builder, it is possible to restore the operating system to the previous state even when your computer fails to boot.
How to Create WinPE Based Bootable Media
Before you do:
Prepare a recordable CD/DVD disc and insert it into your CD/DVD driver. Or you can prepare a USB flash drive and then connect it to your PC. Or you can connect a USB hard disk to your computer.
Note
Some of you may be wondering: Do I need to format my external drive to be a bootable disk? Actually, MiniTool Media Builder supports USB hard disk, USB flash drive, CD and DVD disc. While creating a MiniTool bootable disc or drive, your device will be formatted. Thus, please ensure that there is no important data saved on your device.
Step 1: Select Media Builder from Tools to get the main interface.

Step 2: Select WinPE-based media with MiniTool plug-in to continue.

Note
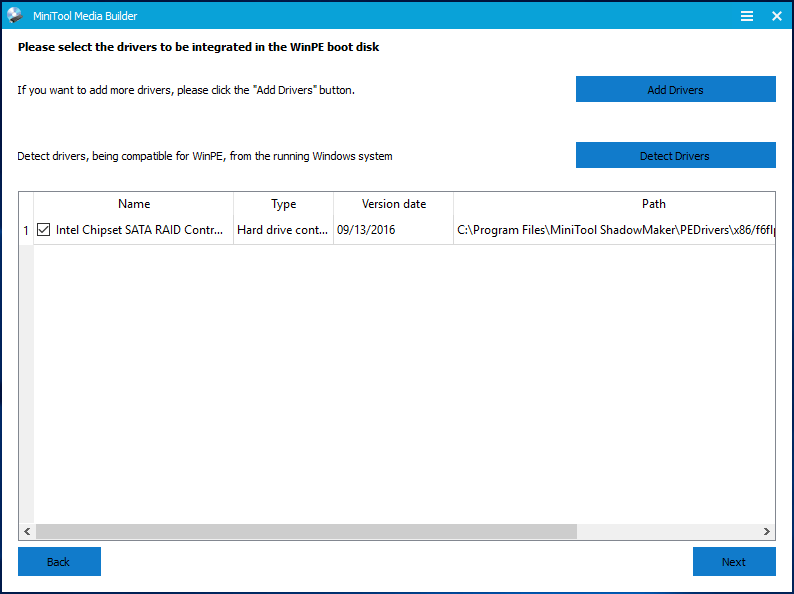
By clicking Options, you can add more drivers to the bootable media.
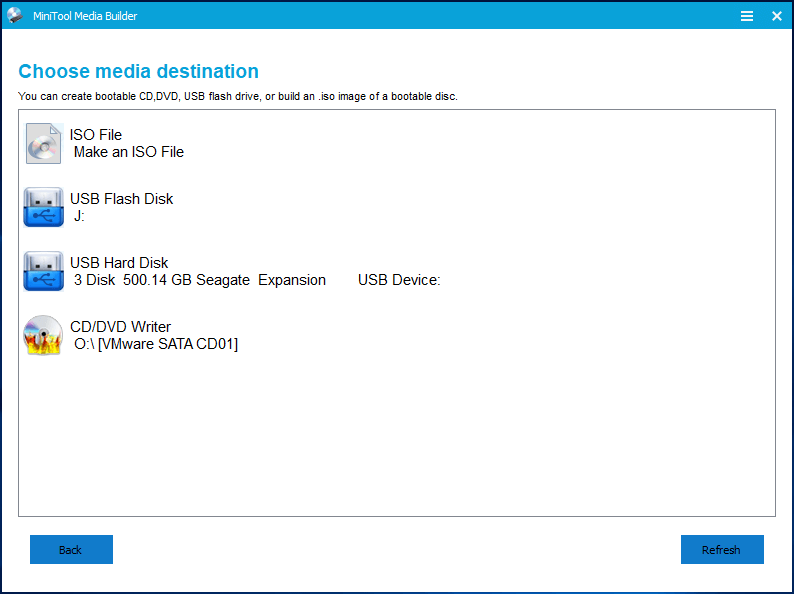
Step 3: Here, MiniTool ShadowMaker allows you to make an ISO file, create a bootable USB flash drive, create a bootable external hard disk, or build a bootable CD/DVD disc.
Note
Only when your removable hard disk is connected to your PC, the USB Hard Disk option can be displayed in the above figure.
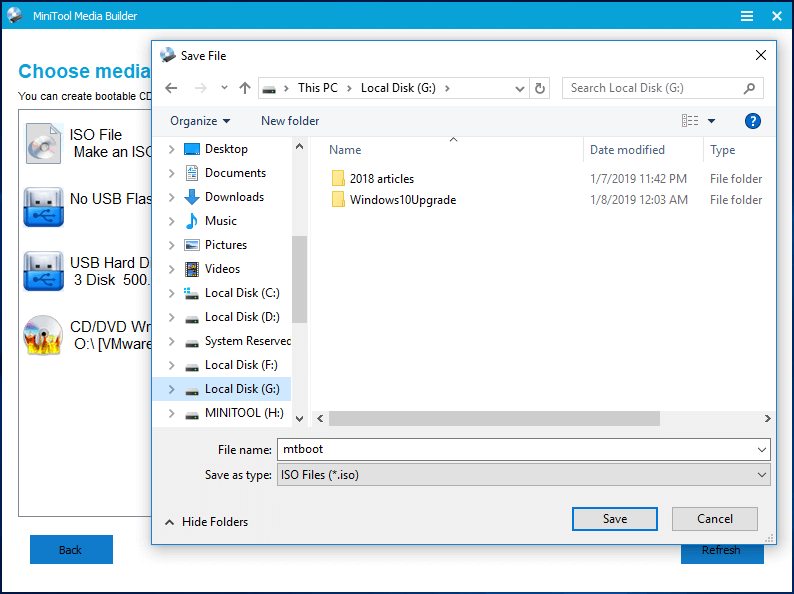
① ISO File:
To make a .iso file, please select ISO File and then choose where to save the .iso file.
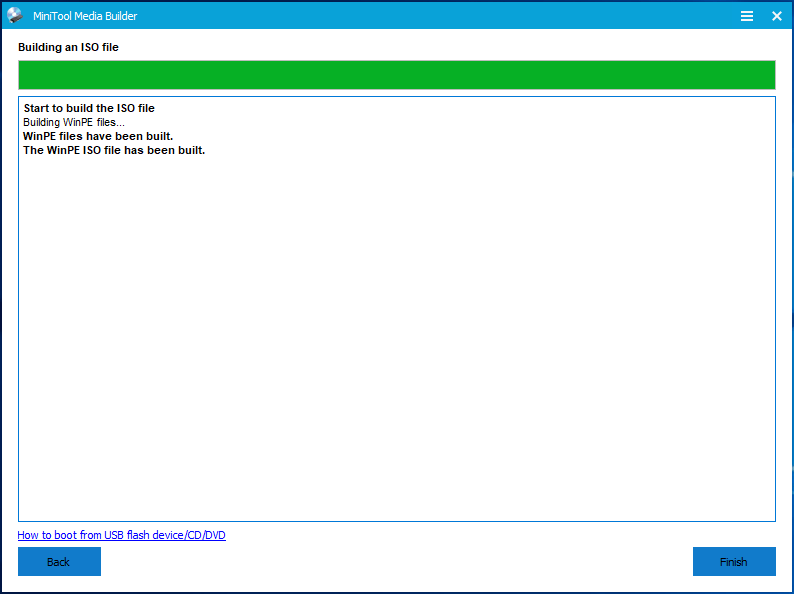
Please wait patiently until MiniTool Media Builder finishes building the .iso file. Then, click the Finish button.
Note
After finishing making a .iso file, you need to burn the .iso file to a USB drive or DVD/CD disc and then boot your PC from the device.
② USB Flash Disk
To create a bootable USB flash drive, please select USB Flash Disk option and select the correct USB flash drive if there are many. Then click Yes to confirm that you want to create the bootable media.
Please wait until MiniTool Media Builder finishes building the USB bootable drive. Finally, click Finish after successful burning.

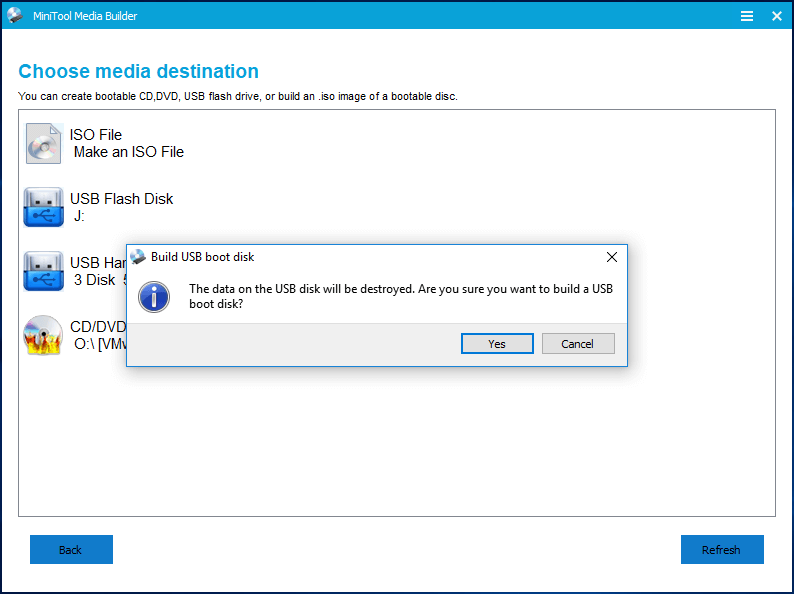
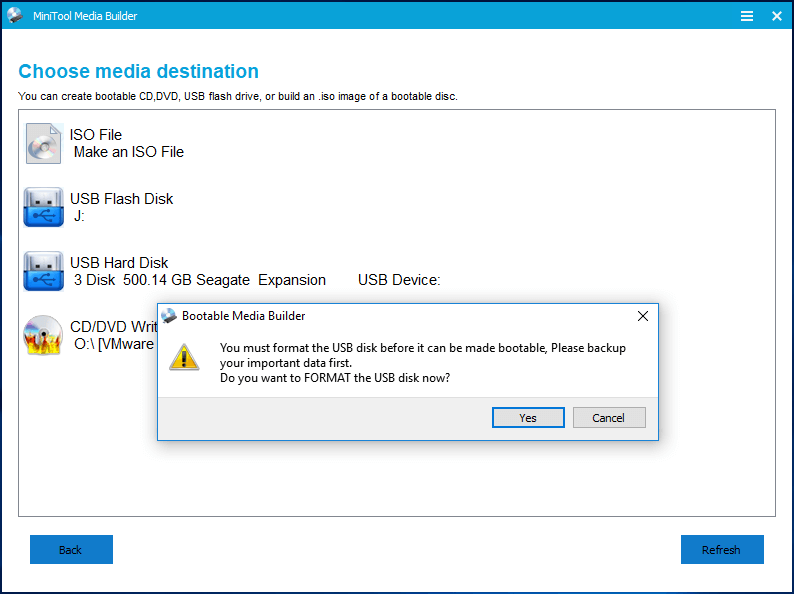
③USB Hard Disk
To create a bootable external hard drive, please click USB Hard Disk option. Then, a warning appears to tell you that your device will be formatted. To continue, click Yes button.
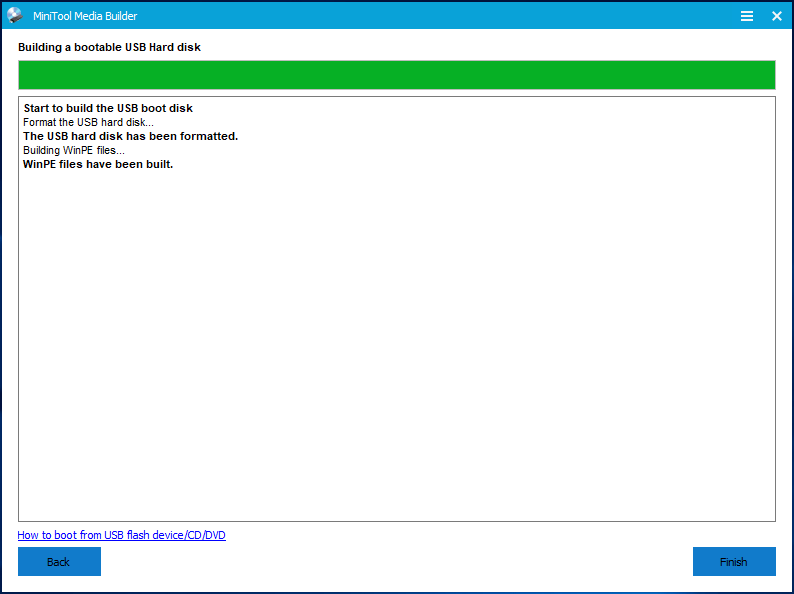
Please wait until MiniTool Media Builder finishes building the bootable USB hard disk. Finally, click Finish after successful burning.
Note
During the process, MiniTool ShadowMaker will format your external hard disk and repartition it into two partitions, one is for the created .iso file and another is for you to save data.

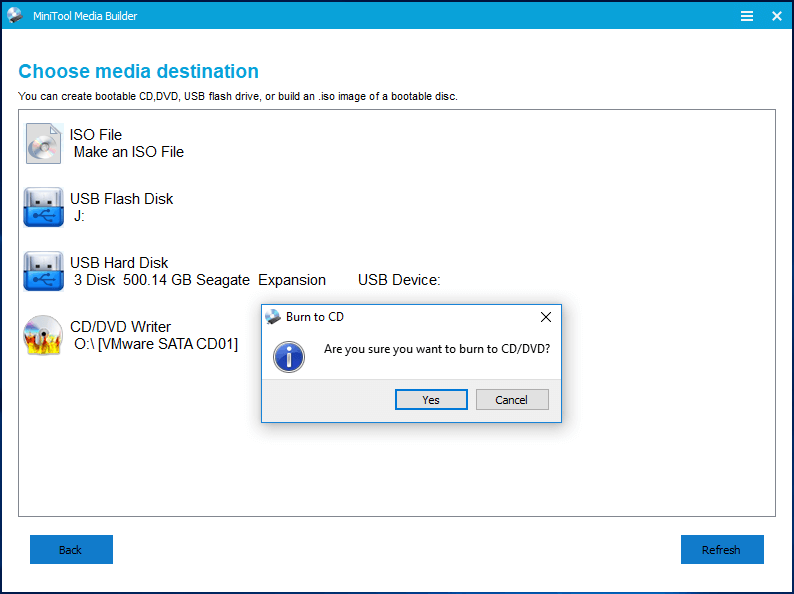
④CD/DVD Writer
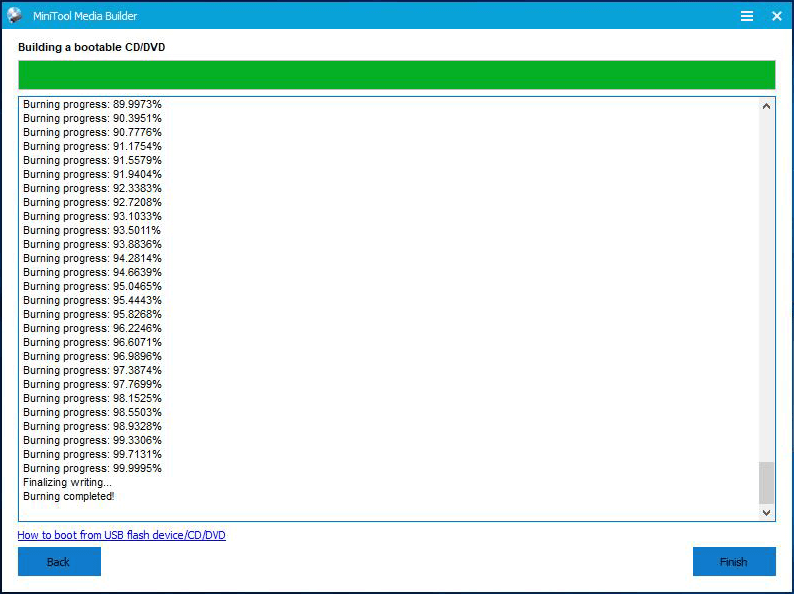
To build a bootable CD/DVD disc, please select CD/DVD Writer and then click Yes to confirm that you want the burning.
Please wait until MiniTool Media Builder finishes building the CD/DVD bootable disc. Finally, click Finish after successful burning.
Note
Based on different operating systems and network environment, the time for bootable media creation varies. Please be patient when MiniTool Media Builder is still processing.
How to Boot from the WinPE Based Bootable Media
Step 1: Connect the burned MiniTool bootable media to your PC, and then start your computer.
Step 2: Wait for the message telling you how to enter BIOS appears and do as it prompts. Note that different computers may show different messages or require users to press different keys to access BIOS. If you miss the message, just restart your computer and try again.
Step 3: In BIOS, you need to set the first boot order.
① If you are trying to boot from the USB flash disk, set your USB drive as the 1st boot option and save configuration changes.

② If you are trying to boot from the CD/DVD disc, set the disc as the 1st boot option and save configuration changes.

③ If you are trying to boot from the external hard drive, set the disk as the 1st boot option and save configuration changes.

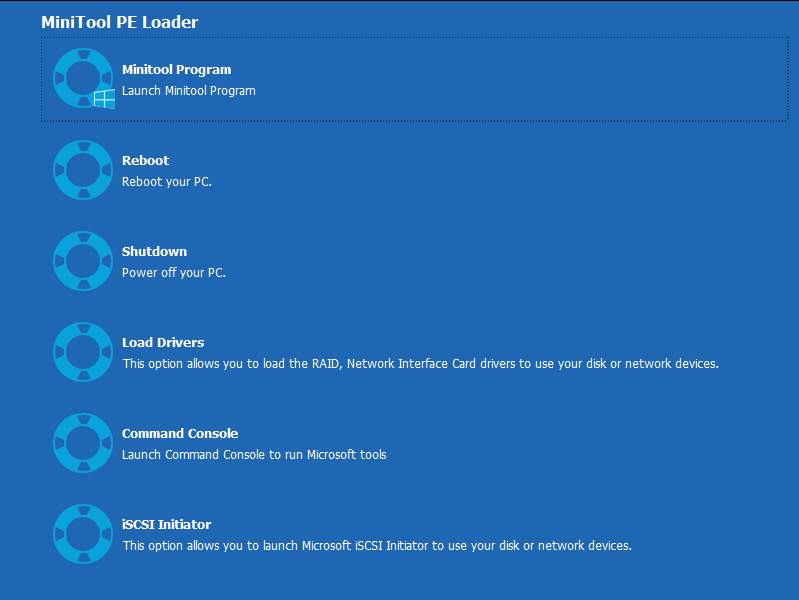
Step 4: After selecting whether to change screen resolution, and whether to load MiniTool Software, you have finally come to the main interface of MiniTool ShadowMaker Bootable.

Limitations in Windows 7 Disk Management
Windows 7 became generally available on October 22, 2009. Years later, many of you are still using this version. There are both 32-bit and 64-bit versions of Windows 7 for your choice. 32-bit and 64-bit refer to the way a computer’s processor (also called a CPU), handles information.
In 2003, 64-bit CPUs were introduced to the mainstream personal computer arena, while 32-bit was popular previously. The 64-bit version of Windows can handle large amounts of random access memory (RAM) more effectively than a 32-bit system. To know about the differences between 32-bit and 64-bit in Windows 7, please read the introduction of Windows 7.
To make full use of Windows 7 hard disks, you need to manage them according to your individual needs. In general, you can apply the Windows 7 snap-in Disk Management tool to partition Windows 7 32/64-bit system. But there are so many limitations in it.
For instance, in the basic disk, you can only extend a primary partition if there is adjacent unallocated space right behind the target partition, or extend a logical partition if there is adjacent free space right behind it (find out what caused extend volume greyed out). Otherwise, the basic disk will be converted into a dynamic disk.

In addition, some conversion functions can cause data loss, for example, conversion between MBR disk and GPT disk and converting dynamic disk to basic disk request you to delete all partitions in the target disk. All these limitations may cause inconvenience to you at any time.
Thus, do you know how to partition Windows 7 64-bit system with ease?
Free Partition Wizard FAQ
Is MiniTool Partition Wizard Free for Windows 10?
MiniTool Partition Wizard Free is definitely among the best free partition manager software for Windows 10. This free program enables users to redistribute hard drive space and check hard drive health. Feel free to download it and have a try.
Can I use MiniTool partition software Free with Windows Server OS?
The free edition of MiniTool Partition Wizard denies usage on Windows Server OS. For those who would prefer a free trial before purchase, applying the Server Trial edition is a good choice.
Is MiniTool partition manager safe?
MiniTool Partition Wizard is absolutely safe to download and install. Based on a wide variety of criteria, the mainstream antivirus software on the market all rate it 100% safe for your devices.
How to uninstall MiniTool Partition Wizard Free?
- Click Windows 10 search bar, then type “MiniTool Partition Wizard”.
- From the best match, click Uninstall.
- When you are in Programs and Features, scroll down the program list until you find MiniTool Partition Wizard.
- Right-click on it and choose Uninstall.
- Follow the on-screen wizard to finish uninstalling.
MiniTool PXE Boot
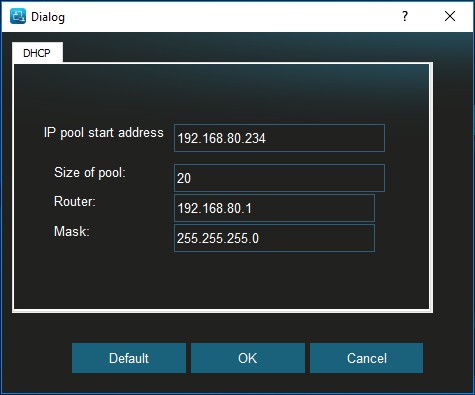
PXE is short for Preboot Execute Environment. MiniTool PXE Boot is designed to boot many computers from micro system in network. To put it simple, you can use MiniTool PXE Boot to make other client PCs boot from the same network. After booting, all client PCs are able to back up, restore or clone with tools offered in Windows PE micro system. In a word, MiniTool PXE Boot offers the best way to maintain multiple computers in LAN.
Step 1. Select PXE under Tools on host computer.

Step 2. Click Start button to begin the PXE service.
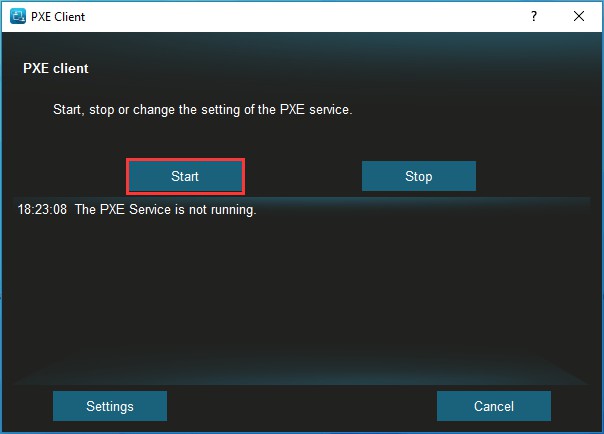
Tip:
MiniTool PXE Boot tool will configure related DHCP values automatically. However, before you click Start, you can change the values by entering Settings.
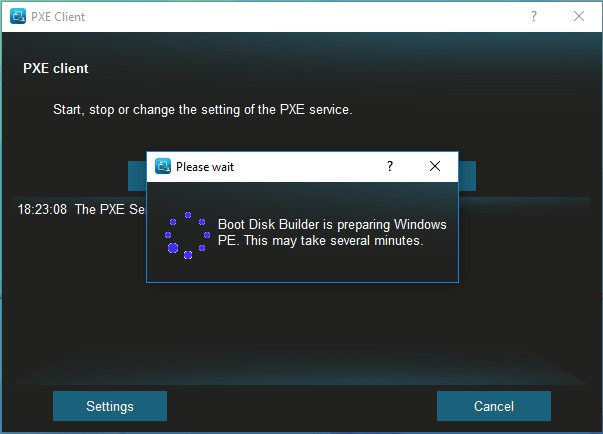
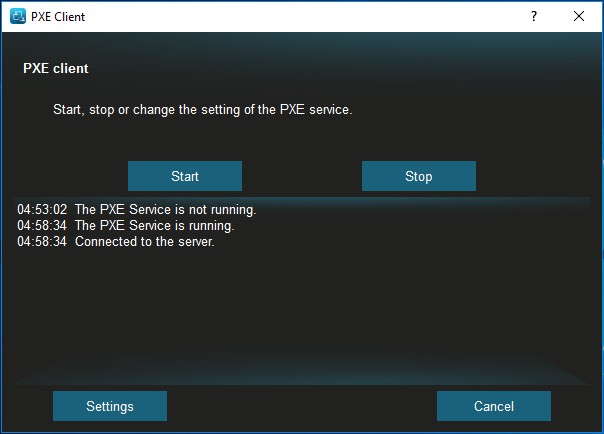
Step 3. In a few minutes, MiniTool PXE Boot will start the service to connect client PCs.
When you see the information «Connected to the server», you can set the client PCs to boot from network in BIOS. When all client PCs are booting from PXE network, maintaining hard drives on many clients will be easier.
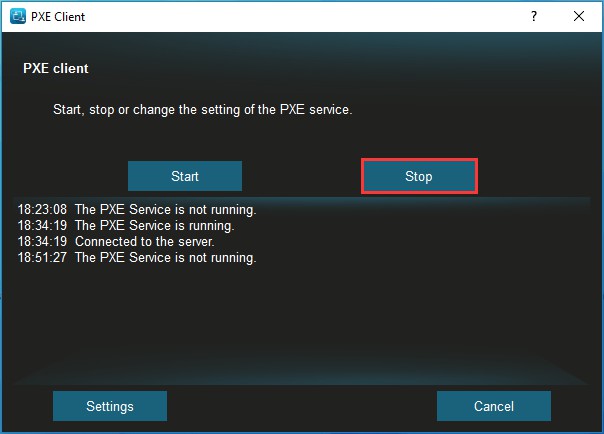
Step 4. When you have finished all tasks on all client PCs, you can stop PXE service on the host computer.
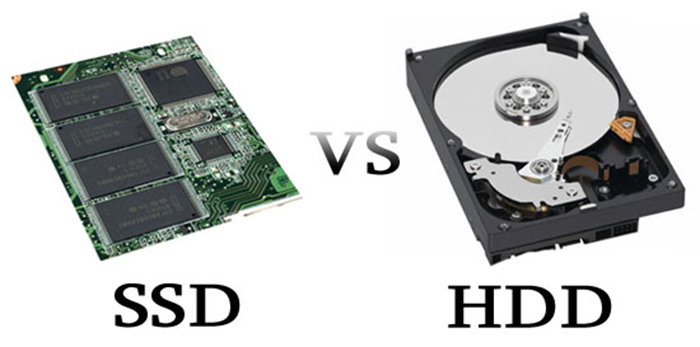
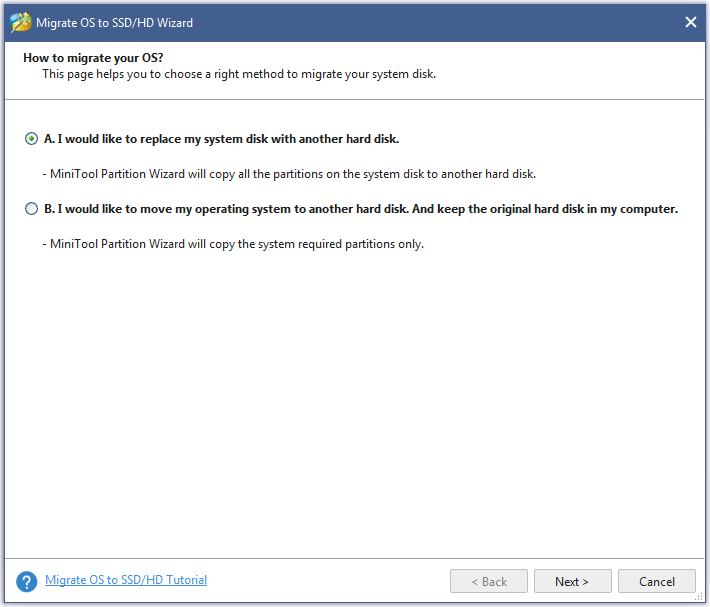
How to Migrate OS to SSD/HD
Step 1. Launch MiniTool Partition Wizard to get its main interface.
Step 2. Click on Migrate OS to SSD/HD in the toolbar.

Step 3. Choose a right method to migrate system disk and click Next.
Option A. To Replace the System Disk
Firstly, please select the target disk to migrate system disk to and click Next.
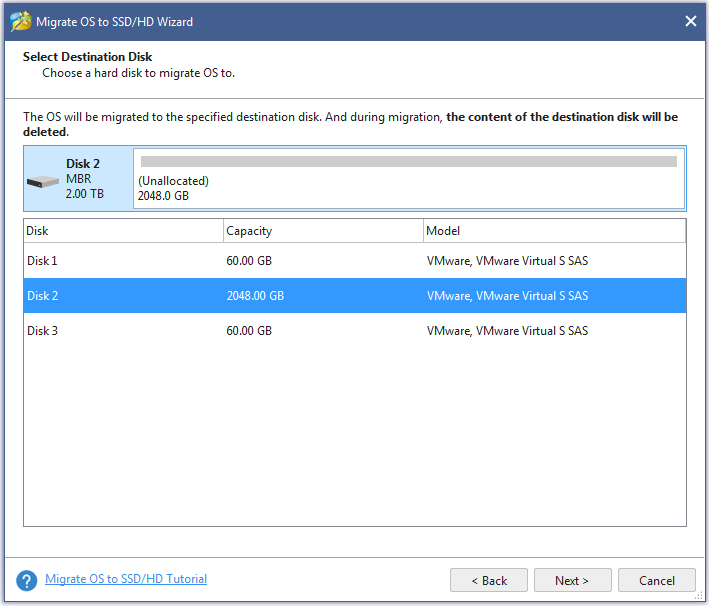
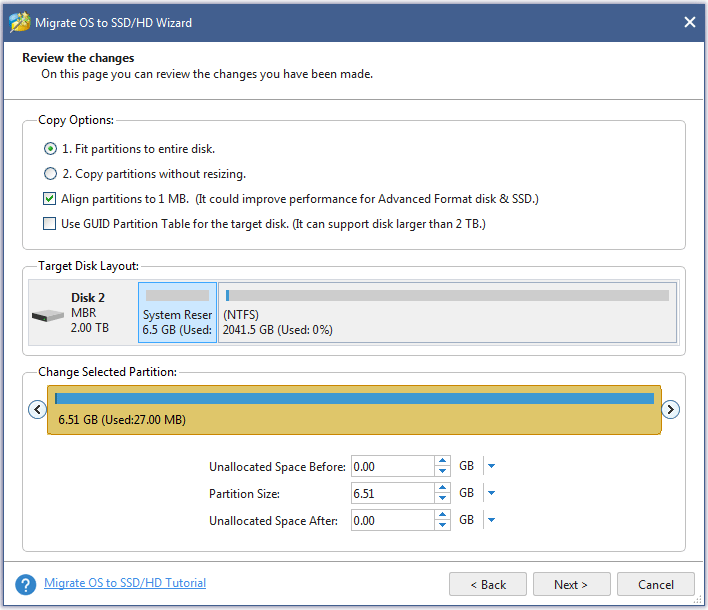
Then, choose a copy option. Alternatively, users can manually edit partition size by inputting exact partition size in MB, GB, or TB.
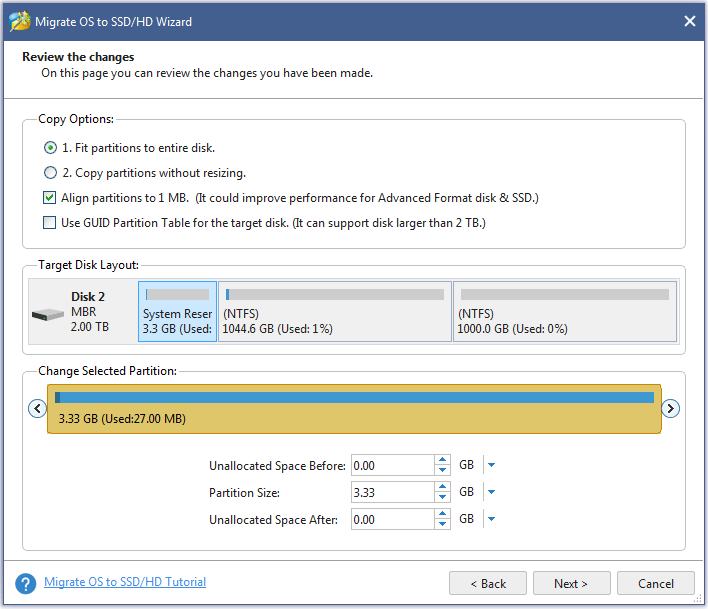
Tricks:
- Align partitions to 1MB could help improve performance for SSD and advanced format disks, so please keep it checked if users are using such devices.
- Checking Use GUID Partition Table for the target disk makes it possible to use all space of hard disk larger than 2TB, but UEFI boot should be enabled in BIOS.
- MiniTool Partition Wizard Free Edition doesn’t support migrating OS on MBR disk using GUID Partition table for the target disk.
- If users want to migrate Windows which is installed on a GPT disk, they will not see the option Use GUID Partition Table for the target disk.
Next, read a popup note and click Finish to continue.
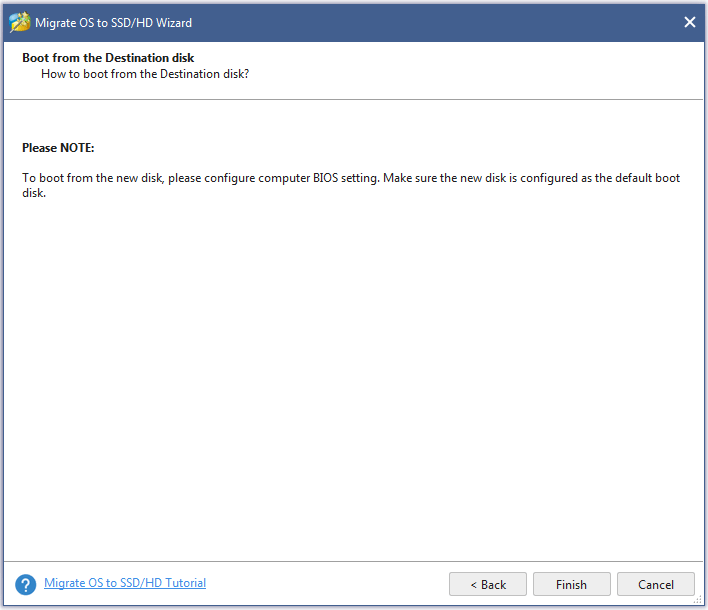
At last, click Apply button to execute pending operations and tap Yes in pop-up prompt window to allow changes.

Option B. To Migrate Windows Only
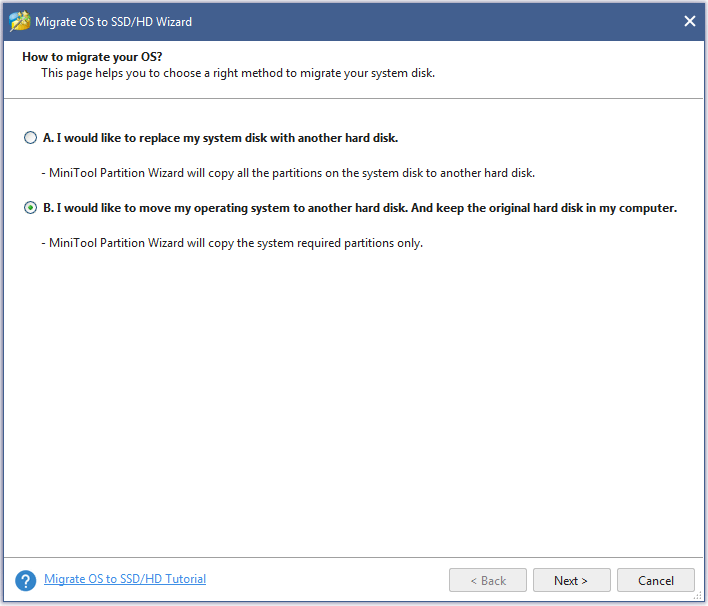
Here, users also need to select the target disk to transfer Windows 10 to and click Next.

Then, select a copy option and click Next.
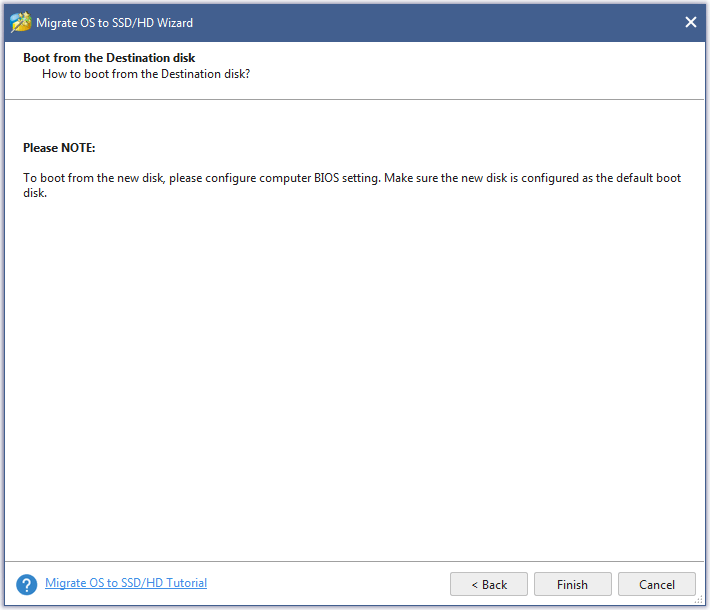
Next, read the boot note and click Finish.
At last, click Apply button in the toolbar to execute pending operations and tap Yes in the pop-up prompt window to allow changes.

SSD Best Sellers
Now you already know how to migrate OS to SSD/HD. Here are the best sellers on the SSD market. Choose one that fits your needs best.
| Product Name | Intel 660p Series (1TB) SSD | Corsair MP500 (480GB) SSD | Samsung 860 EVO (250G) SSD | Samsung 970 EVO NVMe (500GB) SSD | Adata SU800 SATA (1TB) SSD |
| Brand | Intel | Corsair | Samsung | Samsung | Adata |
| Capacity | 1TB | 480GB | 250GB | 500GB | 1TB |
| I/O Speed | Up to 1,800MB/s | Up to 3,000MB/s | Up to 550MB/s | Up to 3500MB/s | Up to 560MB/s |
| Pros | Very good NVMe performance most of the time.Extremely affordable.5-year warranty. |
Black printed circuit board.Copper strip technology.High-Performance.NVMe-Enabled. |
Good overall performance.Outstanding endurance rating.Samsung Magician software.Hardware-Based encryption.Package with DRAM cache and cloning.5-year warranty. |
Affordable (relatively) NVMe drive.Excellent sequential readsAvailable in up to 2TB capacity.Almost 50% shorter file transfer times.5-year warranty. |
Adata SSD Toolbox.Acronis Data Migration.Fair pricing. |
| Cons | Slows to 100MBps writing during very long transfers. |
High initial pricing.Low warranty terms.Lack of progress for the E7 controller. |
Expensive. |
Slows to just over 600MBps after cache is exceeded.Occasionally trails 960 Pro.Lower capacities could be cheaper. |
Micron 384Gbit 3D TLC NAND.Low throughput.High latency.Low notebook battery life. |
| Rating Star | |||||
| Buy | Buy on Amazon | Buy on Amazon | Buy on Amazon | Buy on Amazon | Buy on Amazon |
MiniTool Partition Wizard Is Powerful Portable Partition Magic
Explanation? Well, for some Windows users, they don’t tend to install too much software on the PC, especially the ones they only operate occasionally.
To be honest, disk and partition management also belongs to the occasionally schedule, and users only need partition tools when they have to make the change, such as extend system partition after several years’ usage, while the next time to manage disks and partitions is uncertain.
MiniTool Partition Wizard puts forward portable partition software to meets both sides. You can store it in a USB drive without having to install it on your PC, OR struggle between installing and uninstalling the program for certain reasons.
1. What Can MiniTool Portable Partition Manager Do?
Although MiniTool cuts off the installing process, the features of portable partition manager keep coincident with Partition Wizard Free Edition, because it comes right from the latter one. What you can find in Partition Wizard Free Edition also appear in the portable version. (View full features)
Below is a screenshot after we decompress MiniTool portable partition manager.

Works for Windows 10, Windows 8.1/7/Vista/XP 32-bit and 64-bit
2. How Can You Get MiniTool Portable Partition Magic?
Well, we have prepared a package in consideration of users’ convenience. With this package, you can bring it to anywhere you reach, and deal with the disk & partition issues at home and your workplace; or help your friends to get out of their trouble. Download portable partition magic!
3. How to Use MiniTool Portable Partition Manager?
Step 1. Download MiniTool portable partition manager to your portable USB drive and then decompress the package.
Step 2. When you need to carry out disk and partition management, connect the USB drive to the computer you are going to operate and then you can use MiniTool Partition Wizard without installation.
Upgrade PA Standard to Professional Edition
AOMEI PA Professional includes all functions of the Standard Edition, and it can help you manage your
disk
and partitions easier than the Standard Edition. If you need more functions to manage your partitions
and
hard drives, you can upgrade PA Standard to PA Professional Edition.
|
Basic Partition Management |
||
|
Change Partition Size |
||
|
System Data Migration |
||
|
Convert Disk and Partition |
||
|
Make Bootable Media |
||
|
Disk Partition Utilities |
||
|
Supported Operating Systems |
||
|
Allocate Free Space from One Partition to Another |
||
|
Migrate OS from GPT Disk to GPT/MBR SSD or HDD Migrate OS from MBR Disk to GPT SSD or HDD |
||
|
Convert System/Boot Disk between MBR and GPT Styles Convert Dynamic Disk to Basic Disk without Data Loss Convert Partition between Primary and Logical |
||
|
Partition Alignment Quick Partition Command Line Partitioning |
||
|
Partition Recovery Wizard SSD Secure Erase Wizard Extend Partition Wizard |
||
|
Wipe System Disk Change Serial Number |
||
|
Home Use |
||
|
Business Use |
More Editions for You
Despite this portable partition magic, MiniTool Partition Wizard offers another five editions to satisfy various user demands. Just choose the one that is most suitable for you. To know their differences, please visit Edition Comparison.
| For Home Users | ||
|
Partition Wizard Pro Annual(1-year free upgrade)
$59 Buy Now |
Partition Wizard Pro Deluxe Annual (1-year free upgrade)
$99 |
Partition Wizard Pro Ultimate (lifetime free upgrade)
$129 Buy Now |
| For Server Users | |
|
Partition Wizard Server (1-year free upgrade)
$159 |
Partition Wizard Server (lifetime free upgrade)
$259 |
| For Enterprise Users | |
|
Partition Wizard Enterprise (lifetime free upgrade)
$499 Buy Now |
Partition Wizard Technician (lifetime free upgrade)
$699 Buy Now |
Editors’ Review
- Partition Wizard’s outstanding aspect is not its capabilities, which are largely mirrored in other programs, but how easy it is to use for basic operations.
- Considering this is a truly free tool, I would recommend any Windows user that looks for an easy and powerful way to manage his/her disks and partitions, installing and trying MiniTool Partition Wizard.
- MiniTool Partition Wizard Free Edition does what pricey premium tools do, and more — yet it’s free. It remains our primary disk utility.
- Take one look at MiniTool Partition Wizard: first, it makes partitioning much simpler and friendlier than the Windows tool. Second, it’s much more flexible than Windows’ rather basic tool.
Процесс переноса Windows 10 на SSD или HDD
Прежде чем начать, учитывайте: к компьютеру уже должен быть подключен второй диск — SSD или HDD, причем в процессе все данные с него будут удалены. Также рекомендую закрыть любые программы, связанные с очисткой системы и дисков, желательно отключить антивирусы и неплохо — отключить Интернет (чтобы в процессе не начали скачиваться обновления).
Запускаем MiniTool Partition Wizard Free и выполняем следующие шаги:
На первом экране выберите пункт «Migrate OS» для запуска переноса системы. Есть и другой пункт — Disk Clone, с помощью которого можно выполнить полное клонирование дисков со всеми разделами, но рекомендую использовать именно указанный
Внимание: в последних версиях программы эта функция стала недоступной в бесплатной версии, однако, если вы найдете версию 11.6, там функция работает.
Появится окно с двумя вариантами выбора: первый предполагает полный перенос всех разделов с исходного диска на целевой, включая и те разделы, которые не являются системными. Второй — для переноса только системных разделов, исключая отдельные разделы с данными, что может пригодиться, когда данные вы планируете оставить на первом физическом диске или когда размер нового SSD заметно меньше объема исходного HDD
В обоих случаях с исходного диска ничего удаляться не будет.
На следующем этапе требуется выбрать целевой диск — тот на который будет перенесена система. Напоминаю, если на нем есть данные, они будут удалены в процессе.
Следующий этап позволяет задать размеры разделов на новом диске: их можно оставить без изменений, либо выбрать пункт «Fit partitions to entire disk», что изменит размеры разделов на целевом диске таким образом, чтобы не осталось неиспользуемого места (если второй диск больше), либо система поместилась на него (если размеры разделов на первом диске больше, чем пространство на втором диске, но данными занят объем, который может разместиться на нём). Рекомендую использовать этот пункт, если не знаете, что выбрать.
На следующем экране достаточно нажать «Finish», а затем, в главном окне программы — Apply и подтвердить начало работы, чтобы начать применение изменений.
Процесс, особенно на HDD может занять продолжительное время (иногда — очень) и состоит из двух этапов: сначала — в запущенной ОС, затем — перезагрузка компьютера по нажатию кнопки «Restart Now» и продолжение процесса после перезагрузки.
Внимание: при перезагрузке вы увидите надпись «Press Any Key to cancel» (нажмите любую клавишу, чтобы отменить) на черном экране. Не нажимайте, если не хотите отменить продолжение процесса переноса ОС.
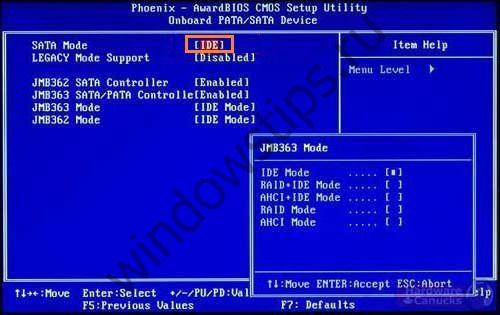
После некоторого периода ожидания компьютер перезагрузится. Причем, в зависимости от параметров БИОС, система может загрузиться как со «старого», так и с «нового» диска (можно проверить в проводнике по размеру — диск, с которого загрузилась текущая система всегда будет под буквой C, также можно посмотреть в «Управлении дисками»). Рекомендую зайти в БИОС/UEFI и выбрать нужный диск загрузки.
На этом процесс завершен, но иногда возможны некоторые проблемы после переноса.
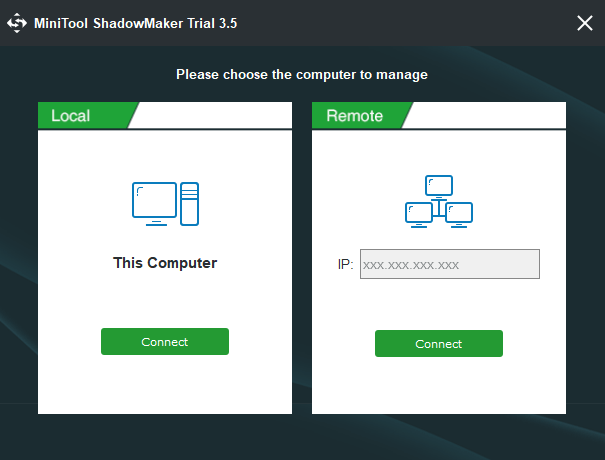
Remote
The Remote computer is a computer which you cannot access physically. But you can access or manage it via some kind of computer network. The Remote connections are made by the use of network that connects to the computer and the device that is used to access it.
For example, MiniTool ShadowMaker enables you to access it or manage it after inputting the IP address. After that, you can manage the remote computer as long as they are on the same LAN.
How do you know the IP address of your computer?
In order to know the IP address of your computer, you can open the Command Line window, then input the ipconfig command and hit Enter to continue. Thus, you can see that the IPv4 address of your computer is listed here, which can be used to access your computer by other people. Of course, you can also know the IP address on the Network and Sharing Center.
How to access Remote computer?
Go to the Tools page, click Remote, and MiniTool ShadowMaker will relaunch. Then, input an IP address in the pop-up window and press the right Connect button to start the remote backup.

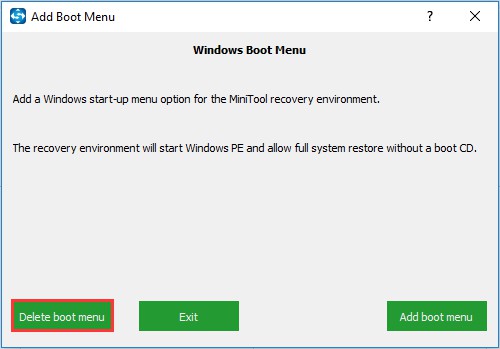
Add Boot Menu
Normally, it is required to burn an .iso file to an USB flash drive or CD/DVD disk to create a bootable media. However, MiniTool ShadowMaker puts forward an easier way to achieve this aim. By simply adding MiniTool ShadowMaker to the boot menu, you can enter the MiniTool Recovery Environment which will start Windows PE and allow full system restore without a bootable media.
How to Add Boot Menu
Step 1. Enter Add Boot Menu under Tools.

Step 2. Select Add Boot Menu and confirm the operation.
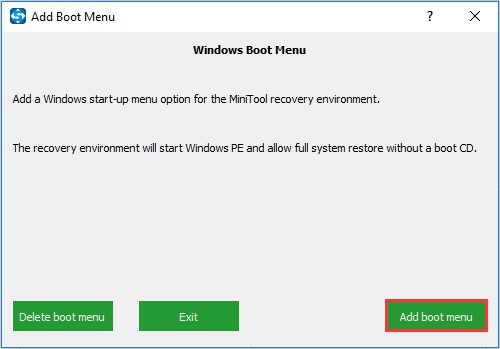
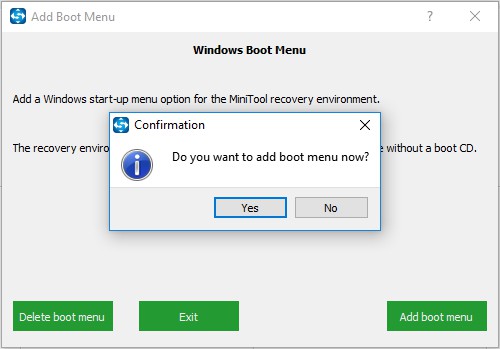
Step 3. Wait for the operation to complete.
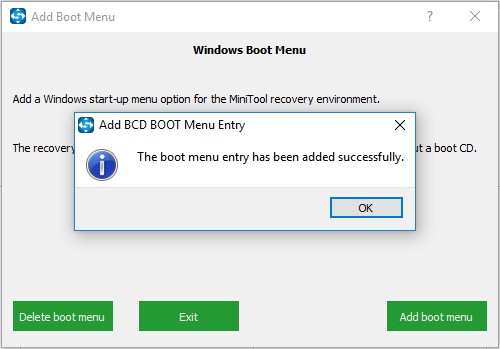
Note
When MiniTool Recovery Environment is added to Windows start-up menu, you can choose to enter Windows OS or choose to enter MiniTool Recovery Environment.

How to Delete Boot Menu
If you no longer need MiniTool Recovery Environment, you can delete the boot menu.
Step 1. Enter Add Boot Menu under Tools.

Step 2. Select Delete Boot Menu and confirm the operation.
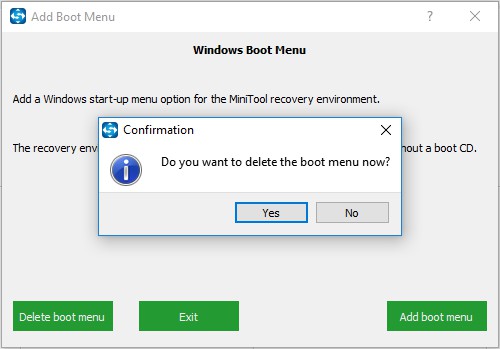
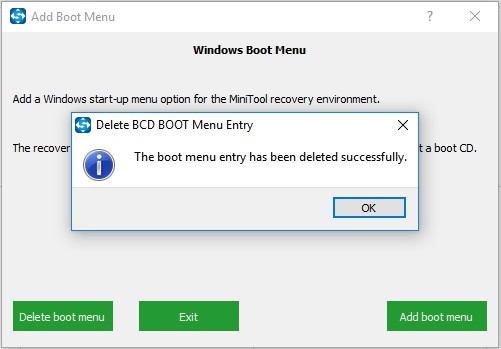
The deletion will be finished quickly.
Guides & Tips
-
A Full Guide to Fix Nintendo Switch Error Code 2005-0003
Do you encounter the Nintendo Switch error code 2005-0003? Do you troubleshoot it successfully? If you are still seeking solutions, this post will be helpful.
→
-
SCSI vs SAS vs SATA Drive: What’s the Difference?
This post introduces SCSI drives and tells the differences between SCSI vs SATA, and SCSI vs SAS.
→
-
Ark Failed to Install Mod Map? Here Is How to Fix It
Do you like to play Ark on PC? Have you ever encountered Ark failed to install mod map error message? Don’t worry. Here are some solutions to this issue.
→
-
VHD VS VHDX – Everything You Need to Know about VHD and VHDX
What are VHD and VHDX? Do you know the differences between VHD and VHDX? In this post, and you can get everything you want to know about VHD VS VHDX.
→
-
Enterprise SSD vs Consumer SSD, Which One Is Your Best Choice
How much do you know about enterprise SSD and consumer SSD? In this article, you will get the differences between these two types of SSDs and further details.
→
-
Photoshop Keeps Freezing in Windows? Fix It Now!
Sometimes, Adobe Photoshop might keep freezing for odd reasons. In this article, you will learn about 7 methods to fix Photoshop freezing issue in Windows.
→