Gimp 2.10 release notes
Содержание:
- FTP and Web Mirrors
- Search system
- Свойства слоя
- Troubleshooting
- Digital Photography
- Miscellaneous
- GIMP for macOS
- Intention
- Under the Hood
- GIMP extensions
- GIMP for Windows
- Crop an Image
- Moving an intersecting pair of guides
- Bug fixing
- Linear color space workflow
- How to GIMP
- Rotate and/or Flip an Image
- Selective Colorization Example
- How You Can Help
- Support of user-installed fonts on Windows
- Первый урок — Знакомство с GIMP
- Miscellaneous
FTP and Web Mirrors
We had a server move a while back that caused us to lose our existing mirrors (moved from physical to virtual server and to an environment that doesn’t allow FTP access).
On the plus side, we are now able to offer rsync access to download.gimp.org.
If you are running one of the existing GIMP mirrors, or want to create a new one, please contact us to get your rsync credentials.
- https://mirrors.ukfast.co.uk/sites/gimp.org/pub/gimp/
- ftp://mirrors.ukfast.co.uk/gimp.org/pub/gimp/
- rsync://mirrors.ukfast.co.uk/gimp.org/pub/gimp/
- Denmark
- https://mirrors.dotsrc.org/gimp/gimp/
- ftp://mirrors.dotsrc.org/gimp/
- rsync://mirrors.dotsrc.org/gimp/
- Finland
- https://www.nic.funet.fi/pub/mirrors/ftp.gimp.org/
- ftp://ftp.funet.fi/pub/mirrors/ftp.gimp.org/
- rsync://rsync.nic.funet.fi/ftp/pub/mirrors/ftp.gimp.org/
- France
- http://ftp.iut-bm.univ-fcomte.fr/gimp/
- ftp://ftp.iut-bm.univ-fcomte.fr/gimp/
- rsync://ftp.iut-bm.univ-fcomte.fr/gimp/
- Germany
- https://ftp.fau.de/gimp/gimp/
- ftp://ftp.fau.de/gimp/gimp/
- rsync://ftp.fau.de/gimp/
- https://ftp.gwdg.de/pub/misc/grafik/gimp/
- ftp://ftp.gwdg.de/pub/misc/grafik/gimp/
- https://artfiles.org/gimp.org/pub/gimp/
- Greece
- https://ftp.cc.uoc.gr/mirrors/gimp/
- ftp://ftp.cc.uoc.gr/mirrors/gimp/
- Japan
- http://www.ring.gr.jp/pub/graphics/gimp/
- Netherlands
- https://ftp.snt.utwente.nl/pub/software/gimp/gimp/
- ftp://ftp.snt.utwente.nl/pub/software/gimp/gimp/
- Philippines
- http://mirror.rise.ph/gimp/
- ftp://mirror.rise.ph/gimp/
- Poland
- https://ftp.icm.edu.pl/pub/graphics/gimp/
- ftp://ftp.icm.edu.pl/pub/graphics/gimp/
- rsync://ftp.icm.edu.pl/pub/graphics/gimp/
- gopher://ftp.icm.edu.pl/1/pub/graphics/gimp/
- Sweden
- https://ftp.lysator.liu.se/pub/gimp/
- ftp://ftp.lysator.liu.se/pub/gimp
- rsync://ftp.lysator.liu.se/pub/gimp
- Ukraine
- https://gimp.ip-connect.info/gimp/
- rsync://gimp.ip-connect.info/gimp/
- ftp://gimp.ip-connect.info/mirror/gimp/
- https://mirror.klaus-uwe.me/gimp/gimp/
- ftp://mirror.klaus-uwe.me/gimp/
- rsync://mirror.klaus-uwe.me/gimp/
- United Kingdom
- https://www.mirrorservice.org/sites/ftp.gimp.org/pub/gimp/
- ftp://ftp.mirrorservice.org/sites/ftp.gimp.org/pub/gimp/
- rsync://rsync.mirrorservice.org/ftp.gimp.org/pub/gimp/
- United States
- https://mirror.jaleco.com/gimp/gimp/
- https://mirror.umd.edu/gimp/gimp/
- http://gimp.cp-dev.com/
- ftp://devhost.cp-dev.com/gimp
- rsync://gimp.cp-dev.com/gimp
- https://mirrors.syringanetworks.net/gimp/gimp/
- ftp://mirrors.syringanetworks.net/gimp/
- rsync://mirrors.syringanetworks.net/gimp/
- https://mirrors.xmission.com/gimp/gimp/
- ftp://mirrors.xmission.com/gimp/gimp/
Search system
As GIMP keeps growing and getting more features, it becomes increasingly
difficult to locate this or that command in the user interface. This is
especially true when you are a new user who has yet to master image editing,
or an experienced user who is accustomed to a different application.
GIMP 2.10 comes with a search system that allows easily locating a command available in GIMP’s menu. Press the slash key (), type a keyword,
and choose the command that looks most applicable.
Contributors: Srihari Sriraman, Jehan Pagès…
Simplified bug reporting and crash recovery
We need good bug reports to make GIMP better for you, so we introduced a new
feature to watch and intercept critical errors and crashes, then generate a
useful error log that you can copy/paste to a bug report.
On development versions, the dialog will be raised on all kind of errors (even
minor ones). On stable releases, it will be raised only during crashes. The
default behavior can be customized in Edit > Preferences > Debugging.
Please note that we still need you to provide context, e.g. what you were doing
when a crash occurred. A step-by-step description of how to reproduce this bug
will be most helpful.
Additionally, in case of a crash, GIMP will now attempt to backup all images
with unsaved changes, then suggest to reopen them the next time you start the application.
We cannot guarantee 100% success, but it will succeed sometimes, and this might
rescue your unsaved work!
Contributors: Jehan Pagès…
Свойства слоя
Каждый слой изображения имеет ряд важных атрибутов:
- Имя. Каждый слой имеет собственное название. Оно назначается автоматически при создании слоя, но вы можете его изменить. Имя слоя изменяется с помощью двойного щелчка на нём в диалоге слоёв, или с помощью пункта контекстного меню Изменить атрибуты слоя.
- Присутствие или отсутствие альфа-канала.Альфа канал хранит информацию прозрачности слоя.
- При создании нового слоя, даже с непрозрачным типом заполнения, альфа-канал создаётся автоматически. Это относится ко всем слоям, кроме фонового. Чтобы получить фоновый слой с прозрачностью, либо создайте новое изображение с прозрачным заполнением, либо используйте команду Слой → Прозрачность → Добавить канал альфа.
- Большинство операций не может быть применено к слою без альфа-канала, например перемещение слоя в другую позицию в списке слоёв. Для удаления альфа канала активируйте нужный слой щелчком по нему в диалоге слоев, и выберите Слой → Прозрачность → Удалить альфа канал.
- Видимость. Существует возможность временно убрать слой с изображения без его удаления, с помощью щелчка по пиктограмме в диалоге слоёв. Это называется «переключением видимости» слоя.
- Связь с другими слоями.Если вы щёлкните между пиктограммой глаза и миниатюрой слоя, вы увидите пиктограмму цепочки, которая позволяет вам группировать слои для операций с несколькими слоями (к примеру с инструментом перемещение).
- Размер. В GIMP границы слоя необязательно равны границам его содержащего изображения. Когда вы создаёте текст, к примеру, каждый текстовый элемент располагается в своём отдельном слое, и слой равен размеру текста, не больше. При создании нового слоя с помощью вырезания и вставки слой создаётся достаточного размера для размещения вставленного содержимого. В окне изображения границы текущего активного слоя показаны чёрно-жёлтой пунктирной линией.
- Чтобы изменить размер слоя нужно выполнить команду Слой → Размер слоя и в открывшемся окне задать необходимые размеры.
- Непрозрачность. Непрозрачность определяется диапазоном от 0 до 100, где 0 означает полную прозрачность, и 100 означает полную непрозрачность.
- Режим. Режим слоя определяет способ смешения цветов текущего слоя и слоев, которые расположены ниже.
Troubleshooting
Yes, GIMP does support graphic tablets and maps pressure, stroke speed, and
other events to its advanced brush engine properties. However, the version of
the user interface toolkit that GIMP currently relies on (GTK+ 2.x) is broken
beyond repair on Windows and Mac with regards to supporting some advanced input
devices such as Wacom’s.
To fix this, we need to port GIMP to GTK+3 where everything mostly works as
expected. This is a work in progress.
My macOS system doesn’t let me open GIMP. What do I do?
We haven’t yet joined the Apple Developer Program, so the DMG files we provide
are unsigned, hence the “unidentified developer” warning. Please follow the
procedure described in Apple’s knowledge base.
Digital Photography
Fullscreen Editing
The fullscreen mode has been improved to not only allow getting a full scale preview of the artwork, but also allow comfortable editing. The artist has maximum screen estate available while all functionality is quickly accessible by pressing the Tab key (toggles visibility of all docks) when working fullscreen.
Whether painting or touching up photos, fullscreen editing keeps all the distracting elements out of sight on a key press. It’s like observing stars in a field as opposed to a light-polluted city.
Color Management and Soft-proofing

GIMP now provides full support for color profiles allowing precise color modification throughout the whole ‘digital darkroom’ process.
For more information, see color management.
New Crop Tool

Just like the selection tools, the new crop tool has been enhanced since the last release. The resize handles actually resize the crop rectangle instead of providing both resize and move functionality. The tool behaves more naturally and consistently with other GIMP tools.
To move, simply drag the rectangle clicking within the area. Resizing is possible in one or two axes at the same time dragging the handle-bars on the sides and corners. The outside area is darkened with a nice passepartout effect to better get the idea of how the final crop will look like.
Improved Printing

Printing has been largely improved. GIMP makes use of the advancements in the gtk+ printing API so that you can control all aspects of the printout with an easy to understand interface and immediate preview.
Red Eye Removal
While numerous red-eye workflows exist already, GIMP now features a very convenient auto-magic filter to remove red eye from your shots.
Perspective Clone

A common task in image editing is to copy pixels from somewhere in an image to somewhere else. Traditionally this has been done using the Clone Tool. To make it easy to perform cloning while taking the perspective of an image into account, a new Perspective Clone Tool has been added to GIMP.
All video demonstrations can also be viewed or downloaded from a separate page.
Lens Distortion

A very common problem exposing itself especially when using cheaper lenses or expensive lenses pushed to their limits, is barrel distortion and vignetting. Luckily GIMP provides a brand new filter to compensate for both problems. Saving photographer’s pocket is our mission!
All video demonstrations can also be viewed or downloaded from a separate page.
JPEG quality
When editing photographs, it is usually better to work with a lossless image format and only save the final result as JPEG. But if you have to work with JPEG images as input, then a new option allows you to use the same compression parameters as the original image when you re-save it.
Miscellaneous
Plug-in Development
GIMP 2.8 also further enhances its scripting abilities. For example, API changes to support layer groups have been made. Here is a list of new symbols in GIMP 2.8.
GEGL
The projection code which composes a single image from layers has been ported to GEGL. This includes the layer modes, as well as support for layer groups. Also, preparations have been made for better and more intuitive handling of the floating selection.
Developers: Michael Natterer, Martin Nordholts
Roadmap
The GIMP developers now maintain a roadmap for GIMP development found here: https://wiki.gimp.org/index.php/Roadmap
GIMP for macOS
Note: the currently available package provides GIMP 2.10.14 and has not yet updated to the latest version, GIMP 2.10.22. We’re working on that, please check back later.
Download GIMP 2.10.14
via BitTorrent
Download GIMP 2.10.14
directly
The download links above will attempt to download GIMP from one of our trusted mirror servers.
If the mirrors do not work or you would rather download directly from our server, you can get the direct download here.
Supported OS: macOS 10.9 Mavericks or over
Since the 2.8.2 version, GIMP runs on OSX natively. No X11 environment is required.
Native build
The official GIMP 2.10 DMG installer (linked above) is a stock GIMP build without any add-ons. Just open the downloaded DMG and drag and drop GIMP into your «Applications» folder.
The SHA256 hash sum for is:
52654d85f894834f6c134c724beff3eddf212a1bda317299314322cfeff97e52
Check it on
VirusTotal:
Macports
An easy way to compile and install GIMP and other great Free software on your Mac is by using Macports. The installer allows you to choose from a large directory of packages. To install gimp using Macports, you simply do once you have Macports installed.
Last we checked, the GIMP
port file pointed to the current stable release
and we have reports from people who’ve built GIMP
successfully this way.
Download Macports
Homebrew
Homebrew is similar to Macports and provides packages (aka formulas) to install, either by compiling them from source or by using pre-made binaries. There are indications that there is now a formula for GIMP, installable with: .
Download Homebrew
NOTE! Please be aware that it was announced recently that Homebrew is using analytics.
To turn this off in homebrew then run:
You can read more about this on Brew Analytics.
Fink
Fink is a package repository that offer mostly precompiled binaries. It provides the apt-get command known to e.g. Debian and Ubuntu users, and installing GIMP is as easy as once you have installed the Fink installer.
If there’s no binary package, then will compile GIMP from source.
Disclaimer: we haven’t been able to determine if it is
possible to install or build recent GIMP from Fink.
Last we checked, GIMP 2.6.12 appears to be the most recent GIMP package that is offered there.
Intention
So you installed GIMP on your computer, congratulations! GIMP is a very powerful image manipulation software, but don’t let that intimidate you. Even if you don’t have time to learn advanced computer graphics, GIMP can still be a very useful and handy tool for quick image modifications.
It is my hope that these few examples will help to solve those small, quick modifications that you may need to apply to an image. Hopefully this will lead to learning even more powerful image editing capabilities that GIMP is capable of as well.
For quick access, these are the four main points I’ll cover in this quick tutorial:
In keeping with the spirit of the predecessor to this page, I will be using images from the Astronomy Picture of the Day (APOD), provided by NASA.
All you need to know to follow these quick examples is to be able to find your image and open it:
File → Open
Under the Hood
GEGL
Important progress towards high bit-depth and non-destructive editing in GIMP has been made. Most color operations in GIMP are now ported to the powerful graph based image processing framework GEGL, meaning that the internal processing is being done in 32bit floating point linear light RGBA. By default the legacy 8bit code paths are still used, but a curious user can turn on the use of GEGL for the color operations with Colors / Use GEGL.
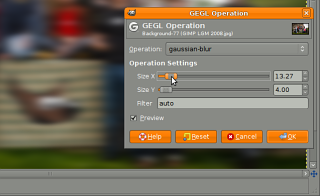
In addition to porting color operations to GEGL, an experimental GEGL Operation tool has been added, found in the Tools menu. It enables applying GEGL operations to an image and it gives on-canvas previews of the results. The screenshot to the right shows this for a Gaussian Blur.
Minor Changes
Ported many widgets to use the 2D graphics library cairo for drawing. See this comparison for an example of how much better this looks.
GIMP extensions
Lastly Jehan, from ZeMarmot project,
has been working on extensions in
GIMP.
An extension could be anything from plug-ins to splash images, patterns,
brushes, gradients… Basically anything which could be created and added
by anyone. The end goal would be to allow creators of such extensions to
upload them on public repositories, and for anyone to search and install
them in a few clicks, with version management, updates, etc.
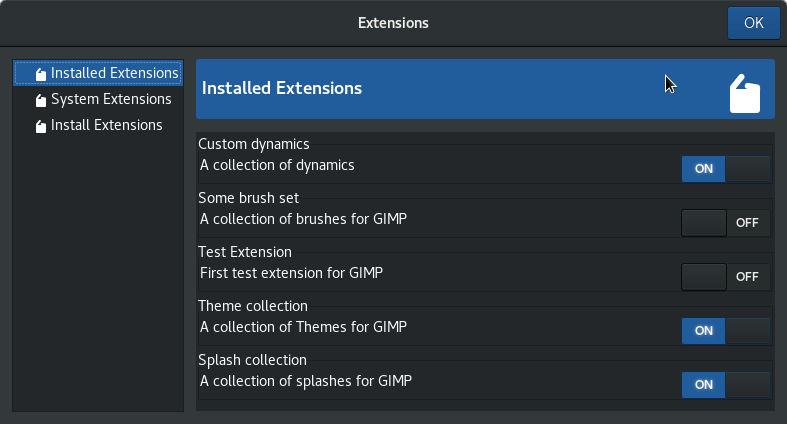
Extension manager in future GIMP
This work is also only in the development branch for the time being,
but should make it to a GIMP 2.10.x release at some point in the future
as well.
GIMP for Windows
Download GIMP 2.8.22
via BitTorrent
Download GIMP 2.8.22
directly
The download links above will attempt to download GIMP from one of our trusted mirror servers.
If the mirrors do not work or you would rather download directly from our server, you can get the direct download here.
These links download the official GIMP installer for Windows (~140-150 MB).
The installer contains both 32-bit and 64-bit versions of GIMP, and will automatically use the appropriate one.
BitTorrent is a peer-to-peer file sharing system. It works by downloading GIMP from a distributed network of BitTorrent users, and may improve download speed dramatically.
Choosing this option will download the torrent file for the GIMP installer.
You may need to install a torrent client to make use of this file. Learn more…
GIMP User Manual
These links download language-specific Windows installers for GIMP’s local help.
By default, they will place the help files with your GIMP installation.
Note: GIMP uses online help by default. If you want to use this local help offline, you will need to change GIMP’s help settings.
- In GIMP, select > >
- For «User manual», select «Use a locally installed copy»
- Under «Help Browser», you can choose between your system’s web browser and GIMP’s help browser plugin (if available).
See the for more settings.
Crop an Image
There are numerous reasons you may want to crop an image. You may want to remove useless borders or information for aesthetic reasons, or you may want the focus of the final image to be of some particular detail for instance.
In a nutshell, cropping is just an operation to trim the image down to a smaller region than what you started with:
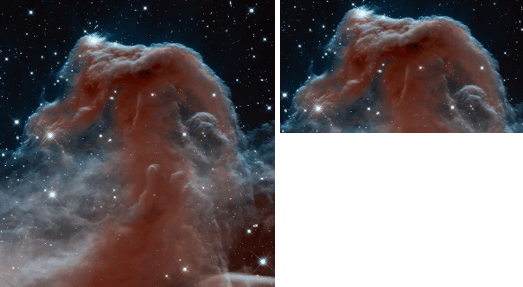
Original image (left), cropped image (right).
The procedure to crop an image is straightforward. You can either get to the Crop Tool through the tools palette:
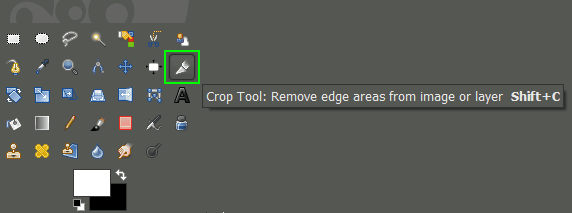
Crop Tool on the Tools Palette.
Or you can access the crop tool through the menus:
Tools → Transform Tools → Crop
Once the tool is activated, you’ll notice that your mouse cursor on the canvas will change to indicate the Crop Tool is being used.
Now you can Left-Click anywhere on your image canvas, and drag the mouse to a new location to highlight an initial selection to crop. You don’t have to worry about being exact at this point, as you will be able to modify the final selection before actually cropping.
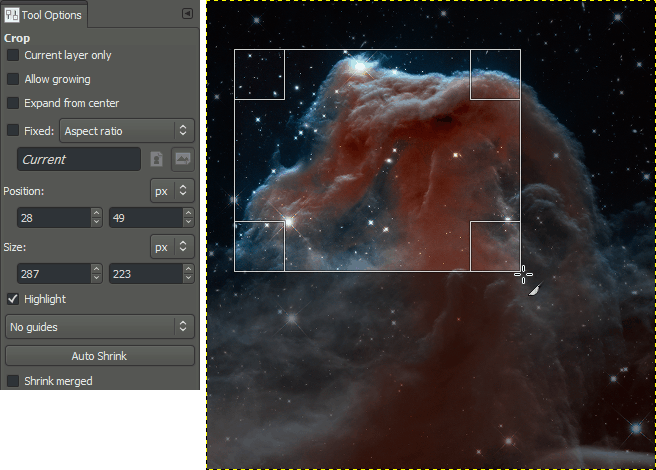
Initial pass with the Crop Tool.
Crop Tool options (left), cropping on the canvas (right).
Moving an intersecting pair of guides
The Move tool can now move together an intersecting pair of guides. by
dragging the guides at their point of intersection. This is useful when
the guides are used to mark a point, rather than a pair of lines (e.g.,
as is the case for the mandala symmetry guides, which mark the
symmetry’s point of origin).
Bug fixing
Many bugs were fixed, some more severe than others (in particular a
few crashes), as well as some code cleaning, factorization, and so on.
The usual deal!
More than the new features, we actually thought these issues were enough
to warrant this new release.
Among most pesky bugs fixed:
- crashes for various reasons, with more crashes to fix yet;
- various color management related bugs;
- unwanted change of foreground and background colors in tools’ presets;
- brush transformation improved and fixed in various places in symmetry
painting mode; - a few localization bugs, and most importantly broken translation
display for several supported languages (so far, we believe it to be a
bug in the Pango dependency); - some brush format bugs;
- …
And more. GIMP 2.10.12 is the result of about 200 commits in 2 months!
We will focus below on two specific bug fixing which deserve mentioning.
Linear color space workflow
Another benefit of using GEGL is being able to work on images in a linear RGB
color space as opposed to gamma-corrected (perceptual) RGB color space.
Here is what it boils down to:
- You now have both linear and perceptual versions of most blending modes.
- There is now a linear version of the Color Invert command.
- You can freely switch between the two at any time via Image > Precision submenu.
- You can choose which mode is displayed in the Histogram docker.
- You can apply Levels and Curves filters in either perceptual or linear mode
- When higher than 8-bit per channel precision is used, all channels data is linear.
- You can choose whether the gradient tool should work in perceptual RGB, linear
RGB, or CIE LAB color space
Contributors: Michael Natterer, Øyvind Kolås, Ell…
How to GIMP
Author: Kat LandrethFormat: PDF ebookISBN-10: N/AISBN-13: N/APublisher/Date: Self-published/May 2013Website: http://howtogimp.com/gimp-book/
Description: A beginner’s guide to using GIMP for photo editing, and basic graphics like using text on images. The book starts from the very beginning. You’ll work through clearly written tutorials using over 30 high quality practice images to learn everything from drawing simple shapes, to using advanced tools like layers, and layer masks. You’ll learn how to use tools effectively, rather than on memorizing steps in tutorials. By the end of the book, you’ll be ready to follow and adapt online tutorials with ease. You’ll even have the confidence to use GIMP without tutorials.
Rotate and/or Flip an Image
There may be a time that you would need to rotate an image. For instance, you may have taken the image with your camera in a vertical orientation, and for some reason it wasn’t detected by GIMP as needing to be rotated (GIMP will normally figure this out for you, but not always).
There may also be a time that you’d like to flip an image as well. These commands are grouped together under the same menu item:
Image → Transform
Flip an Image
If you want to flip your image, the Transform menu offers two options, Flip Horizontally, or Flip Vertically. This operation will mirror your image along the specified axis. For example, here are all of the flip operations shown in a single image:
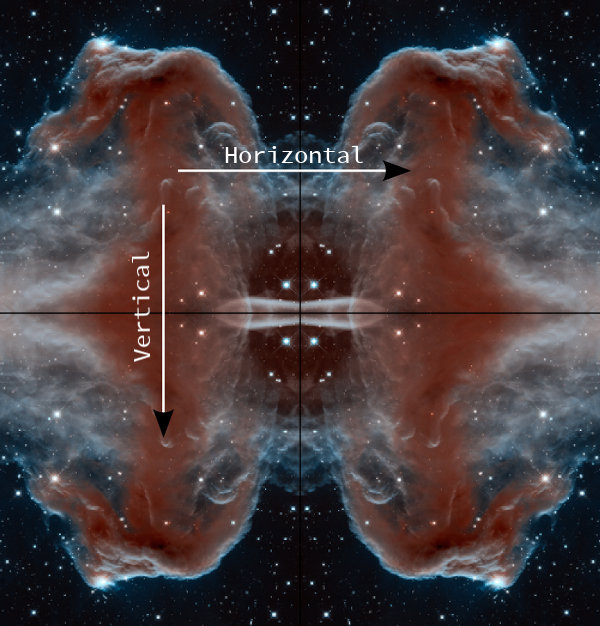
All flips applied to base image (top left).
Rotate an Image
Image rotation from the Transform menu is contrained to either 90° clockwise/counter-clockwise, or 180°.
Don’t mis-interpret this to mean that GIMP cannot do arbitrary rotations (any angle). Arbitrary rotations are handled on a per-layer basis, while the image rotation described here is applicable to the entire image at once.
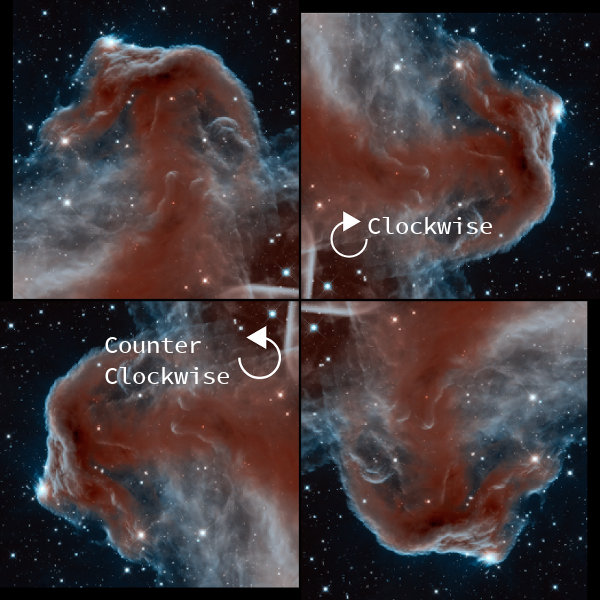
Original (top left), 90° clockwise (top right)
90° counter-clockwise (bottom left), 180° (bottom right)
Selective Colorization Example
A good example of the application of layer masks is doing selective colorization of an image (selectively allowing color to show through a mostly black and white image). I’ll walk through how to easily do this with an image from Mardi Gras 2013:
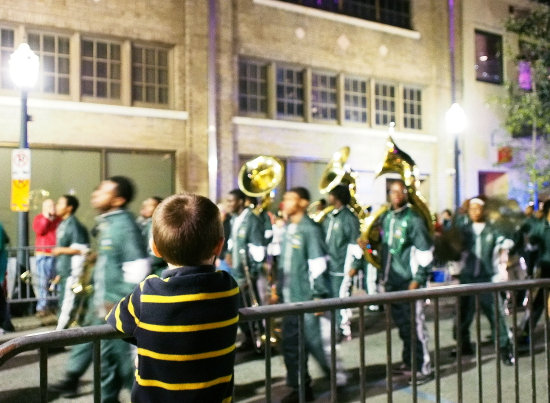
Mardi Gras 2013, Mobile, AL
Start the process by duplicating the base image (Shift+Ctrl+D, or Right-Click layer → Duplicate Layer). From the menu:
Layer → Duplicate Layer
Then desaturate the upper layer using:
Colors → Desaturate
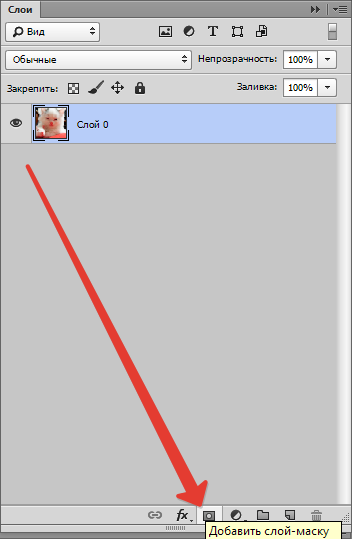
Following the steps above, add a layer mask to the desaturated layer and initialize it to White (full opacity). At this point, the Layers dialog should look like this:
As before, set your foreground color to black. This time, rather than filling selections, we are going to use the Paintbrush Tool to paint areas of the image we want the color to show through from the layer below.
I decided to paint the boy on the fence. Using the Paintbrush Tool I painted over his shirt and head. This allowed those colors to show through from the layer below. Here are the results after painting:
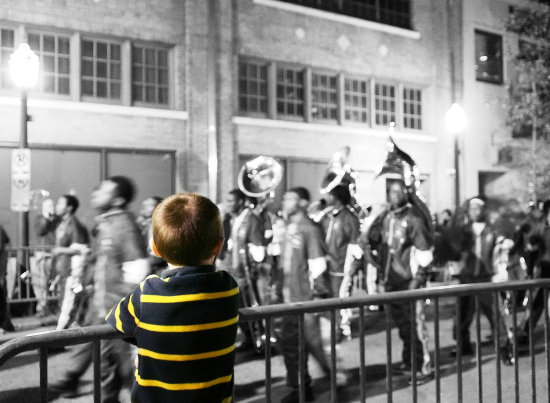
Simple Selective Colorization Example
To illustrate what was done, here is the layer mask I painted to achieve the above result:

Layer mask isolated to illustrate
Of course, I could have chosen a different color than black to create the mask. If I wanted a slightly more muted color I could have painted with a more middle gray vs. black:

Simple Selective Colorization Example (painted with gray vs. black).
How You Can Help
GIMP is Free Software and a part of the GNU Project. In the free software world, there is generally no distinction between users and developers. As in a friendly neighbourhood, everybody pitches in to help their neighbors. Please consider the time you give in assistance to others as payment.
Ways in which you can help:
- program new features,
- report bugs (errors in the program),
- test existing features and provide feedback,
- add documentation,
- translate GIMP to your own language,
- translate the documentation,
- write tutorials,
- improve this website,
- make artwork for GIMP,
- let people know you used GIMP for your artwork,
- give away copies of GIMP,
- help others to learn to use GIMP, etc.
As you can see, anyone can help.
Development Status
The team is currently busy working on v3.0. This will be a port of GIMP to
GTK+3, much newer and better supported version of the user interface toolkit.
Most of GIMP’s source code is related to the user interface, so this port is a
major undertaking, especially since we shall break API and refactor numerious
parts of the program.
We still need to port more plugins to become GEGL operations. If you are willing
to help with that, please refer to the Porting filters to GEGL
page to see what you could work on.
To get a better understanding of where the project is heading to, which features
are planned etc., please visit the Roadmap page.
Bug Reports
GIMP is not a bug-free application nor is any other application so reporting the bugs that you will encounter is very important to the development, it helps the developers to make GIMP more stable and more bug free.
You don’t have to be a developer or a everyday user to report bugs. It can be hard to report a bug the first time you try it out but don’t just quit the whole bug report if you think it is hard. Instead, look at the bugs page you will find some very good help about this.
Web Development
Creating websites that contain useful information is very important. It is actually just as important as doing bug reports. A website contains a lot of information that is needed for the development to move on and it also contains information that will help the public to understand what the application is all about.
Support of user-installed fonts on Windows
Though not fully tested, we now have a temporary support of a new
Windows 10 feature. Windows 10 users indeed now have the ability to
since a recent update.
Therefore we added this non-admin font folder to our search path when
running GIMP. It should be only a temporary workaround since eventually
this should be
supported
by fontconfig, the upstream library used to manage fonts.
Note also that it is not fully tested because of our lack of Windows
developers. Therefore we are mostly hoping it will work as expected, and
this is a good time to make a call again:
Seriously, none of our current developers use Windows and bugs are
piling up in our bug tracker for this platform (same can be said on
macOS by the way), whereas GIMP is so enjoyably stable on GNU/Linux. We
are happy to do the occasional good deeds, but there are limits to what
we can do for a platform we don’t use. On the other hands, we happily
welcome patches and new contributors!
Первый урок — Знакомство с GIMP
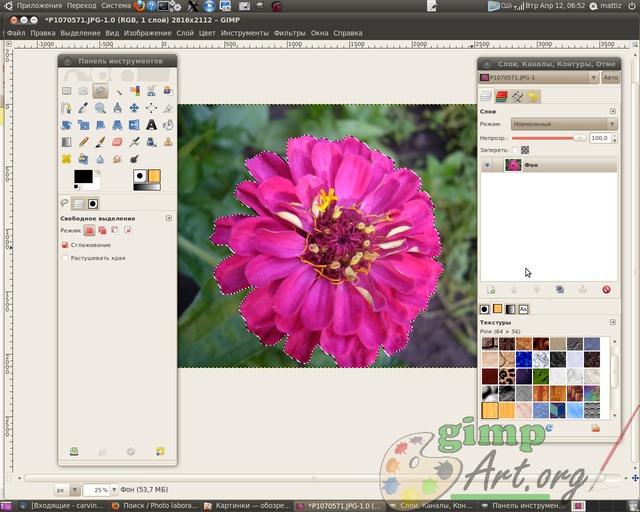
И так изображение у нас открыто. И как помните из задания: необходимо выделить объект на переднем плане, а на переднем плане у нас красивый цветок. На панели инструментов выбираем инструмент «Свободное выделение» или как его еще называют «Лассо». Теперь аккуратно используя мышь, обводим по контуру цветок. Не торопитесь, чем больше контрольных участков у вас получится, тем четче будет выделен объект.
Чтобы увеличить изображение зажмите клавишу Ctrl и с помощью колесика мыши отрегулируйте необходимый масштаб.
Более подробно о различных способах выделения в гимпе читайте в статье методы и способы выделения в гимпе, от простого к сложному.
854
Выделение цветка заканчиваем на начальной точки, с которой мы начали обводить.(просто щелкаем мышкой по ней). При этом наше выделение сменится на так называемую «муравьиную дорожку».
Теперь воспользуемся еще одной командой для улучшения выделения. Нам необходимо смягчить края у выделения, размыть их немного и в этом нам поможет инструмент «Растушевать» из пункта меню Выделение.
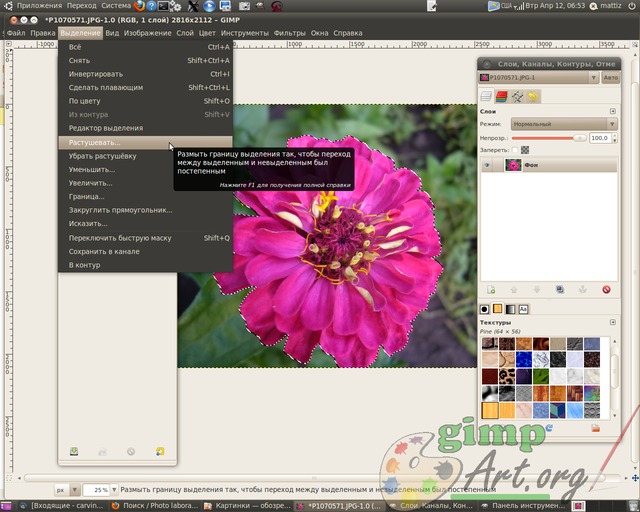
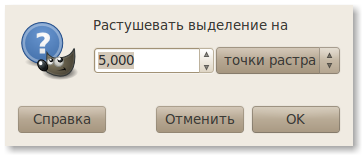
Значение устанавливаем на 5 пикселей.
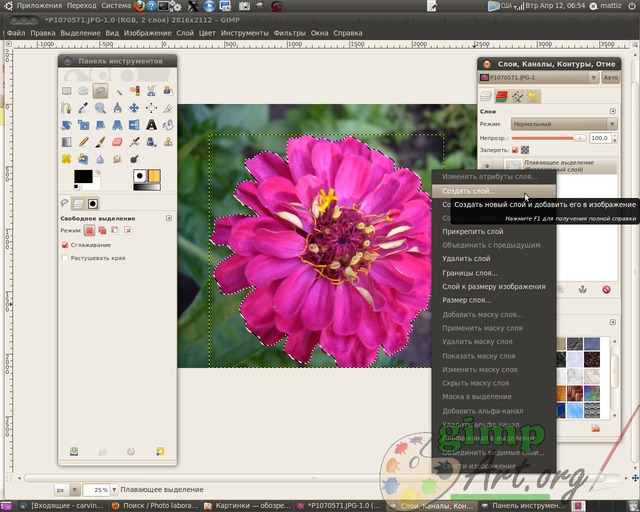
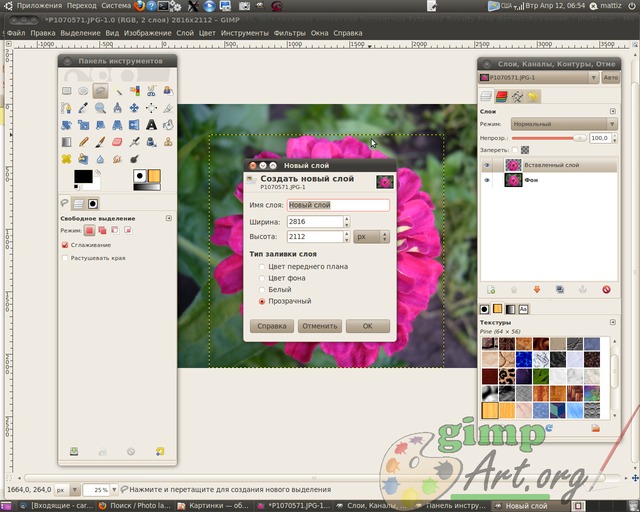
Молодцы. Копируем выделенный фрагмент цветка через меню Правка | Копировать. Теперь вставляем скопированный цветок через Правка | Вставить. И как вы заметите у нас в окне Слои появился слой под названием Плавающее выделение.

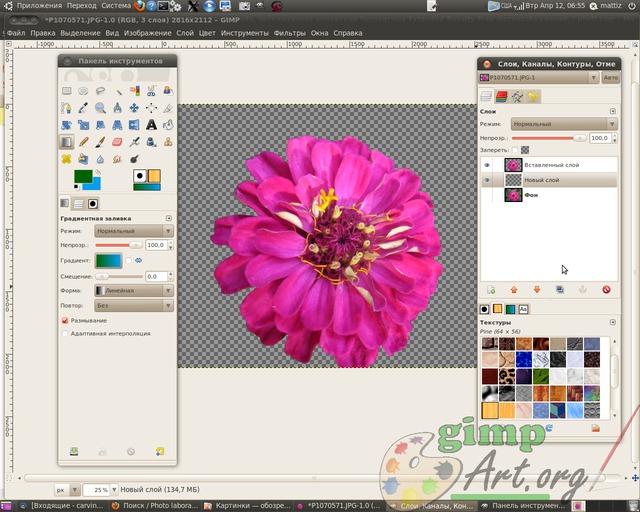
Плавающее выделение — это временный слой, он появляется всегда, когда вы вставляете из буфера обмена картинку или фрагмент изображения. Далее щелкаем правой кнопкой мыши по плавающему слою и из выпавшего контекстового меню выбираем команду — Создать слой.
Визуально нечего не произошло, а на самом деле цветок теперь содержится в новом верхнем слое, и что бы показать это выключим видимость фонового нижнего слоя, щелкнув на пиктограмму глаза напротив слоя.
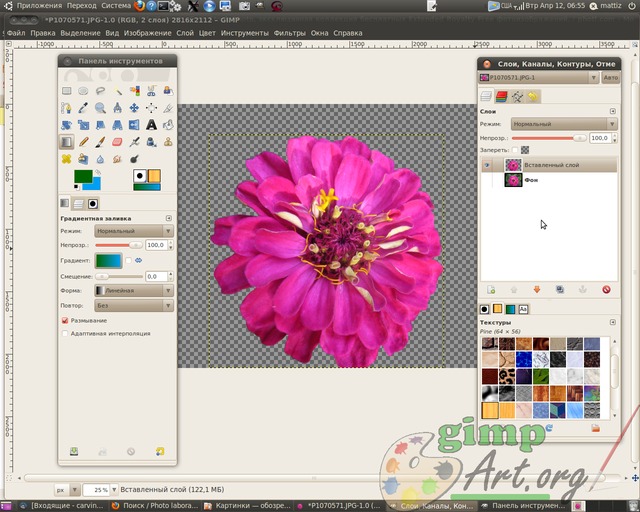
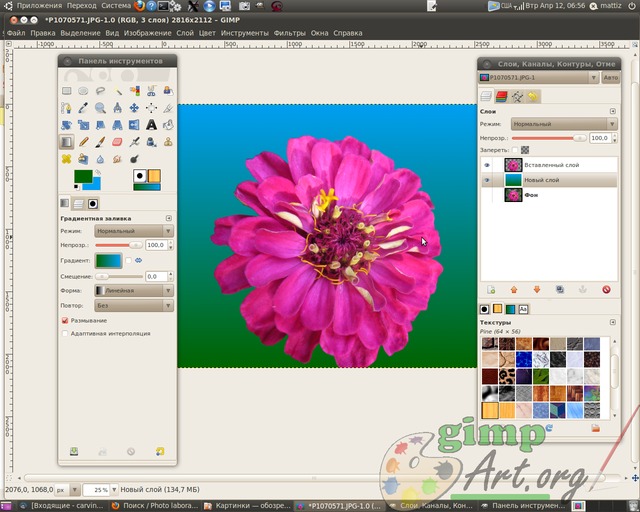
Таким образом мы отделили объект на переднем плане от фона. Теперь создадим прозрачный слой через меню Слой | Создать слой
или нажав на соответствующую пиктограмму
окне Слои.
Данный слой у нас послужит новым фоном для слоя с цветком. Усложнять наше первое задание слишком не будем, и просто возьмем и зальем данный слой градиентной заливкой. Для этого выбираем инструмент Градиент
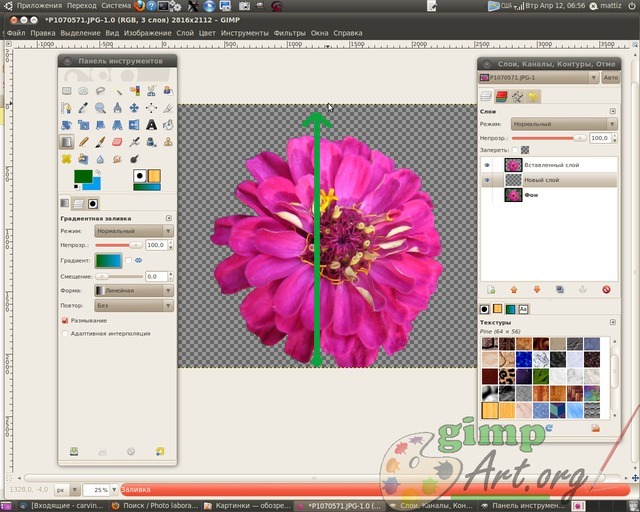
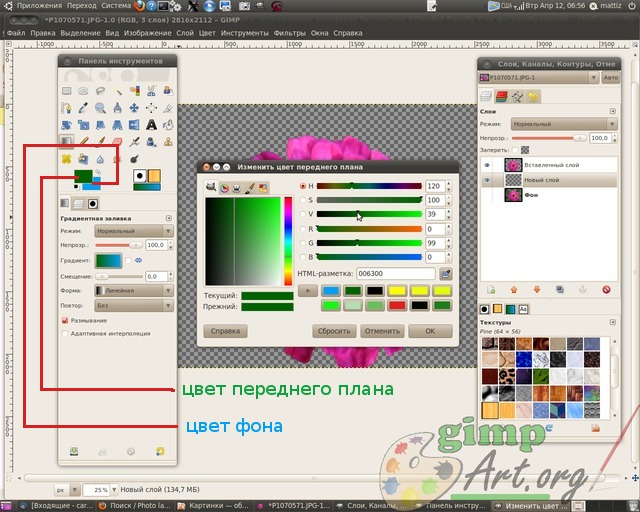
Чтобы выбрать нужный цвет нажимаем на соответствующий прямоугольник : верхний прямоугольник — это цвет переднего плана, а позади него прямоугольник — цвет фона. Откроется диалоговое окно выбора цвета, где мышкой можно выбрать нужный цвет или ввести кодовое обозначение (HTML-разметка) нужного цвета.
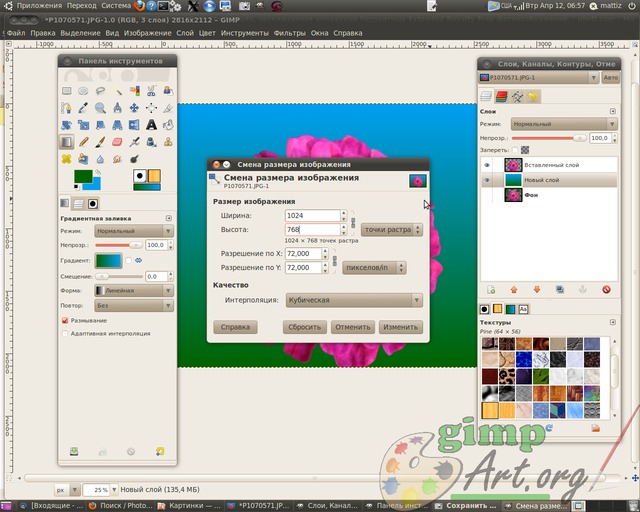
Далее необходимо уменьшить изображение, для этого выбираем Изображение|Размер изображения
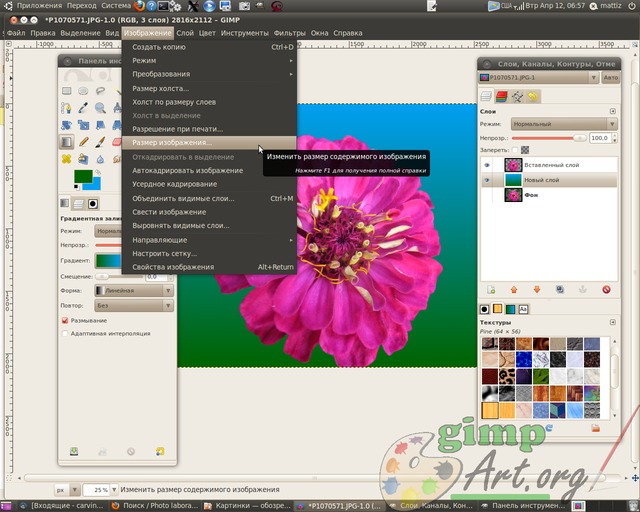
и вводим параметры 1024×768 пикселей. Я ввожу данные значения для примера. Вы можете уменьшить фотографию до других параметров ( в зависимости от выбранного первоначального изображения).
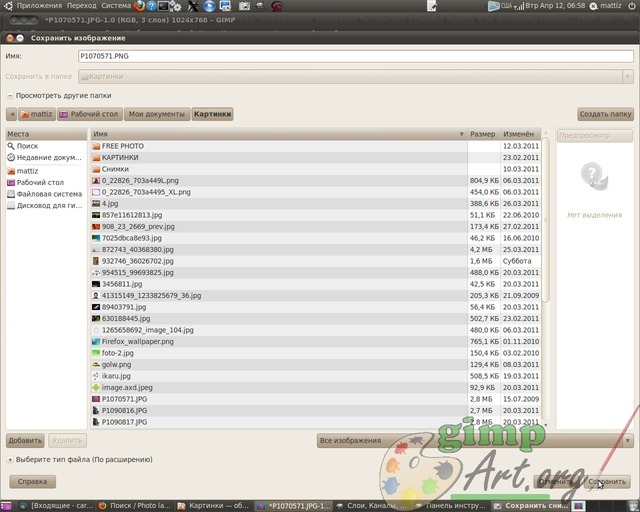
И заключительный этап урока для начинающих это сохранение готового изображения через меню Файл| Сохранить как..

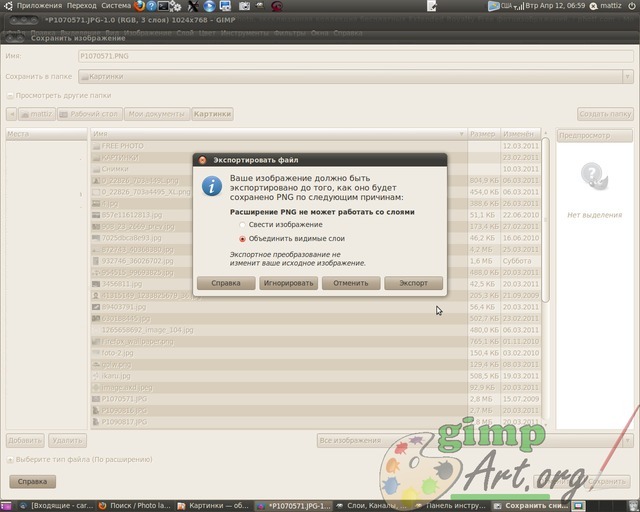
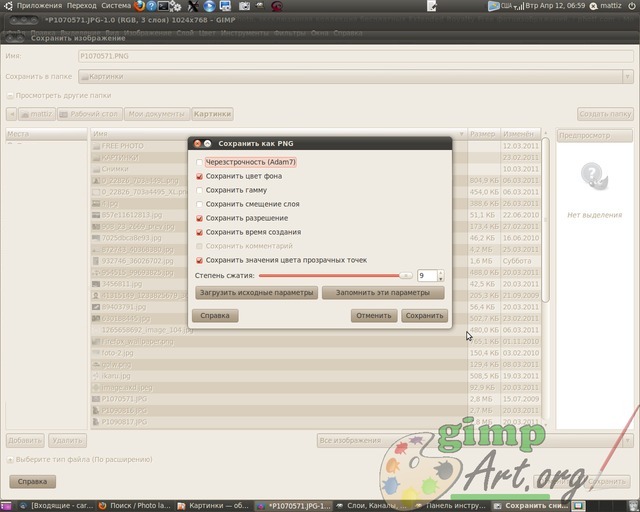
И изменяем расширение изображения с JPEG на PNG в поле Имя. Далее нажимаем кнопку «Сохранить»
Откроются еще два окна. В первом нажимаем «Экспорт», во втором окне «Сохранить»
На этом наше первое знакомство с GIMP завершено
Спасибо за внимание!. Не забудьте пройти небольшой тест по компьютерной графике
Не забудьте пройти небольшой тест по компьютерной графике.
Тест №1 по компьютерной графике
Предлагаю Вам пройти небольшой тест по компьютерной графике и проверить свои знания
ПРОЙТИ ТЕСТ
Вопрос:
Ваш ответ:
Правильный ответ:
ДАЛЕЕ
Miscellaneous
Plug-in Development
GIMP 2.8 also further enhances its scripting abilities. For example, API changes to support layer groups have been made. Here is a list of new symbols in GIMP 2.8.
GEGL
The projection code which composes a single image from layers has been ported to GEGL. This includes the layer modes, as well as support for layer groups. Also, preparations have been made for better and more intuitive handling of the floating selection. Developers: Michael Natterer, Martin Nordholts
Roadmap
The GIMP developers now maintain a roadmap for GIMP development found here: https://wiki.gimp.org/index.php/Roadmap