Latest cisco anyconnect offline installer [ direct download ]
Содержание:
- Introduction
- Prerequisites
- Предварительные условия
- Технология настройки Cisco VPN client
- Troubleshoot
- What’s new in Cisco AnyConnect 4.8
- Функционал
- Настройка
- System Requirements
- Configure
- Resolved Caveats
- Синхронизация времени по протоколу NTP
- Troubleshoot
- 7 преимуществ Easy VPN
- Remote Access VPN Business Scenarios
- Сервер сертификатов Cisco IOS
- Conclusion and Next Steps after Installation
- Using Cisco AnyConnect 4.8
- Verify
- Настройка доступа к локальной сети для VPN-клиентов или клиента AnyConnect Secure Mobility Client
- Objective
Introduction
This sample configuration shows how to setup a remote access VPN connection from a Cisco VPN Client to a PIX Firewall, using Advanced Encryption Standard (AES) for encryption. This example uses Cisco Easy VPN to set up the secure channel and the PIX Firewall is configured as an Easy VPN server.
In Cisco Secure PIX Firewall software release 6.3 and later, the new international encryption standard AES is supported for securing site-to-site and remote access VPN connections. This is in addition to the Data Encryption Standard (DES) and 3DES encryption algorithms. The PIX Firewall supports AES key sizes of 128, 192, and 256 bits.
The VPN Client supports AES as an encryption algorithm starting with Cisco VPN Client release 3.6.1. The VPN Client supports key sizes of 128 bits and 256 bits only.
Prerequisites
Requirements
Ensure that you meet these requirements before you attempt this configuration:
-
A pool of addresses to be assigned for IPsec
-
A group called 3000clients with a preshared key of cisco123 for the VPN Clients
-
Group and user authentication is done locally on the router for the VPN Clients.
-
The no-xauth parameter is used on the ISAKMP key command for the LAN-to-LAN tunnel.
Components Used
The information in this document is based on these software and hardware versions .
-
Routers that run Cisco IOS Software Release 12.2(8)T.
Note: This document was recently tested with Cisco IOS Software Release 12.3(1). No changes are required.
-
Cisco VPN Client for Windows Version 4.x (any VPN Client 3.x and later works).
The information in this document was created from the devices in a specific lab environment. All of the devices used in this document started with a cleared (default) configuration. If your network is live, make sure that you understand the potential impact of any command.
Output from the show version command on the router is shown in this output.
Предварительные условия
Требования
Перед проведением настройки убедитесь, что выполняются следующие условия:
-
Соединению по протоколу IPsec назначен пул адресов;
-
Для клиентов VPN группа с названием 3000clients обладает предварительно распространенным ключом коллективного пользования cisco123;
-
Для клиентов VPN аутентификация групп и пользователей осуществляется на маршрутизаторе локально;
-
Для туннеля между локальными сетями используется параметр no-xauth для команды ISAKMP key.
Используемые компоненты
Сведения, содержащиеся в данном документе, касаются следующих версий программного и аппаратного обеспечения:
-
Маршрутизатор под управлением операционной системы Cisco IOS Release 12.2(8)T;
Примечание. Сведения, содержащиеся в данном документе, были недавно проверены для операционной системы Cisco IOS Release 12.3(1). В связи с этим никаких изменений вносить не требуется.
-
Cisco VPN Client для Windows версии 4.х (любая программа VPN Client версии 3.x и выше).
Данные для документа были получены в специально созданных лабораторных условиях. При написании данного документа использовались только устройства с пустой (стандартной) конфигурацией. В рабочей сети необходимо изучить потенциальное воздействие на сеть всех команд.
Ниже приведены результаты выполнения команды show version на маршрутизаторе.
Условные обозначения
Дополнительные сведения об условных обозначениях см. в документе «Технические рекомендации Cisco. Условные обозначения».
Технология настройки Cisco VPN client
Технология Cisco Easy VPN упрощает администрирование и управление сетями VPN, которые связывают различные узлы сети между собой, за счет активного продвижения новых политик безопасности из головного узла в сети на удаленные площадки. Для простоты конфигурации и высокой масштабируемости в решении Easy VPN применяется технология «проталкивания политики» (policy-push), но при этом сохраняется широкий спектр настроек и контроль над соблюдением политики.
Сервер Easy VPN, сконфигурированный в центральном офисе компании, передает политики безопасности на удаленные устройства VPN, обеспечивая реализацию на таких соединениях действующих политик еще до установки соединения.
Troubleshoot
This section provides information you can use to troubleshoot your configuration.
These debug commands can assist in troubleshooting problems with the VPN setup.
Note: Refer to Important Information on Debug Commands before you issue debug commands.
-
debug crypto isakmp—Shows the ISAKMP SA that is built and the IPsec attributes that are negotiated. During ISAKMP SA negotiation, the PIX can possibly discard several proposals as «not acceptable» before it accepts one. Once the ISAKMP SA is agreed upon, the IPsec attributes are negotiated. Once again, several proposals can possibly be rejected before one is accepted, as shown in this debug output.
-
debug crypto ipsec—Displays information on IPsec SA negotiations.
With the configurations shown in this document, the VPN Client is able to successfully connect to the central site PIX using AES. It is sometimes observed that although the VPN tunnel is established successfully, users are not able to perform common tasks such as ping network resources, log on to the domain, or browse network neighborhood. More information on troubleshooting such problems is available in Troubleshooting Microsoft Network Neighborhood After Establishing a VPN Tunnel With the Cisco VPN Client.
What’s new in Cisco AnyConnect 4.8
This is a major release of the software as it includes a lot of bug fixes and new features. I’m listing down some of the features.
- Management VPN Tunnel enables the client to automatically connect to the VPN when the computer starts. This is useful for always-connected remote computers.
- TLS v1.2 is fully supported including handshaking and certificate authentication.
- NVM flow filter now monitors the filtered traffic making it easier for the admins to work on the logs.
- A lot of new cipher suites are supported for SSL/TLS connections.
If you want to go through all the features of this release, you may visit this page.
Функционал
Cisco VPN Client применяет технологию «VPN» и обеспечивает обход блокировки к сайту через настроенную виртуальную сеть. С помощью этой утилиты можно настроить маршрутизаторы, свитчи и прочую технику для работы с Сетью в обход установленного файервола. Виртуальная сеть формируется в автоматическом режиме, поэтому владельцу компьютера или ноутбука не потребуется устанавливать дополнительные настройки или параметры.
С помощью утилиты обеспечивается удаленная работа с сервером. В программе присутствуют функции настройки устройства с поддержкой Unified Client Framework. В графическом интерфейсе отсутствует меню или сложные установки, мешающие качественной настройке и обеспечению безопасности оборудования.
Визуальная оболочка программы имеет простое и понятное меню и будет удобна не только для опытных, но и для начинающих пользователей даже несмотря на отсутствие русского языка.
Утилита используется для установки ключей на USB-носителях и смарт-картах. USB-ключи позволяют защитить данные на удаленных серверах. Загрузка конфигурации «VPN» из центрального шлюза обеспечивается свежими сборками Cisco VPN Client. Благодаря этой функции система действует просто и безопасно.
Утилита работает на ОС Windows от XP, чтобы скачать Cisco VPN Client на ПК программу и установить, пользователю могут потребоваться права администратора. Утилита была разработана в то время, когда были актуальны XP и 7, поэтому при инсталляции на Windows 10 могут обнаруживаться проблемы с совместимостью.
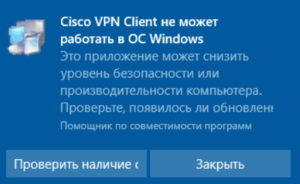
Проблема решена сторонними разработчиками. Программа работает на Windows 10.
Настройка
В этом разделе содержатся сведения о настройке функций, описанных в этом документе.
Примечание. Для поиска дополнительной информации о командах, приведенных в данном документе, используйте инструмент Средство поиска команд (только для зарегистрированных пользователей).
Схема сети
В настоящем документе используется следующая схема сети:
Примечание. Схемы IP-адресации, используемые в этой конфигурации, нельзя использовать для маршрутизации в Интернете. Это адреса RFC 1918 , которые использовались в лабораторной среде.
Варианты конфигурации
В этом документе используются следующие конфигурации:
|
Маршрутизатор |
|---|
VPN#show run Building configuration... Current configuration : 2170 bytes ! version 12.4 service timestamps debug datetime msec service timestamps log datetime msec no service password-encryption ! hostname VPN ! boot-start-marker boot-end-marker ! ! aaa new-model ! aaa authentication login userauthen local aaa authorization network groupauthor local ! aaa session-id common ! resource policy ! ! username user password 0 cisco ! ! ! crypto isakmp policy 3 encr 3des authentication pre-share group 2 crypto isakmp client configuration group vpnclient key cisco123 dns 10.10.10.10 wins 10.10.10.20 domain cisco.com pool ippool acl 101 ! crypto ipsec transform-set myset esp-3des esp-md5-hmac ! crypto dynamic-map dynmap 10 set transform-set myset reverse-route ! crypto map clientmap client authentication list userauthen crypto map clientmap isakmp authorization list groupauthor crypto map clientmap client configuration address respond crypto map clientmap 10 ipsec-isakmp dynamic dynmap ! ! ! ! interface Ethernet0/0 ip address 10.10.10.1 255.255.255.0 half-duplex ip nat inside interface FastEthernet1/0 ip address 172.16.1.1 255.255.255.0 ip nat outside ip virtual-reassembly duplex auto speed auto crypto map clientmap ! interface Serial2/0 no ip address ! interface Serial2/1 no ip address shutdown ! interface Serial2/2 no ip address shutdown ! interface Serial2/3 no ip address shutdown ! ip local pool ippool 192.168.1.1 192.168.1.2 ip http server no ip http secure-server ! ip route 0.0.0.0 0.0.0.0 172.16.1.2 ip nat inside source list 111 interface FastEthernet1/0 overload ! access-list 111 deny ip 10.10.10.0 0.0.0.255 192.168.1.0 0.0.0.255 access-list 111 permit ip any any access-list 101 permit ip 10.10.10.0 0.0.0.255 192.168.1.0 0.0.0.255 control-plane ! line con 0 line aux 0 line vty 0 4 ! end |
Настройка VPN Client 4.8
Чтобы настроить VPN Client 4.8, выполните следующие действия.
-
Выберите Пуск > Программы > Cisco Systems VPN Client > VPN Client.
-
Нажмите New, чтобы открыть окно «Create New VPN Connection Entry» (Создание новой записи VPN-соединения).
-
Введите имя записи подключения и его описание, а также внешний IP-адрес маршрутизатора в поле «Host» и имя и пароль группы VPN. Нажмите Save.
-
Выберите подключение, которое необходимо использовать, и нажмите Connect в главном окне VPN Client.
-
При появлении соответствующего запроса введите имя пользователя и пароль для аутентификации Xauth и нажмите OK для подключения к удаленной сети.
-
ПО VPN Client соединится с маршрутизатором на центральном узле.
-
Выберите Status > Statistics, чтобы проверить статистику туннеля для VPN Client.
-
Перейдите на вкладку «Route Details» (Сведения о маршруте), чтобы увидеть маршруты маршрутизатору, защищенные клиентом VPN.
В этом примере клиент VPN защищает доступ к сети 10.10.10.0/24, а весь остальной трафик не шифруется и не отправляется по туннелю. Защищенная сеть загружается из ACL 101, который настроен на маршрутизаторе центрального узла.
System Requirements
VPN Client 5.0.07 supports the following Microsoft OSs:
•Windows 7 on x86 (32-bit only)
•Windows Vista on x86 (32-bit only)
•Windows XP on x86
VPN Client does not support the Tablet PC 2004/2005; and Windows 2000, NT, 98, and ME.
VPN Client supports smart card authentication on Windows 7, Vista, and XP.
VPN Client supports up to one Ethernet adapter and one PPP adapter.
VPN Client 5.0.x is incompatible with the combination of Cisco Unified Video Advantage 2.1.2 and McAfee HIPS Patch 4 Build 688. To avoid system failures, uninstall either of these two applications, upgrade McAfee to the latest version, or use VPN Client 4.6.x.
To install the VPN Client, you need
•Pentium-class processor or greater
•Microsoft TCP/IP installed. (Confirm via Start > Settings > Control Panel > Network > Protocols or Configuration.)
•50 MB hard disk space.
•128 MB RAM(256 MB recommended)
•Administrator privileges
The VPN Client supports the following Cisco VPN devices:
•Cisco Series 5500 Adaptive Security Appliance, Version 7.0 or later.
•Cisco VPN 3000 Series Concentrator, Version 3.0 or later.
•Cisco PIX Firewall, Version 6.2.2(122) or Version 6.3(1).
•Cisco IOS Routers, Version 12.2(8)T or later.
Configure
In this section, you are presented with the information used to configure the features described in this document.
Network Diagram
This document uses this network setup .
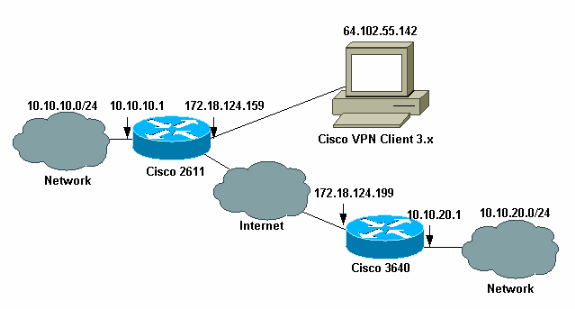
Note: The IP addresses in this example are not routable in the global Internet because they are private IP addresses in a lab network.
Configure the Cisco 2611 Router
| Cisco 2611 Router |
|---|
vpn2611#show run Building configuration... Current configuration : 2265 bytes ! version 12.2 service timestamps debug uptime service timestamps log uptime no service password-encryption ! hostname vpn2611 ! aaa new-model ! ! aaa authentication login userauthen local aaa authorization network groupauthor local aaa session-id common ! username cisco password 0 cisco ip subnet-zero ! ! ! ip audit notify log ip audit po max-events 100 ! crypto isakmp policy 3 encr 3des authentication pre-share group 2 ! crypto isakmp policy 10 hash md5 authentication pre-share crypto isakmp key cisco123 address 172.18.124.199 no-xauth ! crypto isakmp client configuration group 3000client key cisco123 dns 10.10.10.10 wins 10.10.10.20 domain cisco.com pool ippool ! ! crypto ipsec transform-set myset esp-3des esp-md5-hmac ! crypto dynamic-map dynmap 10 set transform-set myset ! ! crypto map clientmap client authentication list userauthen crypto map clientmap isakmp authorization list groupauthor crypto map clientmap client configuration address respond crypto map clientmap 1 ipsec-isakmp set peer 172.18.124.199 set transform-set myset match address 100 crypto map clientmap 10 ipsec-isakmp dynamic dynmap ! ! fax interface-type fax-mail mta receive maximum-recipients 0 ! ! interface Ethernet0/0 ip address 172.18.124.159 255.255.255.0 half-duplex crypto map clientmap ! interface Serial0/0 no ip address shutdown ! interface Ethernet0/1 ip address 10.10.10.1 255.255.255.0 no keepalive half-duplex ! ! ip local pool ippool 14.1.1.100 14.1.1.200 ip classless ip route 0.0.0.0 0.0.0.0 172.18.124.1 ip http server ip pim bidir-enable ! ! access-list 100 permit ip 10.10.10.0 0.0.0.255 10.10.20.0 0.0.0.255 ! ! snmp-server community foobar RO call rsvp-sync ! ! mgcp profile default ! dial-peer cor custom ! ! line con 0 exec-timeout 0 0 line aux 0 line vty 0 4 ! ! end |
Configure the 3640 Router
| Cisco 3640 Router |
|---|
vpn3640#show run Building configuration... Current configuration : 1287 bytes ! ! Last configuration change at 13:47:37 UTC Wed Mar 6 2002 ! version 12.2 service timestamps debug uptime service timestamps log uptime no service password-encryption ! hostname vpn3640 ! ! ip subnet-zero ip cef ! crypto isakmp policy 10 hash md5 authentication pre-share crypto isakmp key cisco123 address 172.18.124.159 ! ! crypto ipsec transform-set myset esp-3des esp-md5-hmac ! crypto map mymap 10 ipsec-isakmp set peer 172.18.124.159 set transform-set myset match address 100 ! call RSVP-sync ! ! ! interface Ethernet0/0 ip address 172.18.124.199 255.255.255.0 half-duplex crypto map mymap ! interface Ethernet0/1 ip address 10.10.20.1 255.255.255.0 half-duplex ! ip classless ip route 0.0.0.0 0.0.0.0 172.18.124.1 ip http server ip pim bidir-enable ! access-list 100 permit ip 10.10.20.0 0.0.0.255 10.10.10.0 0.0.0.255 snmp-server community foobar RO ! dial-peer cor custom ! ! line con 0 exec-timeout 0 0 line aux 0 line vty 0 4 login ! end |
Configure the VPN Client 4.x
Follow these steps in order to configure Cisco VPN Client 4.x.
-
Launch the VPN Client, and then click New in order to create a new connection.
-
Input the necessary information, and click Save when finished.
-
Right-click on the newly created Connection Entry, and click Connect in order to connect to the router.
-
During the IPsec negotiations, you are prompted for a username and password.
-
The window displays messages that read «Negotiating security profiles» and «Your link is now secure.»
Resolved Caveats
shows the caveats that Release 5.0.07 resolves.
Table 2 Resolved Caveats
ID
Headline
CSCsi26001
unity xp-vista: reauth on rekey with saved password causes disconnect
CSCsr08760
VPN client does not handle IP option properly under Vista
CSCsr11437
IGMP packets from the Vista discovery service are getting encapsulated
CSCta07697
SetMTU needs to support Dial-Up Networking on Vista.
CSCta96341
ENH: unity client with SBL shows error message with firewall detected
CSCtb00682
VPN Client can’t connect for certain period after forcible termination
CSCtb85181
VPN Client will not connect to headend if PCF is read only
CSCtd08761
PC reboots if physical link is disrupted during a VPN connection
Синхронизация времени по протоколу NTP
Для нормальной работы инфраструктуры PKI очень важно, чтобы на всех взаимодействующих устройствах было установлено точное время и дата. В цифровом сертификате формата x.509 присутствуют поля с явным указанием его срока действия
В случае сильного расхождения времени на двух устройствах при проведении процедуры аутентификации одно из них решит, что срок действия сертификата другого устройства уже истек или еще не наступил. При этом сертификат считается недействительным, и успешное завершение процедуры аутентификации становится невозможным.
На любых устройствах, работающих под управлением OC Cisco IOS, точное время можно устанавливать при помощи протокола NTP (Network Time Protocol). Рекомендуется использовать NTP-серверы, имеющие наивысший Stratum1. Это означает, что NTP-сервер напрямую подключен к источнику точного времени, такому как атомные часы или GPS приемник. В свою очередь, Stratum2 получает точное время от Stratum1 и т.д. Если у тебя нет подконтрольного NTP-сервера, рекомендуется настроить для синхронизации сразу несколько внешних серверов. На любом NTP-сервере может произойти сбой, в результате которого он начнет распространять значительно отличающееся от реального время. Если на маршрутизаторе настроено несколько NTP-серверов, алгоритм тут же определит неожиданно большую разницу между получаемыми значениями и не будет использовать вышедший из строя сервер.
!указано отличие московского времени от времени по Гринвичу clock timezone Moscow 3 !алгоритм перевода часов для соответствия российскому летнему времени clock summer-time Moscow recurring last Sun Mar 3:00 last Sun Oct 4:00 !не обязательно использовать приведенные ниже серверы !список публичных серверов Stratum 1 и 2 найдешь на сайте www.ntp.org ntp server 195.68.135.5 ntp server 193.79.237.14 ntp server 195.2.64.5 ntp server 193.190.230.65
Troubleshoot
This section provides information that helps to troubleshoot your configuration.
Troubleshooting Commands
Certain show commands are supported by the Output Interpreter Tool (registered customers only) , which allows you to view an analysis of show command output.
Note: Refer to the Important Information on Debug Commands before you issue debug commands.
-
debug crypto ipsec—Displays IPsec events. The no form of this command disables debugging output.
-
debug crypto isakmp—Displays messages about IKE events. The no form of this command disables debugging output.
-
debug crypto engine—Displays information that pertains to the crypto engine, such as when Cisco IOS software performs encryption or decryption oprerations.
7 преимуществ Easy VPN
- Easy VPN Server и Easy МЗТ Client поддерживается на маршрутизаторах с интеграцией сервисов, VPN-концентраторах, межсетевых экранах Cisco PIX и многофункциональных защитных устройствах Cisco ASA.
- Клиентское программное обеспечение Cisco VPN Client можно инсталлировать без дополнительных затрат на компьютерах PC, Mac и в системах UNIX, для удаленного доступа к VPN-маршрутизатору. Поскольку одна и та же технология (Easy VPN) используется на аппаратуре у клиента (CPE) и программном обеспечении, общая стоимость владения снижается за счет упрощения и унификации в обслуживании, мониторинге и сервисов AAA.
- В Easy VPN предусмотрены опции локальной (на базе маршрутизаторов) и централизованной аутентификации RADIUS. Аутентификацию на базе стандарта 802.1x также можно использовать для аутентификации хостов в каждом местоположении CPE.
- Easy VPN предлагает цифровые сертификаты, повышая уровень безопасности по сравнению с preshared keys.
- Балансировка нагрузки для нескольких находящихся на центральной площадке концентраторов Easy VPN автоматически распределяет нагрузку между несколькими серверами Easy VPN. Принудительная передача политик с резервных концентраторов на CPE позволяет компаниям масштабировать решение без переконфигурации CPE.
- Easy VPN предлагает полнофункциональную интеграцию, включая динамическое назначение политики QoS, межсетевые экраны и IPS, раздельное туннелирование и Cisco Service Assurance Agent и NetFlow для мониторинга.
- Cisco SDM дает возможность на базе мастер-программы быстро развернуть Easy VPN совместно с сервисами AAA и межсетевого экрана, а также возможность графического мониторинга удаленных клиентов Easy VPN в реальном времени.
Remote Access VPN Business Scenarios
This chapter explains the basic tasks for configuring an IP-based, remote access Virtual Private Network (VPN) on a Cisco 7200 series router. In the remote access VPN business scenario, a remote user running VPN client software on a PC establishes a connection to the headquarters Cisco 7200 series router.
The configurations in this chapter utilize a Cisco 7200 series router. If you have a Cisco 2600 series router or a Cisco 3600 series router, your configurations will differ slightly, most notably in the port slot numbering. Please refer to your model configuration guide for detailed configuration information. Please refer to the for instructions about locating product documentation.
Note In this Guide, the term `Cisco 7200 series router’ implies that an Integrated Service Adaptor (ISA) or a VAM (VAM, VAM2, or VAM2+) is installed in the Cisco 7200 series router.
This chapter describes basic features and configurations used in a remote access VPN scenario. Some Cisco IOS security software features not described in this document can be used to increase performance and scalability of your VPN. For up-to-date Cisco IOS security software features documentation, refer to the Cisco IOS Security Configuration Guide and the Cisco IOS Security Command Reference for your Cisco IOS Release. To access these documents, see .
This chapter includes the following sections:
•
•
•
•
•
Note Throughout this chapter, there are numerous configuration examples and sample configuration outputs that include unusable IP addresses. Be sure to use your own IP addresses when configuring your Cisco 7200 series router.
Сервер сертификатов Cisco IOS
Сервер сертификатов Cisco IOS Certificate Server внедрен в программное обеспечение Cisco IOS и дает маршрутизатору возможность действовать в сети в качестве центра сертификации (выпускать и отзывать цифровые сертификаты). Традиционно, генерирование криптографической информации и управление ею — непростая задача, по мере роста количества VPN. Сервер сертификатов Cisco IOS решает эти проблемы при помощи масштабируемого и несложного в управлении центра сертификации, который встроен в ту же аппаратуру поддержки IPSec VPN. Программное обеспечение Cisco IOS также поддерживает встроенные клиентские функции PKI, которые взаимодействуют с сервером сертификатов и с центрами сертификатов сторонних производителей.
Conclusion and Next Steps after Installation
There you have it! You have now successfully installed the Cisco AnyConnect Secure Mobility Client
on your computer.
Wondering what the next steps are? Don’t worry. If you need help configuring AnyConnect on your router, check out Configure AnyConnect VPN Connectivity on the RV34x Series Router.
AnyConnect App
The Anyconnect App can be downloaded from the Google Play store or the Apple store.
Download Android AppDownload
iOS App
Additional Resources
Basic Troubleshooting
Administrator Guide Release 4.8
Release Notes — 4.8
AnyConnect Licensing — RV340
Cisco Business VPN Overview and Best Practices
Using Cisco AnyConnect 4.8
Using AnyConnect from the client perspective is quite simple. You just have to start the client, give the server URL, username and password and it just connects. We will give you our step by step overview of how to start the client and the disconnect from the VPN when required.
Starting and connecting to the VPN using AnyConnect
Make sure that you have installed AnyConnect successfully. Follow the steps below to start the VPN client:
- Open Cisco AnyConnect Secure Mobility Client from the Start Menu
- Select the connection from the drop-down menu. If this field is blank, you should manually type in the server URL. Most of the time, network administrators will configure a VPN profile for the users. So the default connection will automatically be listed in the drop-down menu.
- Click Connect
- You will be asked to enter your Username and Password.
- After entering your credentials, press Ok.
Once the connection is successful, AnyConnect will automatically minimize itself in the system tray. To disconnect from the VPN, double-click the AnyConnect icon from the system tray and press the Disconnect button.
Verify
Use this section to confirm that your configuration works properly.
Procedure
Complete these procedures in order to confirm your configuration works properly:
-
Test your configuration with a user. Enter https://WebVPN_Gateway_IP_Address into an SSL-enabled Web browser; where WebVPN_Gateway_IP_Address is the IP address of the WebVPN service. After you accept the certificate and enter a user name and password, a screen similar to this image should appear.
-
Check the SSL VPN session. Within the SDM application, click the Monitor button, and then click VPN Status. Expand WebVPN (All Contexts), expand the appropriate context, and choose Users.
-
Check error messages. Within the SDM application, click the Monitor button, click Logging, and then click the Syslog tab.
-
View the running configuration for the device. Within the SDM application, click the Configure button, and then click Additional Tasks. Expand Configuration Management, and choose Config Editor.
Commands
Several show commands are associated with WebVPN. You can execute these commands at the command-line interface (CLI) to show statistics and other information. For detailed information about show commands, refer to .
Note: The Output Interpreter Tool (registered customers only) (OIT) supports certain show commands. Use the OIT to view an analysis of show command output.
Настройка доступа к локальной сети для VPN-клиентов или клиента AnyConnect Secure Mobility Client
Выполните следующие действия, чтобы разрешить клиентам Cisco VPN или Cisco AnyConnect Secure Mobility доступ к их локальной сети при наличии подключения к устройству ASA:
- или
Настройка ASA через ASDM
Выполните следующие действия в ASDM, чтобы разрешить клиентам VPN доступ к локальной сети при наличии подключения к устройству ASA:
- Выберите Configuration> Remote Access VPN> Network (Client) Access> Group Policy (Конфигурация > VPN для удаленного доступа > Доступ к сети (клиент) > Групповая политика) и выберите групповую политику, в которой следует включить доступ к локальной сети. Затем нажмите Edit (Редактировать).
- Перейдите в меню Advanced > Split Tunneling (Дополнительно > Разделенное туннелирование).
- Снимите флажок Inherit (Наследовать) для политики и выберите Exclude Network List Below (Исключить список сетей ниже).
- Снимите флажок Inherit (Наследовать) для списка сетей и затем нажмите Manage (Управление), чтобы запустить диспетчер списков контроля доступа (ACL Manager).
- В приложении ACL Manager, последовательно выберите Add > Add ACL…, чтобы создать новый список доступа.
- Укажите имя ACL и нажмите кнопку OK.
- После создания списка ACL выберите Добавить > Добавить ACE…, чтобы добавить элемент контроля доступа (ACE).
- Определите элемент контроля доступа, соответствующий локальной сети клиента.
- Выберите Permit (Разрешить).
- Выберите IP-адрес 0.0.0.0
- Выберите маску подсети /32.
- Введите описание (необязательно).
- Нажмите кнопку ОК.
- Нажмите кнопку OK, чтобы завершить работу с приложением ACL Manager.
- Убедитесь, что только что созданный список контроля доступа выбран для списка сетей разделенных туннелей.
- Нажмите кнопку OK, чтобы вернуться к настройке групповой политики.
- Нажмите кнопку Apply и затем (если потребуется) Send, чтобы отправить эти команды в модуль ASA.
Настройка ASA через интерфейс командной строки
Разрешить VPN-клиентам доступ к локальной сети при наличии подключения к ASA можно не только при помощи ASDM, но и посредством интерфейса командной строки устройства ASA:
Переход в режим конфигурирования.ciscoasa>enablePassword:ciscoasa#configure terminalciscoasa(config)#
Создайте список контроля доступа, чтобы разрешить доступ к локальной сети.ciscoasa(config)#access-list Local_LAN_Access remark Client Local LAN Accessciscoasa(config)#access-list Local_LAN_Access standard permit host 0.0.0.0
Внимание. : Из-за различий в синтаксисе списка контроля доступа в версиях 8.x и 9.x программного обеспечения ASA этот список контроля доступа стал некорректным, и администраторы будут получать следующее сообщение об ошибке при попытке его настройки:rtpvpnoutbound6(config)# access-list test standard permit host 0.0.0.0Ошибка: недопустимый IP-адресМожно использовать только следующую команду:rtpvpnoutbound6(config)# access-list test standard permit any4 Это известная неполадка, для обхода которой был создан идентификатор ошибки Cisco CSCut3131. Выполните обновление до версии, в которой исправлена эта ошибка, чтобы иметь возможность настроить доступ к локальной сети. Перейдите в режим настройки для групповой политики, которую необходимо изменить.ciscoasa(config)#group-policy hillvalleyvpn attributesciscoasa(config-group-policy)#
Укажите политику раздельных туннелей. В данном случае используется политика excludespecified.ciscoasa(config-group-policy)#split-tunnel-policy excludespecified
Укажите список доступа к разделенным туннелям. В данном случае используется список Local_LAN_Access.ciscoasa(config-group-policy)#split-tunnel-network-list value Local_LAN_Access
Введите следующую команду:ciscoasa(config)#tunnel-group hillvalleyvpn general-attributes
Привяжите групповую политику к туннельной группеciscoasa(config-tunnel-ipsec)# default-group-policy hillvalleyvpn
Выйдите из обоих режимов конфигурирования.ciscoasa(config-group-policy)#exitciscoasa(config)#exitciscoasa#
Сохраните конфигурацию в энергонезависимой памяти (NVRAM) и нажмите клавишу ВВОД, когда будет предложено указать имя файла источника. ciscoasa#copy running-config startup-configSource filename ?Cryptochecksum: 93bb3217 0f60bfa4 c36bbb29 75cf714a3847 bytes copied in 3.470 secs (1282 bytes/sec)ciscoasa#
Objective
This article shows you how to download
and
install the Cisco AnyConnect Secure Mobility Client on a
Windows
Computer. This article is applicable only to Cisco Business products that includes the RV34x series routers and not Enterprise products.
Introduction
AnyConnect Secure Mobility Client is a modular endpoint software product. It not only provides Virtual
Private
Network (VPN) access through Secure Sockets Layer (SSL) and Internet Protocol Security (IPsec) Internet Key
Exchange version2 (IKEv2) but also offers enhanced security through various built-in modules. Why use a VPN? A VPN connection allows users to access, send, and receive data to and from a private network by means of going through a public or shared network such as the Internet but still ensuring a secure connection to an underlying network infrastructure to protect the private network and its resources.
Cisco AnyConnect is compatible with Windows versions 7, 8, 8.1, 10 and later.
If you are using a Mac computer, click
here to view an article on how to install AnyConnect on Mac.
Applicable Devices | Software Version
- RV340 — 1.0.03.17 (Download latest)
- RV340W — 1.0.03.17 (Download latest)
- RV345 — 1.0.03.17 (Download latest)
- RV345P — 1.0.03.17 (Download latest)