Vue.js для начинающих, урок 10: формы
Содержание:
- Наши code conventions
- Change Detection Caveats
- Declarative Rendering
- # Getting Started
- # Нужен ли вам SSR?
- # Conditionals and Loops
- Passing Data to Child Components with Props
- # watch
- Functional Components
- Getting Started
- Circular References
- # Component Binding Helpers
- Vue 3.0 — первый взгляд
- Версия с использованием Vue
- # Опции конструктора Vuex.Store
- Формы с Vuex
- DOM Template Parsing Caveats
- Additional Context
- # Методы экземпляра Vuex.Store
- Instance Lifecycle Hooks
Наши code conventions
Чтобы ваш опыт был еще более приятным, вот обещанные выше соглашения по коду от нашей команды, может быть вам пригодятся.
Безусловно они очень субъективны, но иначе быть не может.
Наш собственный cookbook — сейчас содержит только пример сервиса, но будет расширяться (часть информации на локальных ресурсах).
Это наш Vue seed (TS, кастомные настройки Jest, ESlint и т.д.), в данный момент, до выхода в релиз Vue CLI 3,
он сгенерирован на предыдущей версии и представляет из себя не темплейт а репозиторий.
Готовится версия для разворачивания с помощью Vue CLI 3 через шаблон.
PS: После прочтения может показаться, что у Vue больше минусов чем плюсов — просто не хочется писать очередную хвалебную статью, ведь их и так полон гугл
PPS: Кстати английский вариант предыдущей статьи был настолько успешен, что у меня даже состоялось прямое общение (видео) с основными виновниками — но работу не предложили =(
Английская версия: https://medium.com/@igogrek/how-i-started-loving-vue-d41c1c8e77e1
Change Detection Caveats
Due to limitations in JavaScript, there are types of changes that Vue cannot detect. However, there are ways to circumvent them to preserve reactivity.
For Objects
Vue cannot detect property addition or deletion. Since Vue performs the getter/setter conversion process during instance initialization, a property must be present in the object in order for Vue to convert it and make it reactive. For example:
Vue does not allow dynamically adding new root-level reactive properties to an already created instance. However, it’s possible to add reactive properties to a nested object using the method:
You can also use the instance method, which is an alias to the global :
Sometimes you may want to assign a number of properties to an existing object, for example using or . However, new properties added to the object will not trigger changes. In such cases, create a fresh object with properties from both the original object and the mixin object:
For Arrays
Vue cannot detect the following changes to an array:
- When you directly set an item with the index, e.g.
- When you modify the length of the array, e.g.
For example:
To overcome caveat 1, both of the following will accomplish the same as , but will also trigger state updates in the reactivity system:
You can also use the instance method, which is an alias for the global :
To deal with caveat 2, you can use :
Declarative Rendering
At the core of Vue.js is a system that enables us to declaratively render data to the DOM using straightforward template syntax:
` message `
We have already created our very first Vue app! This looks pretty similar to rendering a string template, but Vue has done a lot of work under the hood. The data and the DOM are now linked, and everything is now reactive. How do we know? Open your browser’s JavaScript console (right now, on this page) and set to a different value. You should see the rendered example above update accordingly.
Note that we no longer have to interact with the HTML directly. A Vue app attaches itself to a single DOM element ( in our case) then fully controls it. The HTML is our entry point, but everything else happens within the newly created Vue instance.
In addition to text interpolation, we can also bind element attributes like this:
Hover your mouse over me for a few seconds to see my dynamically bound title!
Here we are encountering something new. The attribute you are seeing is called a directive. Directives are prefixed with to indicate that they are special attributes provided by Vue, and as you may have guessed, they apply special reactive behavior to the rendered DOM. Here, it is basically saying “keep this element’s attribute up-to-date with the property on the Vue instance.”
If you open up your JavaScript console again and enter , you’ll once again see that the bound HTML — in this case the attribute — has been updated.
# Getting Started
TIP
The official guide assumes intermediate level knowledge of HTML, CSS, and JavaScript. If you are totally new to frontend development, it might not be the best idea to jump right into a framework as your first step — grasp the basics then come back! Prior experience with other frameworks helps, but is not required.
The easiest way to try out Vue.js is using the Hello World example(opens new window). Feel free to open it in another tab and follow along as we go through some basic examples.
The Installation page provides more options of installing Vue. Note: We do not recommend that beginners start with , especially if you are not yet familiar with Node.js-based build tools.
# Нужен ли вам SSR?
По сравнению с традиционным SPA (Single-Page Application), преимуществами серверного рендеринга будут:
Лучшее SEO, поскольку поисковые роботы будут видеть полностью отрендеренную страницу
Обратите внимание, что на данный момент Google и Bing могут без проблем индексировать синхронные приложения JavaScript. Ключевое слово здесь — синхронные
Если ваше приложение запускается с индикатором загрузки, а потом догружает контент через Ajax, то поисковый робот просто не будет дожидаться окончания загрузки. Это значит, что если у вас есть асинхронный контент на страницах где SEO важен, то может потребоваться серверный рендеринг.
Лучшие показатели времени до отображения контента (time-to-content), особенно при плохом интернете или на медленных устройствах. Для разметки, отрендеренной на сервере, не требуется дожидаться пока весь JavaScript будет загружен и выполнен, поэтому ваш пользователь увидит полностью отрендеренную страницу раньше. Как правило, это приводит к лучшему пользовательскому опыту и может быть критичным для приложений, где время до отображения контента напрямую связано с коэффициентом конверсии.
Следует учитывать и некоторые компромиссы при использовании серверного рендеринга:
-
Ограничения при разработке. Код только для браузера может быть использован лишь в определённых хуках жизненного цикла; некоторые внешние библиотеки могут нуждаться в особой обработке, чтобы иметь возможность запускаться в приложении с серверным рендерингом.
-
Более сложные требования по настройке и развёртыванию сборки. В отличие от полностью статичного SPA, который может быть развёрнут на любом статичном файловом сервере, приложение с серверным рендерингом требует окружения, где есть возможность запустить сервер Node.js.
-
Повышенная нагрузка на стороне сервера. Рендеринг полноценного приложения в Node.js очевидно более требователен к ресурсам процессора, чем простая раздача статичных файлов, поэтому если вы ожидаете большой трафик, будьте готовы к соответствующей нагрузке на сервер и используйте стратегии кэширования.
Прежде чем использовать серверный рендеринг для вашего приложения, задайте себе вопрос, действительно ли он вам нужен
Ответ зависит от того, насколько важно время до контента для вашего приложения. Например, если вы разрабатываете панель мониторинга для внутренних нужд, где дополнительные несколько сотен миллисекунд начальной загрузки не так важны, то серверный рендеринг будет излишеством
Однако, в тех случаях, когда время до контента критично, серверный рендеринг может позволит достичь наилучшей производительности начальной загрузки.
# Conditionals and Loops
It’s easy to toggle the presence of an element, too:
123
123456789
This example demonstrates that we can bind data to not only text and attributes, but also the structure of the DOM. Moreover, Vue also provides a powerful transition effect system that can automatically apply transition effects when elements are inserted/updated/removed by Vue.
You can change from to in the sandbox below to check the effect:
See the Pen Conditional rendering
by Vue (@Vue)
on CodePen.
There are quite a few other directives, each with its own special functionality. For example, the directive can be used to display a list of items using the data from an Array:
1234567
12345678910111213
See the Pen List rendering
by Vue (@Vue)
on CodePen.
Passing Data to Child Components with Props
Earlier, we mentioned creating a component for blog posts. The problem is, that component won’t be useful unless you can pass data to it, such as the title and content of the specific post we want to display. That’s where props come in.
Props are custom attributes you can register on a component. When a value is passed to a prop attribute, it becomes a property on that component instance. To pass a title to our blog post component, we can include it in the list of props this component accepts, using a option:
A component can have as many props as you’d like and by default, any value can be passed to any prop. In the template above, you’ll see that we can access this value on the component instance, just like with .
Once a prop is registered, you can pass data to it as a custom attribute, like this:
In a typical app, however, you’ll likely have an array of posts in :
Then want to render a component for each one:
Above, you’ll see that we can use to dynamically pass props. This is especially useful when you don’t know the exact content you’re going to render ahead of time, like when fetching posts from an API.
That’s all you need to know about props for now, but once you’ve finished reading this page and feel comfortable with its content, we recommend coming back later to read the full guide on Props.
# watch
The API is the exact equivalent of the component property. requires watching a specific data source and applies side effects in a separate callback function. It also is lazy by default — i.e. the callback is only called when the watched source has changed.
-
Compared to , allows us to:
- Perform the side effect lazily;
- Be more specific about what state should trigger the watcher to re-run;
- Access both the previous and current value of the watched state.
A watcher data source can either be a getter function that returns a value, or directly a :
1234567891011121314
A watcher can also watch multiple sources at the same time using an array:
123456789
Functional Components
The anchored heading component we created earlier is relatively simple. It doesn’t manage any state, watch any state passed to it, and it has no lifecycle methods. Really, it’s only a function with some props.
In cases like this, we can mark components as , which means that they’re stateless (no ) and instanceless (no context). A functional component looks like this:
In 2.5.0+, if you are using single-file components, template-based functional components can be declared with:
Everything the component needs is passed through , which is an object containing:
- : An object of the provided props
- : An array of the VNode children
- : A function returning a slots object
- : (2.6.0+) An object that exposes passed-in scoped slots. Also exposes normal slots as functions.
- : The entire , passed to the component as the 2nd argument of
- : A reference to the parent component
- : (2.3.0+) An object containing parent-registered event listeners. This is an alias to
- : (2.3.0+) if using the option, this will contain resolved injections.
After adding , updating the render function of our anchored heading component would require adding the argument, updating to , then updating to .
Since functional components are just functions, they’re much cheaper to render.
They’re also very useful as wrapper components. For example, when you need to:
- Programmatically choose one of several other components to delegate to
- Manipulate children, props, or data before passing them on to a child component
Here’s an example of a component that delegates to more specific components, depending on the props passed to it:
Passing Attributes and Events to Child Elements/Components
On normal components, attributes not defined as props are automatically added to the root element of the component, replacing or intelligently merging with any existing attributes of the same name.
Functional components, however, require you to explicitly define this behavior:
By passing as the second argument to , we are passing down any attributes or event listeners used on . It’s so transparent, in fact, that events don’t even require the modifier.
If you are using template-based functional components, you will also have to manually add attributes and listeners. Since we have access to the individual context contents, we can use to pass along any HTML attributes and (the alias for ) to pass along any event listeners.
vs
You may wonder why we need both and . Wouldn’t be the same as ? In some cases, yes — but what if you have a functional component with the following children?
For this component, will give you both paragraphs, will give you only the second, and will give you only the first. Having both and therefore allows you to choose whether this component knows about a slot system or perhaps delegates that responsibility to another component by passing along .
Getting Started
The official guide assumes intermediate level knowledge of HTML, CSS, and JavaScript. If you are totally new to frontend development, it might not be the best idea to jump right into a framework as your first step — grasp the basics then come back! Prior experience with other frameworks helps, but is not required.
The easiest way to try out Vue.js is using the Hello World example. Feel free to open it in another tab and follow along as we go through some basic examples. Or, you can create an file and include Vue with:
or:
The Installation page provides more options of installing Vue. Note: We do not recommend that beginners start with , especially if you are not yet familiar with Node.js-based build tools.
If you prefer something more interactive, you can also check out this tutorial series on Scrimba, which gives you a mix of screencast and code playground that you can pause and play around with anytime.
Circular References
Recursive Components
Components can recursively invoke themselves in their own template. However, they can only do so with the option:
When you register a component globally using , the global ID is automatically set as the component’s option.
If you’re not careful, recursive components can also lead to infinite loops:
A component like the above will result in a “max stack size exceeded” error, so make sure recursive invocation is conditional (i.e. uses a that will eventually be ).
Circular References Between Components
Let’s say you’re building a file directory tree, like in Finder or File Explorer. You might have a component with this template:
Then a component with this template:
When you look closely, you’ll see that these components will actually be each other’s descendent and ancestor in the render tree — a paradox! When registering components globally with , this paradox is resolved for you automatically. If that’s you, you can stop reading here.
However, if you’re requiring/importing components using a module system, e.g. via Webpack or Browserify, you’ll get an error:
To explain what’s happening, let’s call our components A and B. The module system sees that it needs A, but first A needs B, but B needs A, but A needs B, etc. It’s stuck in a loop, not knowing how to fully resolve either component without first resolving the other. To fix this, we need to give the module system a point at which it can say, “A needs B eventually, but there’s no need to resolve B first.”
In our case, let’s make that point the component. We know the child that creates the paradox is the component, so we’ll wait until the lifecycle hook to register it:
Or alternatively, you could use Webpack’s asynchronous when you register the component locally:
Problem solved!
# Component Binding Helpers
mapState
mapState(namespace?: string, map: Array | Object): Object
Create component computed options that return the sub tree of the Vuex store.
The first argument can optionally be a namespace string.
The second object argument’s members can be a function.
mapGetters
mapGetters(namespace?: string, map: Array | Object): Object
Create component computed options that return the evaluated value of a getter.
The first argument can optionally be a namespace string.
mapActions
mapActions(namespace?: string, map: Array | Object): Object
Create component methods options that dispatch an action.
The first argument can optionally be a namespace string.
The second object argument’s members can be a function.
mapMutations
mapMutations(namespace?: string, map: Array | Object): Object
Create component methods options that commit a mutation.
The first argument can optionally be a namespace string.
The second object argument’s members can be a function.
createNamespacedHelpers
createNamespacedHelpers(namespace: string): Object
Create namespaced component binding helpers. The returned object contains , , and that are bound with the given namespace.
Vue 3.0 — первый взгляд
Наконец-то руки дошли попробовать новую версию Vue. Я не собираюсь быть объективным в этой статье, я просто расскажу свои впечатления в процессе работы с новой версией, а так же расскажу как её установить и начать работу уже сейчас.
Не смотря на релиз, Vue 3.0 еще не готов для полноценного использования в продакшене. Router и Vuex еще не готовы для работы с новой версией, Vue CLI по умолчанию устанавливает старую версию, не говоря уже о сторонних плагинах и библиотеках, авторы которых не успели их обновить. Вот такой долгожданный и неполноценный релиз мы получили.
Особенно много вопросов вызывает новый синтаксис, так называемый Composition API, который к счастью не заменит полностью привычный и всеми любимый Options API. В пользу новой композиции нам всюду предлагают подобную картинку:
Версия с использованием Vue
Наша версия Vue будет написана с использованием обычного JavaScript, чтобы избежать необходимости беспокоиться об инструментах ES6 и сосредоточиться вместо этого на примере компонента.
Вы увидите как Vue помогает отделять данные от отображения пользовательского интерфейса, с отображением данных в реактивном подходе. Нам также не нужны перемещения по DOM для вычисления значений, которые начинают казаться неуклюжими, когда вы сравниваете как это делается в jQuery по сравнению с React или Vue.
Начиная
Прежде чем писать наш шаблон и JavaScript, давайте обсудим наш подход к построению формы. Думая о данных связанных с формой, я представляю коллекцию (массив) участников и цену одного элемента.
Объект-литерал может выглядеть следующим образом:
Если мы обновим данные, добавив еще одного участника, Vue будет слушать и готов реагировать на это изменение данных:
Имея это в виду, давайте построим приблизительную HTML-разметку и JavaScript скелет для нашего пользовательского интерфейса.
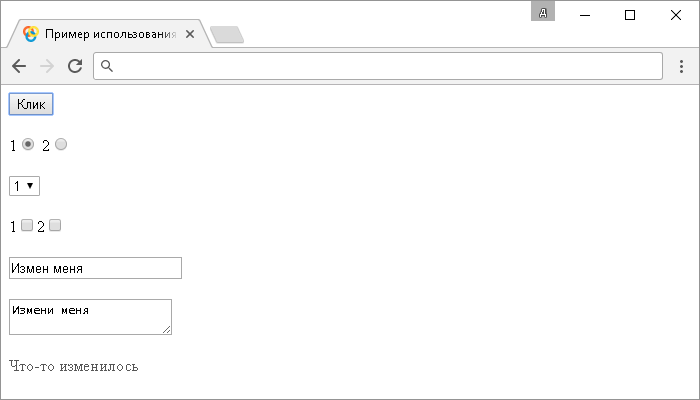
Vue HTML шаблон
Мы будем постепенно наращивать JavaScript и HTML, чтобы пропустить вас через каждую функцию, которую мы уже рассмотрели в jQuery версии.
Вот начальная HTML разметка для Vue части этого руководства:
Разметка очень похожа на нашу jQuery версию, но, возможно, вы заметили переменную для цены одного элемента:
Vue использует для рендеринга данных в DOM. ` cost ` — привязка данных с использованием синтаксиса «Усы» и символа доллара $.
Помните объект данных со свойством cost?
Тег усы заменяется значением data.cost при изменении связанных данных.
Затем обратите внимание на строку v-for=»(attendee, index) in attendees», которая представляет собой цикл, перебирающий массив данных attendees, и отображающий поля ввода формы для каждого участника. Атрибут v-for — это , которая «реактивно применяет к DOM изменения при обновлении значения этого выражения»
В нашем примере когда массив data.attendees обновлен, DOM будет обновляться в результате действия этой директивы
Атрибут v-for — это , которая «реактивно применяет к DOM изменения при обновлении значения этого выражения». В нашем примере когда массив data.attendees обновлен, DOM будет обновляться в результате действия этой директивы.
Вы должны начать видеть шаблон: мы модифицируем данные (состояние), и пользовательский интерфейс реагирует на эти изменения. В результате ваш код более декларативный и пишется легче.
# Опции конструктора Vuex.Store
state
тип: Object | Function Корневой объект состояния хранилища Vuex. Подробнее При передаче функции, возвращающей объект, возвращаемый объект будет использован в качестве корневого состояния. Это пригодится, если необходимо повторно использовать объект состояния, особенно при повторном использовании модулей. Подробнее
mutations
тип: { : Function } Доступные мутации хранилища. Обработчики мутаций первым аргументом получают state (при использовании модулей это будет локальное состояние модуля). Вторым аргументом передаётся «нагрузка» (payload), если она есть. Подробнее
actions
тип: { : Function } Доступные действия хранилища. В обработчики передаётся объект context, со следующими свойствами: {
state, // то же, что и `store.state`, или локальный state при использовании модулей
rootState, // то же, что и `store.state`, только при использовании модулей
commit, // то же, что и `store.commit`
dispatch, // то же, что и `store.dispatch`
getters, // то же, что и `store.getters`
rootGetters; // то же, что и `store.getters`, только в модулях
}
Вторым аргументом передаётся «нагрузка» (payload), если она есть. Подробнее
getters
тип: { : Function } Доступные геттеры хранилища. Функция получает следующие аргументы: state, // при использовании модулей — локальный state модуля
getters // то же, что и store.getters
При определении в модуле state, // при использовании модулей — локальный state модуля
getters, // локальные геттеры текущего модуля
rootState, // глобальный state
rootGetters // все геттеры
Зарегистрированные геттеры доступны через store.getters. Подробнее
modules
тип: Object Объект, содержащий под-модули для помещения в хранилище, в формате: {
key: {
state,
namespaced?,
mutations?,
actions?,
getters?,
modules?
},
…
}
У каждого модуля могут быть свои state и mutations, аналогично корневому хранилищу. Состояние модуля прикрепляется к корневому, по указанному ключу. Мутации и геттеры модуля получают первым аргументом локальное состояние, а не корневое. При вызове действий context.state аналогичным образом указывает на локальное состояние модуля. Подробнее
plugins
тип: Array Массив функций-плагинов, которые применяются к хранилищу. Плагины просто получают хранилище в качестве единственного аргумента, и могут как отслеживать мутации (для сохранения исходящих данных, логирования или отладки) или инициировать их (для обработки входящих данных, например, websockets или observables). Подробнее
strict
-
тип:
-
по умолчанию:
Форсирует использование «строгого режима» в хранилище Vuex. В нём любые изменения состояния, происходящие вне обработчиков мутаций, будут выбрасывать ошибки.
devtools
тип: boolean Интеграция в devtools конкретного экземпляра Vuex. Например, передача false сообщает экземпляру хранилища Vuex, что не требуется подписываться на плагин devtools. Это будет полезно если у вас несколько хранилищ на одной странице. {
devtools: false
}
Формы с Vuex
Вообще формы это проблема не только Vuex, а почти любого State Management паттерна.
Все-таки он предполагает односторонний поток данных, а формы подразумевают двусторонний байдинг.
Vuex предлагает два варианта решения.
Через привязку к значению state, а для обновления — событие input с отправкой коммита:
Или все же использовать двусторонний байдинг и а получение и коммит осуществлять через геттер и сеттер:
Нам второй вариант кажется удобнее и лаконичнее, но все же очень многословным.
Представьте описывать подобным образом форму с 20ю или более полями?
Получается огромное количество кода для такой, казалось бы, примитивной задачи.
Проблема чуть менее актуальна если использовать мапперы, а именно и ,
но, как я писал выше, они в данный момент с TypeScript плохо работают и пришлось искать другое решение.
Мы написали примитивнейший маппер, который добавляет геттер (геттер из state) и сеттер (коммит мутации):
Он позволяет сократить количество кода и описывать поля подобным образом:
И, соответственно, использовать :
DOM Template Parsing Caveats
Some HTML elements, such as , , and have restrictions on what elements can appear inside them, and some elements such as , , and can only appear inside certain other elements.
This will lead to issues when using components with elements that have such restrictions. For example:
The custom component will be hoisted out as invalid content, causing errors in the eventual rendered output. Fortunately, the special attribute offers a workaround:
It should be noted that this limitation does not apply if you are using string templates from one of the following sources:
- String templates (e.g. )
- Single-file () components
That’s all you need to know about DOM template parsing caveats for now – and actually, the end of Vue’s Essentials. Congratulations! There’s still more to learn, but first, we recommend taking a break to play with Vue yourself and build something fun.
Once you feel comfortable with the knowledge you’ve just digested, we recommend coming back to read the full guide on Dynamic & Async Components, as well as the other pages in the Components In-Depth section of the sidebar.
##company## — ##description##
Edit this on GitHub!
Netlify
Additional Context
The above test is fairly simple, but in practice Vue components often have other behaviors you want to test, such as:
- making API calls
- committing or dispatching mutations or actions with a store
- testing interaction
There are more complete examples showing such tests in the Vue Test Utils guides.
Vue Test Utils and the enormous JavaScript ecosystem provides plenty of tooling to facilitate almost 100% test coverage. Unit tests are only one part of the testing pyramid, though. Some other types of tests include e2e (end to end) tests, and snapshot tests. Unit tests are the smallest and most simple of tests — they make assertions on the smallest units of work, isolating each part of a single component.
Snapshot tests save the markup of your Vue component, and compare to the new one generated each time the test runs. If something changes, the developer is notified, and can decide if the change was intentional (the component was updated) or accidental (the component is behaving incorrectly).
End to end tests ensure a number of components interact well together. They are more high level. Some examples might be testing if a user can sign up, log in, and update their username. These are slower to run than unit tests or snapshot tests.
Unit tests are most useful during development, either to help a developer think about how to design a component, or refactor an existing component, and are often run every time code is changed.
Higher level tests, such as end to end tests, run much slower. These usually run pre-deploy, to ensure each part of the system is working together correctly.
More information about testing Vue components can be found in Testing Vue.js Applications by core team member Edd Yerburgh.
# Методы экземпляра Vuex.Store
dispatch
Запуск действия. может содержать опцию что позволяет запускать корневые (root) действия . Возвращает Promise который разрешает все обработчики инициируемых действий. Подробнее
replaceState
replaceState(state: Object)
Замена корневого состояние хранилища новым. Используйте только для гидратации состояния и/или функциональности «машины времени».
watch
watch(fn: Function, callback: Function, options?: Object): Function
Реактивно отслеживает возвращаемое значение , и вызывает коллбэк в случае изменений. Первым аргументом будет состояние хранилища, вторым — геттеры. Опционально может принимать объект с настройками, с такими же параметрами как и у .
Для прекращения отслеживания, необходимо вызвать возвращаемую методом функцию.
subscribe
subscribe(handler: Function, options?: Object): Function
Отслеживание вызова мутаций хранилища. Обработчик вызывается после каждой мутации и получает в качестве параметров дескриптор мутации и состояние после мутации.
По умолчанию, новый обработчик добавляется в конец цепочки, поэтому он будет выполняться после других обработчиков, добавленных раньше. Это поведение можно переопределить добавив в , что позволит добавлять обработчик в начало цепочки.
Метод возвращает функцию , которую требуется вызывать когда отслеживание больше не требуется. Например, можно подписаться на модуль Vuex и прекращать отслеживание при удалении регистрации модуля. Или можно вызвать внутри компонента Vue, а позднее уничтожить компонент. В таких случаях, необходимо вручную останавливать отслеживание.
Чаще всего используется в плагинах. Подробнее
subscribeAction
subscribeAction(handler: Function, options?: Object): Function
Отслеживание вызова действий хранилища. Обработчик вызывается после каждого действия и получает в качестве параметров дескриптор действия и текущее состояние хранилища.
Метод возвращает функцию , которую требуется вызывать когда отслеживание больше не требуется. Например, при удалении регистрации модуля Vuex или перед уничтожением компонента Vue.
По умолчанию, новый обработчик добавляется в конец цепочки, поэтому он будет выполняться после других обработчиков, добавленных раньше. Это поведение можно переопределить добавив в , что позволит добавлять обработчик в начало цепочки.
Метод возвращает функцию , которую требуется вызывать когда отслеживание больше не требуется. Например, можно подписаться на модуль Vuex и прекращать отслеживание при удалении регистрации модуля. Или можно вызвать внутри компонента Vue, а позднее уничтожить компонент. В таких случаях, необходимо вручную останавливать отслеживание.
Начиная с версии 3.1.0, в также можно определять, должен ли обработчик вызываться до или после вызова действия (по умолчанию поведение до):
С версии 3.4.0 в также можно указывать обработчик для перехвата ошибки, выброшенной при выполнении действия. В качестве третьего аргумента функция получает объект .
Метод чаще всего используется в плагинах. Подробнее
registerModule
registerModule(path: string | Array, module: Module, options?: Object)
Регистрирует динамический модуль.
может иметь опцию , что позволяет сохранить предыдущее состояние. Полезно при отрисовке на стороне сервера (SSR).
unregisterModule(path: string | Array)
Удаление зарегистрированного динамического модуля.
hasModule(path: string | Array): boolean
Проверка, не зарегистрирован ли уже модуль с заданным именем.
Instance Lifecycle Hooks
Each Vue instance goes through a series of initialization steps when it’s created — for example, it needs to set up data observation, compile the template, mount the instance to the DOM, and update the DOM when data changes. Along the way, it also runs functions called lifecycle hooks, giving users the opportunity to add their own code at specific stages.
For example, the hook can be used to run code after an instance is created:
There are also other hooks which will be called at different stages of the instance’s lifecycle, such as , , and . All lifecycle hooks are called with their context pointing to the Vue instance invoking it.
Don’t use arrow functions on an options property or callback, such as or . Since an arrow function doesn’t have a , will be treated as any other variable and lexically looked up through parent scopes until found, often resulting in errors such as or .