Роутер tp-link tl-wr1043nd: небольшой обзор модели и подробное руководство
Содержание:
- Open Source Code For Programmers (GPL)
- To Upgrade
- Open Source Code For Programmers (GPL)
- Восстановление
- To Upgrade
- Open Source Code voor Programmeerders (GPL)
- Аппаратный моддинг
- Домашняя сеть LAN и DHCP
- Подключение TP-Link TL-WR1043ND к компьютеру и настройка сетевой карты
- To Upgrade
- To Upgrade
- Немного о самом роутере TP-Link TL-WR1043ND: описание корпуса, параметры, стоимость, содержимое коробки
- Базовая настройка маршрутизатора:
- Специальные настройки
- ДЛЯ ОБНОВЛЕНИЯ
- Настройка подключения к интернету (Динамический IP, PPPoE, L2TP)
- To Upgrade
- Open Source Code For Programmers (GPL)
- To Upgrade
- To Upgrade
- Open Source Code For Programmers (GPL)
- Open Source Code For Programmers (GPL)
Open Source Code For Programmers (GPL)
Please note: The products of TP-Link partly contain software code developed by third parties, including software code subject to the GNU General Public Licence (“GPL“), Version 1/Version 2/Version 3 or GNU Lesser General Public License («LGPL»). You may use the respective software condition to following the GPL licence terms.
You can review, print and download the respective GPL licence terms here. You receive the GPL source codes of the respective software used in TP-Link products for direct download and further information, including a list of TP-Link software that contain GPL software code under GPL Code Center.
To Upgrade
IMPORTANT: To prevent upgrade failures, please read the following before proceeding with the upgrade process
- Please upgrade firmware from the local TP-Link official website of the purchase location for your TP-Link device, otherwise it will be against the warranty. Please click here to change site if necessary.
- Please verify the hardware version of your device for the firmware version. Wrong firmware upgrade may damage your device and void the warranty. (Normally V1.x=V1)How to find the hardware version on a TP-Link device?
- Do NOT turn off the power during the upgrade process, as it may cause permanent damage to the product.
- To avoid wireless disconnect issue during firmware upgrade process, it’s recommended to upload firmware with wired connection unless there is no LAN/Ethernet port on your TP-Link device.
- It’s recommended that users stop all Internet applications on the computer, or simply disconnect Internet line from the device before the upgrade.
- Use decompression software such as WinZIP or WinRAR to extract the file you download before the upgrade.
| TL-WR1043ND(UN)_V2_140912 | ||
|---|---|---|
| Published Date: 2014-09-12 | Language: English | File Size: 5.25 MB |
|
| TL-WR1043ND_V2_140613 | ||
|---|---|---|
| Published Date: 2014-06-13 | Language: English | File Size: 5.35 MB |
|
| TL-WR1043ND_V2_131118(Unifi & Maxis Fiber) | ||
|---|---|---|
| Published Date: 2013-11-18 | Language: English | File Size: 5.25 MB |
|
Open Source Code For Programmers (GPL)
Please note: The products of TP-Link partly contain software code developed by third parties, including software code subject to the GNU General Public Licence (“GPL“), Version 1/Version 2/Version 3 or GNU Lesser General Public License («LGPL»). You may use the respective software condition to following the GPL licence terms.
You can review, print and download the respective GPL licence terms here. You receive the GPL source codes of the respective software used in TP-Link products for direct download and further information, including a list of TP-Link software that contain GPL software code under GPL Code Center.
Восстановление
→ generic.debrick
Примечание: Если вы случайно брикнули свой роутер, перезаписав загрузчик попробуйте следующее:
- Отпаяйте Spansion SPI-Flash (datasheet) от платы. Я использую аллюминиевую фольгу, чтобы защитить остальные элементы платы от излишнего нагрева и выпаиваю микросхему при помощи фена паяльной станции. Получается отлично.
- Найдите способ подключить SPI флеш к чему-либо с SPI интерфейсом…. Я использовал AVR микроконтроллер. Тут Вы можете скачать документацию с дополнительной информацией. Attention, the PDF is mirrored and it is intended to manufacuring boards with the direct toner method.
- Прошейте bootloader на флеш-память. Я взял bootloader с аналогичного wr1043nd.
- Припаяйте чип назад на роутер, соблюдая ключ.
- The router shall now be unbricked.
To Upgrade
IMPORTANT: To prevent upgrade failures, please read the following before proceeding with the upgrade process
- Please upgrade firmware from the local TP-Link official website of the purchase location for your TP-Link device, otherwise it will be against the warranty. Please click here to change site if necessary.
- Please verify the hardware version of your device for the firmware version. Wrong firmware upgrade may damage your device and void the warranty. (Normally V1.x=V1)How to find the hardware version on a TP-Link device?
- Do NOT turn off the power during the upgrade process, as it may cause permanent damage to the product.
- To avoid wireless disconnect issue during firmware upgrade process, it’s recommended to upload firmware with wired connection unless there is no LAN/Ethernet port on your TP-Link device.
- It’s recommended that users stop all Internet applications on the computer, or simply disconnect Internet line from the device before the upgrade.
- Use decompression software such as WinZIP or WinRAR to extract the file you download before the upgrade.
| TL-WR1043ND_V1_140319 | ||
|---|---|---|
| Published Date: 2014-03-19 | Language: English | File Size: 4.75 MB |
|
| TL-WR1043ND_v1_130428 | ||
|---|---|---|
| Published Date: 2013-04-28 | Language: English | File Size: 4.44 MB |
|
| TL-WR1043ND_V1_130325 | ||
|---|---|---|
| Published Date: 2013-03-25 | Language: English | File Size: 5.22 MB |
|
Open Source Code voor Programmeerders (GPL)
Houd er rekening mee dat: De producten van TP-Link deels software codes bevatten van derde partijen, inclusief software codes naar de GNU General Public Licence (“GPL“), Versie 1/Versie 2/Versie 3 of GNU Lager General Public License («LGPL»). U kunt de betreffende software voorwaarde gebruiken in lijn met de GPL licentievoorwaarden.
U kunt de betreffende GPL licentievoorwaren hier bekijken, printen en downloaden. U vindt de download van de GPL source codes van de betreffende software in een TP-Link product en meer informatie, inclusief een lijst met TP-Link software voorzien van GPL software codes, onder GPL Code Center.
Аппаратный моддинг
Внимание: Мы не несем никакой ответственности, за Ваши действия или бездействия, за физический, финансовый, моральный или любой другой ущерб. Помните, вскрывая роутер, Вы лишаетесь гарантии
Данный материал не является пошаговым руководством: Вы должны понимать, что Вы делаете.
Вы были предупреждены.
Мод 64MB памяти
Устройство использует DDR1 16Mbit x 16bit (16Mibit*16=256 mebibit. 256 mebibit/8=32MiByte) чип с частотой 400MHz. Замените его на любой 32Mbit x 16bit чип. 333MHz чипы, вместо 400МГц, также работают отлично. Такого типа чипы найти довольно сложно. Самый простой способ их найти — снять их с DDR-SODIMM модуля памяти. Так как нет 64Mbit x 16Bit DDR1 чипов → мод 128 МБ памяти невозможен!
Проверенные микросхемы памяти:
- Hynix HY5DU121622DTP-D43 (From Mustang DDR-SODIMM 512 MB)
- Infineon HYB25D512160BE (From Infineon DDR-SODIMM 512 MB)
Также могут работать:
Убедитесь, что роутер “увидел” все 64МБ оперативной памяти (используя PuTTY):
1.nvram set sdram_init=0x0013
2.nvram commit
3.reboot
root@OpenWrt:~# free
total used free shared buffers
Mem: 62104 17472 44632 0 1392
Total: 62104 17472 44632
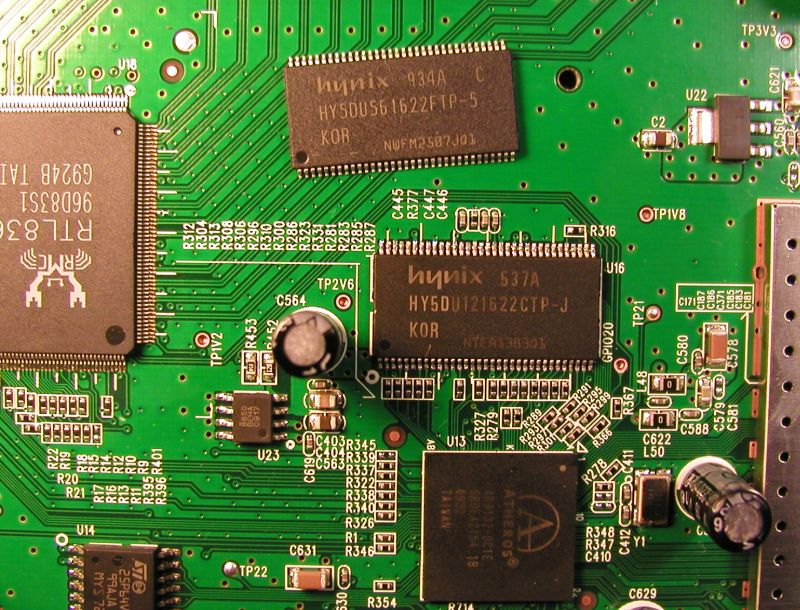
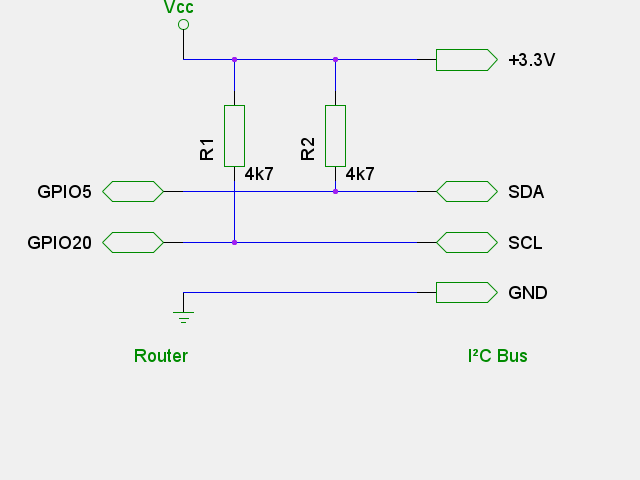
Мод I²C GPIO
An I²C-bus can easily be added using the GPIO-lines of the AR913x-SoC. So far, the only usable ones which have been confirmed to work are GPIO 5 (the QSS-LED, easily solderable at D10,left pin with ‘+’) as SDA and GPIO 20 (labeled on the pcb, next to the RAM chip) as SCL. There are only two pull-up resistors of 4,7k-10k needed, which have to be soldered between the apropriate GPIO line and Vcc (found at the spot labeled TP3V3, about 2 cm above the WiFi-shielding). The common ground can be obtained from the TP_GND spot (between P1 and the flash chip). Remember this bus runs at 3.3V level, when connecting I²C-devices.
Unfortunately the precompiled packages don’t seem to work properly, so building from sources is most likely necessary. Therefore, make sure the apropriate part of your OpenWRT-config file looks like that:
#
# I2C support
#
CONFIG_PACKAGE_kmod-i2c-core=y
CONFIG_PACKAGE_kmod-i2c-algo-bit=y
# CONFIG_PACKAGE_kmod-i2c-algo-pca is not set
# CONFIG_PACKAGE_kmod-i2c-algo-pcf is not set
CONFIG_PACKAGE_kmod-i2c-gpio=y
CONFIG_PACKAGE_kmod-i2c-gpio-custom=y
Besides that, check in the kernel-config, that the support for I²C character device is selected. In the kernel config file the appropriate line should look like that:
CONFIG_I2C_CHARDEV=m
To load the kernel module, do a:
insmod i2c-gpio-custom bus0=0,5,20
In many cases, GPIO 5 will already be occupied by the leds-gpio kernel module — causing the above command to fail. In case you don’t need the leds at all, you can just unload the leds-gpio kernel module, remove the package or disable it in the OpenWRT-configuration. As an alternative, you can just release the binding of the QSS-LED in sysfs — thus keeping the function of the other LEDs.
Мод I²C Tiny-USB
Though not really a modification of the internal hardware, the I²C Tiny-USB adapter allows you to extend your router with an I²C bus over USB. It is not as cheap as the I²C-GPIO mod, but will not risk your warranty. Remember this bus runs at 5V level, when connecting I²C-devices.
Домашняя сеть LAN и DHCP
Где меняются параметры внутренней сети маршрутизатора TP-Link TL-WR1043ND:
-
Внутренняя сеть настраивается в блоке LAN в списке «Сеть» (Network). Наберите другой адрес IP для вашего маршрутизатора. Это в принципе единственное, что вы можете сделать с этой вкладкой. Можете сразу активировать опцию IGMP.
- Сервер DHCP настраивается в отдельном блоке — по наименованию поймёте в каком.
-
В DHCP Settings установите состояние Enable для сервера. Это нужно сделать обязательно. Количество адресов можно оставить без изменений — обычно значение по умолчанию равно 100 адресам. Эти адреса будут получать гаджеты, которые будут пользоваться вашим «Вай-Фаем». Если что-то поменяете, кликните по Save (функция сохранения).
Подключение TP-Link TL-WR1043ND к компьютеру и настройка сетевой карты
Первый шаг в настройке — установка связи между настраивающим устройством и роутером. Отладка будет проведена в интерфейсе компьютера, поэтому соединяем сетевой девайс с ПК.
В коробке есть шнур — вставьте одну его вилку из пластика в жёлтый порт (можете взять любой), а другую — в компьютер (выход будет такой же прямоугольной формы). Кабель, что провёл вам провайдер тоже идёт со штекером — его подключаем, естественно, к роутеру, так как он должен получать сигнал от компании (гнездо синего цвета).
Чтобы роутер работал, подключаем его к розетке с помощью адаптера из коробки. После этого следует нажать на Power и подождать, когда завершится загрузка.
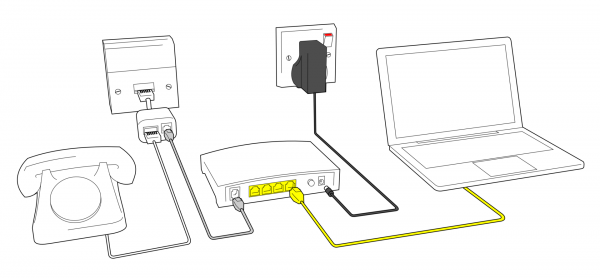
К жёлтому выходу подключаем шнур из комплекта
Задайте нужные параметры для своей сетевой карты, чтобы она распознала сигнал от роутера:
- Открыть «Панель управления» через «Пуск» либо окно «Выполнить» (вызывается через зажатие кнопок Win и R) и команду control, запущенной в нём.
- Раскрываем «Центр управления сетями».
- Кликаем по строчке «Изменение параметров адаптера».
- Выбираем правой клавишей мышки локальное подключение либо соединение Ethernet. Кликаем по «Свойства».
- Ищем четвёртый протокол IP (IPv4). Заходим в его свойства с помощью специальной кнопки.
- Ставим автоматическое получение данных для обоих параметров — IP и DNS.
To Upgrade
IMPORTANT: To prevent upgrade failures, please read the following before proceeding with the upgrade process
- Please upgrade firmware from the local TP-Link official website of the purchase location for your TP-Link device, otherwise it will be against the warranty. Please click here to change site if necessary.
- Please verify the hardware version of your device for the firmware version. Wrong firmware upgrade may damage your device and void the warranty. (Normally V1.x=V1)How to find the hardware version on a TP-Link device?
- Do NOT turn off the power during the upgrade process, as it may cause permanent damage to the product.
- To avoid wireless disconnect issue during firmware upgrade process, it’s recommended to upload firmware with wired connection unless there is no LAN/Ethernet port on your TP-Link device.
- It’s recommended that users stop all Internet applications on the computer, or simply disconnect Internet line from the device before the upgrade.
- Use decompression software such as WinZIP or WinRAR to extract the file you download before the upgrade.
| TL-WR1043ND_V1_140319 | ||
|---|---|---|
| Published Date: 2014-03-19 | Language: English | File Size: 4.75 MB |
|
| TL-WR1043ND_v1_130428 | ||
|---|---|---|
| Published Date: 2013-04-28 | Language: English | File Size: 4.44 MB |
|
| TL-WR1043ND_V1_130325 | ||
|---|---|---|
| Published Date: 2013-03-25 | Language: English | File Size: 5.22 MB |
|
To Upgrade
IMPORTANT: To prevent upgrade failures, please read the following before proceeding with the upgrade process
- Please upgrade firmware from the local TP-Link official website of the purchase location for your TP-Link device, otherwise it will be against the warranty. Please click here to change site if necessary.
- Please verify the hardware version of your device for the firmware version. Wrong firmware upgrade may damage your device and void the warranty. (Normally V1.x=V1)Hoe vind ik de hardware versie van een TP-Link product?
- Do NOT turn off the power during the upgrade process, as it may cause permanent damage to the product.
- To avoid wireless disconnect issue during firmware upgrade process, it’s recommended to upload firmware with wired connection unless there is no LAN/Ethernet port on your TP-Link device.
- It’s recommended that users stop all Internet applications on the computer, or simply disconnect Internet line from the device before the upgrade.
- Use decompression software such as WinZIP or WinRAR to extract the file you download before the upgrade.
| TL-WR1043ND_V2_150910 | ||
|---|---|---|
| Publicatiedatum: 2015-10-23 | Taal: Engels | Bestandsgrootte: 4.73 MB |
|
| TL-WR1043ND(UN)_V2_140912 | ||
|---|---|---|
| Publicatiedatum: 2014-09-12 | Taal: Engels | Bestandsgrootte: 5.25 MB |
|
| TL-WR1043ND_V2_140613 | ||
|---|---|---|
| Publicatiedatum: 2014-06-13 | Taal: Engels | Bestandsgrootte: 5.35 MB |
|
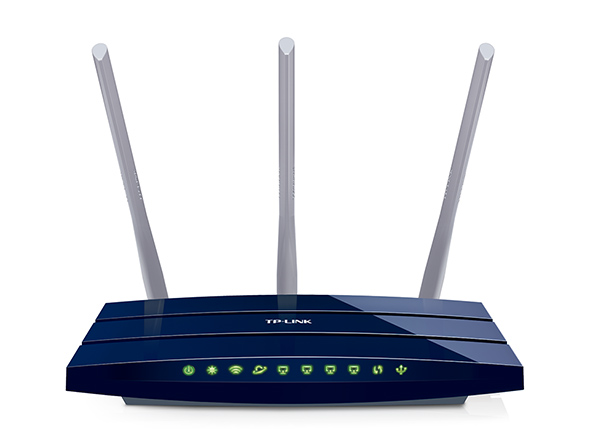
Немного о самом роутере TP-Link TL-WR1043ND: описание корпуса, параметры, стоимость, содержимое коробки
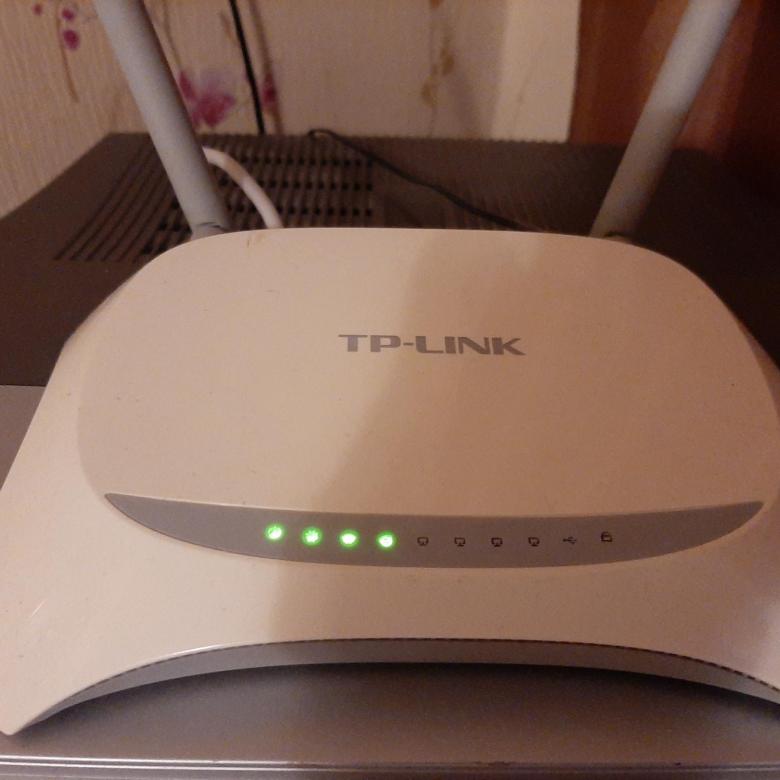
Роутер выполнен в синем цвете. Сзади закреплены три антенны серого цвета — они съёмные. Впереди 10 индикаторов, которые горят зелёным, означая активность той или иной функции, кнопки или выхода.
На роутере есть несколько индикаторов, которые указывают на состояние тех или иных выходов и клавиш
Все выходы находятся на роутере сзади. Между первой и второй антенной — 4 жёлтых порта для домашней сети и кнопка для включения и выключения «Вай-Фая» (Wireless On/Off). Далее справа идёт голубая розетка для подключения кабеля провайдера, выход USB (для подключения принтеров или жёстких дисков, чтобы создать сетевое хранилище). После кнопки питания и выхода для адаптера находится клавиша Reset/WPS.
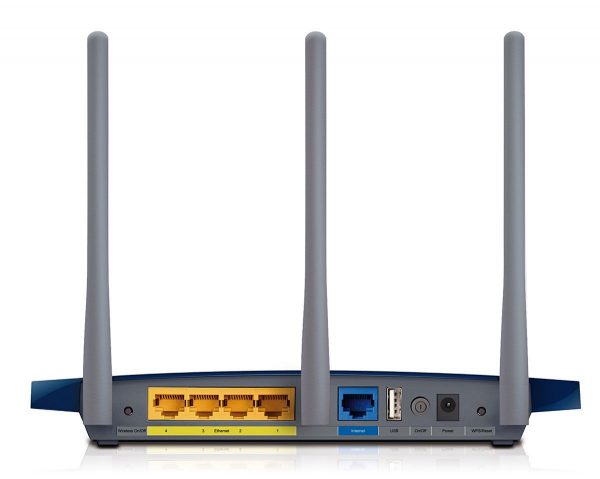
К жёлтым гнёздам вы можете подключить устройства, которые, например, не работают с сетями «Вай-Фай»
Что входит в коробку кроме синего устройства: адаптер питания, провод Ethernet, компакт-диск с разными материалами, инструкция по быстрой отладке. Стоимость роутера совсем небольшая — всего 1500 рублей.
Таблица: что указано в технических параметрах модели
| Интерфейс | 4 порта LAN 10/100/1000 Мбит/с1 порт WAN 10/100/1000 Мбит/1 порт USB 2.0 |
| Стандарты беспроводной передачи данных | IEEE 802.11n, IEEE 802.11g, IEEE 802.11b |
| Антенна | 5 дБи * 3 съёмные всенаправленные антенны (разъём RP-SMA) |
| Диапазон частот | 2,4 ГГц |
| Скорость передачи | 11n: до 300 Мбит/с (динамическая)11g: до 54 Мбит/с (динамическая)11b: до 11 Мбит/с (динамическая) |
| Перенаправление портов | Виртуальный сервер, Запуск портов, UPnP, DMZ |
| Контроль доступа | Родительский контроль, контроль локального управления, список узлов, доступ по расписанию, управление правилами |
| Протоколы | Support IPv4 and IPv6 |
| Системные требования | Microsoft Windows 98SE, NT, 2000, XP, Vista или Windows 8/8.1/10, MAC OS, NetWare, UNIX или Linux |
| Гостевая сеть | есть |
Базовая настройка маршрутизатора:
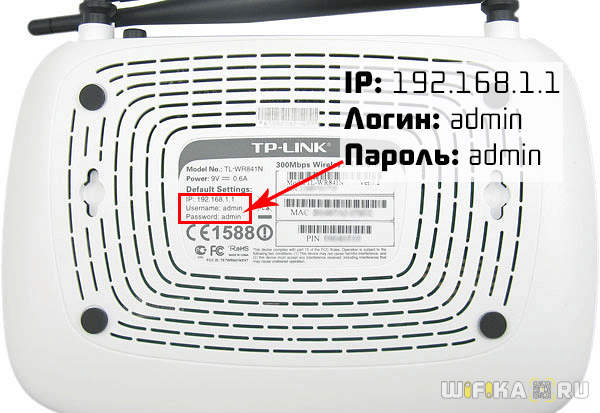
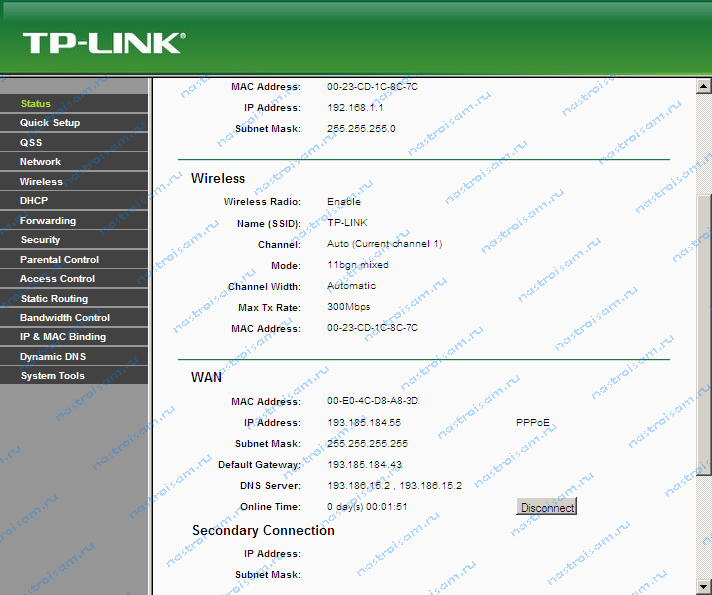
IP-адрес роутера стандартный для TP-Link — 192.168.1.1, соответственно веб-интерфейс доступен по адресу: http://192.168.1.1, логин: admin и пароль по умолчанию — admin. Веб-интерфейс обычный для TP-Link:
Настройку роутеров TP-Link через Quick Setup я уже описывал здесь — ссылка. Поэтому в данной инструкции я рассмотрю чуть более продвинутый вариант настройки, хотя ничего сложного в нем нет абсолютно.
Идем в раздел «Network» ->» WAN». В русском интерфейсе это будет раздел «Сеть» -> «WAN».
Настройка PPPoE для Ростелеком, ТТК и Дом.ру

При настройке роутераTL-WR1043ND для Ростелеком (большинство филиалов) и ТТК(кроме ТТК-Урал), а так же для Дом.ру — параметр «WAN Connection Type» выбираем — «PPPoE/Russian PPPoE».
Затем прописываем логин и пароль на подключение к Интернет, выданные при подключении. Второе соединение — «Secondary Connection», в случае PPPoE обычно не используется — ставим «Disabled».
«Wan Connection Mode» делаем «Connect automatically».
Нажимаем кнопку «Save».
Настройка VPN L2TP для Билайн.

Для подключения беспроводного маршрутизатора TP-Link к Домашнему Интернету Билайн, надо тип WAN подключения — «WAN Connection Type» — выбрать «L2TP/Russian L2TP».
В поля «User Name» и «Password» прописываем номер лицевого счета и пароль, выданный при подключении.
Ниже ставим галочку «Dynamic IP (Динамический IP)».
Далее, в поле «Server IP Address Name» прописываем адрес vpn-сервера Билайн: tp.internet.beeline.ru.
«WAN Connection Mode» выставляем в значение «Connect Automatically».
Нажимаем кнопку «Save».
Специальные настройки
Интерфейс
Сетевые настройки по-умолчанию:
| Имя интерфейса | Описание | Настройки по-умолчанию |
|---|---|---|
| br-lan | LAN & WiFi | 192.168.1.1/24 |
| eth0 | LAN ports (1 to 4) + WAN | Нет |
| wlan0 | WiFi | Отключен |
Порты коммутатора для VLAN (hw ver 1.x)
Порты коммутатора с 1 по 4 подключены к внешним портам LAN(1-4), как они помечены на корпусе, порт 0 — разъём WAN на корпусе.
5 порт подключен внутри к самому роутеру.
Это иллюстрирует таблица ниже:
| Порт | Порт коммутатора |
|---|---|
| Internet (WAN) | |
| LAN 1 | 1 |
| LAN 2 | 2 |
| LAN 3 | 3 |
| LAN 4 | 4 |
| GMII | 5 |
Порты коммутатора для VLAN (hw ver 2.x)
В апп. версии 2, у процессора два независимых порта, каждый из которых может быть использован для создания trunk, или access-интерфейса.
Соответствие внутренних портов внешним разъёмам и портам процессора показано на рисунке ниже:

Некоторые нюансы, касающиеся версии 10.03.1-rc4 на аппаратной версии 1.8 смотрите .
Безопасный режим
→ OpenWrt Failsafe Mode
Включите ваш маршрутизатор. После того, как индикатор ‘SYS’ начнет мигать, нажмите и удерживайте кнопку QSS (Находится на передней панели справа), до тех пор, пока индикатор ‘SYS’ не начнет мигать быстрее.
Восстановление через последовательную консоль
Вы увидите что-то подобное:
.
No valid address in Flash. Using fixed address
: cfg1 0xf cfg2 0x7114
eth0 up
eth0
Autobooting in 1 seconds
Введите
tpl
в течении 1 секунды. Затем используйте этот метод —
ДЛЯ ОБНОВЛЕНИЯ
ВАЖНО: Чтобы избежать проблем при обновлении ПО, пожалуйста, прочитайте следующую информацию по процедуре обновления. Проверьте соответствие аппаратной версии и версии ПО
Установка неправильной версии ПО может повредить ваше устройство и аннулировать гарантию. (Обычно V1.x =V1)
Проверьте соответствие аппаратной версии и версии ПО. Установка неправильной версии ПО может повредить ваше устройство и аннулировать гарантию. (Обычно V1.x =V1)
НЕ рекомендуется устанавливать версию ПО, не предназначенную для вашего региона. Нажмите здесь для выбора региона и загрузите наиболее актуальную версию ПО.
- НЕ отключайте питание во время процесса обновления, поскольку это может нанести урон маршрутизатору
- НЕ обновляйте ПО маршрутизатора по Wi-Fi, за исключением тех случаев, когда это является единственно возможным способом.
- Рекомендуется, чтобы все пользователи прекратили использовать все интернет-приложения на компьютере или отключили сетевой кабель от клиентских устройств перед обновлением.
Примечание: Конфигурационные файлы могут быть некорректно установлены на новые версии встроенного ПО, требующие сброса на заводские настройки.
Рекомендации по обновлению ПО: Wi-Fi роутер, Wi-Fi роутер с модемом ADSL2+, Усилитель Wi-Fi сигнала
| TL-WR1043ND_V2_150910 | ||
|---|---|---|
| Дата публикации: 2015-10-23 | Язык: Английский | Размер файла: 4.73 MB |
|
| TL-WR1043ND_V2_150717 | ||
|---|---|---|
| Дата публикации: 2015-08-11 | Язык: Английский | Размер файла: 4.64 MB |
|
| TL-WR1043ND_V2_140725_RU | ||
|---|---|---|
| Дата публикации: 2014-07-25 | Язык: Русский | Размер файла: 5.74 MB |
|
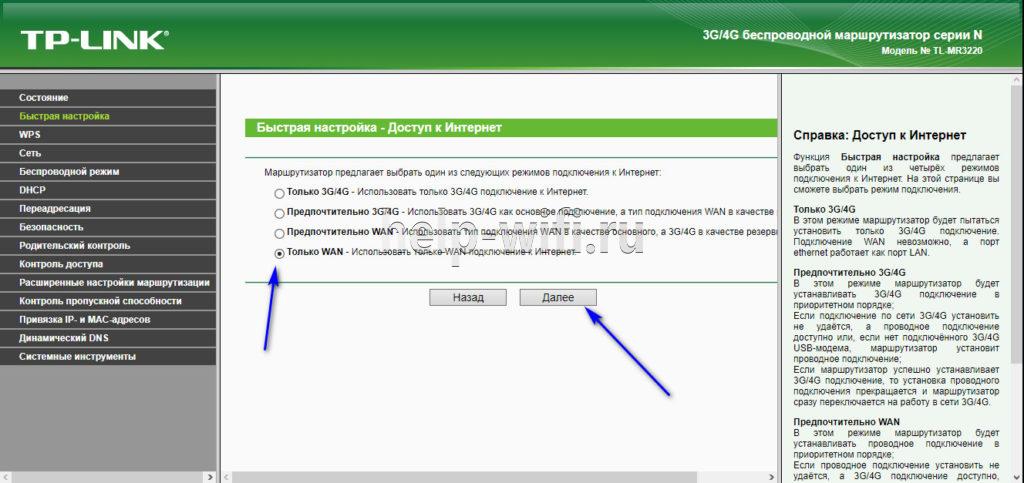
Настройка подключения к интернету (Динамический IP, PPPoE, L2TP)
Это самые важные настройки. Вам нужно выяснить, какой тип подключения к интернету использует ваш интернет-провайдер. У знать все необходимые данные для подключения, если они необходимы. Скорее всего, у вас Динамический IP, PPPoE, PPTP, или L2TP. Задать эти параметры нужно на вкладке «Сеть» (Network) – «WAN».
В зависимости от вашего подключения, открывайте нужный спойлер, и смотрите инструкцию по настройке.
Это самый простой тип соединения, в плане настройки. Выбираем его в выпадающем меню «Тип подключения WAN», и нажимаем на кнопку «Сохранить» (Save).
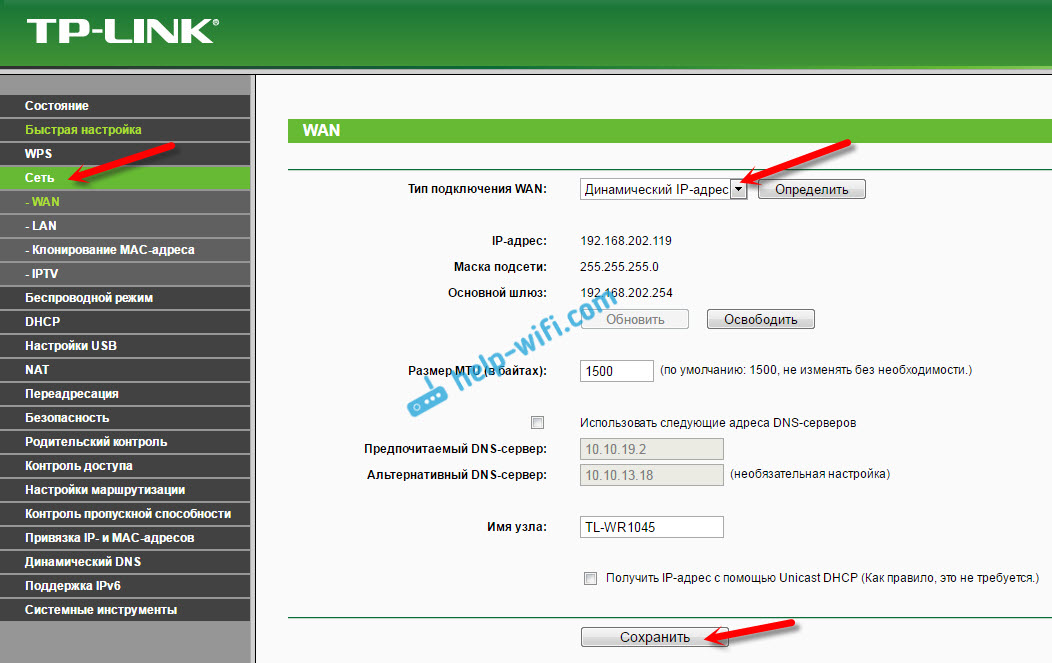
Такой же тип соединения нужно выбрать, если вы подключили роутер к модему.
Некоторые провайдеры, до этой поры делают привязку по MAC-адресу. Если у вас такой провайдер, то смотрите эту статью. Там я показывал как клонировать MAC-адрес на примере TP-LINK.
Сразу после сохранения настроек, интернет через роутер уже должен работать.
Выбираем тип подключения PPPoE, задаем имя пользователя и пароль (которые выдает провайдер), затем проверяем, выставлено ли автоматическое подключение, нажимаем на кнопку «Подключить», и если соединение с провайдером будет установлено, сохраняем настройки.

Здесь все так же, как в случае с PPPoE. Выбираем в выпадающем меню свое подключение L2TP, или PPTP. Указываем имя пользователя, пароль, и IP-адрес (имя сервера). Выставляем автоматическое подключение, и пробуем установить соединение с провайдером. Если соединение есть, и интернет работает, сохраняем настройки.

Если интернет через роутер уже работает, то можно продолжать настройку. Но, самое главное, мы уже сделали. Если до установки роутера у вас на компьютре было высокоскоростное подключение, то оно уже не нужно. Его не нужно запускать, и можно удалить. Роутер сам будет устанавливать это подключение, мы его только что настроили.
Настройка Wi-Fi и установка пароля на TP-LINK TL-WR1045ND и TP-LINK TL-WR1043ND
Перейдите на вкладку «Беспроводной режим» (Wireless). Здесь нужно сменить название Wi-Fi сети (SSID), и указать регион. Для сохранения настроек нажимаем на кнопку «Сохранить» (Save).

Установка пароля на Wi-Fi сеть
Перейдите на вкладку «Защита беспроводного режима» (Wireless Security). Выделите пункт «WPA/WPA2 — Personal (рекомендуется)», выставьте параметры версии и шифрования, как на скриншоте ниже, и в поле «Пароль PSK» придумайте и запишите пароль, который будет использоваться для защиты вашей Wi-Fi сети. Пароль должен быть минимум 8 символов.

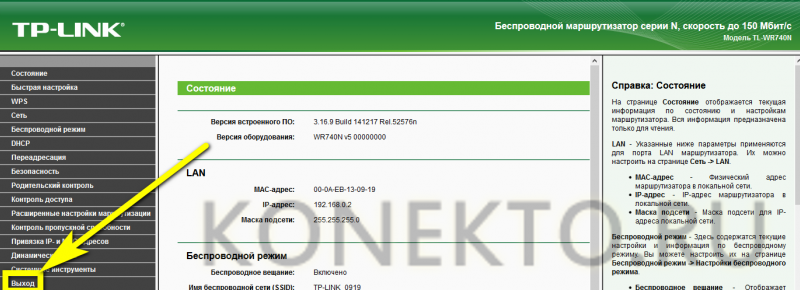
Не забудьте сохранить настройки. И нужно перезагрузить роутер. Это можно сделать из панели управления, на вкладке «Системные инструменты» – «Перезагрузка» (Reboot), нажав на кнопку «Перезагрузить».
После перезагрузки, роутер будет транслировать беспроводную сеть с новым именем, которое вы задали в настройках. Для подключения, нужно использовать установленный пароль.
Смена пароля admin. Защита настроек маршрутизатора
При входе в web-интерфейс маршрутизатора, мы указываем пароль и имя пользователя. Заводские admin и admin. Так вот, этот пароль лучше сменить, что бы никто не смог получить доступ к настройкам.
Сделать это можно на вкладке «Системные инструменты» (System Tools) – «Пароль» (Password).
Указываем сначала действующее имя пользователя и пароль, а затем, придумываем новый пароль. Имя пользователя можете оставить admin.

Настройка IPTV на роутерах TL-WR1045ND и TL-WR1043ND
Если ваш провайдер предлагает услуги IPTV, то настроить его можно на вкладке «Сеть» (Network) – «IPTV».

Достаточно выбрать режим работы. Если у вас есть приставка, то выбираем «Мост», указываем LAN порт, сохраняем настройки и подключаем STB-приставку к выбранному LAN порту.
Если же нужно транслировать IPTV по Wi-Fi и кабелю, например, для просмотра на компьютере, или планшете, то выберите 802.1Q Tag VLAN, и включите IGMP Proxy.
9
Сергей
TP-Link
To Upgrade
IMPORTANT: To prevent upgrade failures, please read the following before proceeding with the upgrade process
- Please upgrade firmware from the local TP-Link official website of the purchase location for your TP-Link device, otherwise it will be against the warranty. Please click here to change site if necessary.
- Please verify the hardware version of your device for the firmware version. Wrong firmware upgrade may damage your device and void the warranty. (Normally V1.x=V1)How to find the hardware version on a TP-Link device?
- Do NOT turn off the power during the upgrade process, as it may cause permanent damage to the product.
- To avoid wireless disconnect issue during firmware upgrade process, it’s recommended to upload firmware with wired connection unless there is no LAN/Ethernet port on your TP-Link device.
- It’s recommended that users stop all Internet applications on the computer, or simply disconnect Internet line from the device before the upgrade.
- Use decompression software such as WinZIP or WinRAR to extract the file you download before the upgrade.
| TL-WR1043ND_V1_140319 | ||
|---|---|---|
| Published Date: 2014-03-19 | Language: English | File Size: 4.75 MB |
|
| TL-WR1043ND_v1_130428 | ||
|---|---|---|
| Published Date: 2013-04-28 | Language: English | File Size: 4.44 MB |
|
| TL-WR1043ND_V1_130325 | ||
|---|---|---|
| Published Date: 2013-03-25 | Language: English | File Size: 5.22 MB |
|
Open Source Code For Programmers (GPL)
Please note: The products of TP-Link partly contain software code developed by third parties, including software code subject to the GNU General Public Licence (“GPL“), Version 1/Version 2/Version 3 or GNU Lesser General Public License («LGPL»). You may use the respective software condition to following the GPL licence terms.
You can review, print and download the respective GPL licence terms here. You receive the GPL source codes of the respective software used in TP-Link products for direct download and further information, including a list of TP-Link software that contain GPL software code under GPL Code Center.
To Upgrade
IMPORTANT: To prevent upgrade failures, please read the following before proceeding with the upgrade process
- Please upgrade firmware from the local TP-Link official website of the purchase location for your TP-Link device, otherwise it will be against the warranty. Please click here to change site if necessary.
- Please verify the hardware version of your device for the firmware version. Wrong firmware upgrade may damage your device and void the warranty. (Normally V1.x=V1)Hoe vind ik de hardware versie van een TP-Link product?
- Do NOT turn off the power during the upgrade process, as it may cause permanent damage to the product.
- To avoid wireless disconnect issue during firmware upgrade process, it’s recommended to upload firmware with wired connection unless there is no LAN/Ethernet port on your TP-Link device.
- It’s recommended that users stop all Internet applications on the computer, or simply disconnect Internet line from the device before the upgrade.
- Use decompression software such as WinZIP or WinRAR to extract the file you download before the upgrade.
| TL-WR1043ND_V1_140319 | ||
|---|---|---|
| Publicatiedatum: 2014-03-19 | Taal: Engels | Bestandsgrootte: 4.75 MB |
|
| TL-WR1043ND_v1_130428 | ||
|---|---|---|
| Publicatiedatum: 2013-04-28 | Taal: Engels | Bestandsgrootte: 4.44 MB |
|
| TL-WR1043ND_V1_130325 | ||
|---|---|---|
| Publicatiedatum: 2013-03-25 | Taal: Engels | Bestandsgrootte: 5.22 MB |
|
To Upgrade
IMPORTANT: To prevent upgrade failures, please read the following before proceeding with the upgrade process
- Please upgrade firmware from the local TP-Link official website of the purchase location for your TP-Link device, otherwise it will be against the warranty. Please click here to change site if necessary.
- Please verify the hardware version of your device for the firmware version. Wrong firmware upgrade may damage your device and void the warranty. (Normally V1.x=V1)How to find the hardware version on a TP-Link device?
- Do NOT turn off the power during the upgrade process, as it may cause permanent damage to the product.
- To avoid wireless disconnect issue during firmware upgrade process, it’s recommended to upload firmware with wired connection unless there is no LAN/Ethernet port on your TP-Link device.
- It’s recommended that users stop all Internet applications on the computer, or simply disconnect Internet line from the device before the upgrade.
- Use decompression software such as WinZIP or WinRAR to extract the file you download before the upgrade.
| TL-WR1043ND_V1_140319 | ||
|---|---|---|
| Published Date: 2014-03-19 | Language: English | File Size: 4.75 MB |
|
| TL-WR1043ND_v1_130428 | ||
|---|---|---|
| Published Date: 2013-04-28 | Language: English | File Size: 4.44 MB |
|
| TL-WR1043ND_V1_130325 | ||
|---|---|---|
| Published Date: 2013-03-25 | Language: English | File Size: 5.22 MB |
|
Open Source Code For Programmers (GPL)
Please note: The products of TP-Link partly contain software code developed by third parties, including software code subject to the GNU General Public Licence (“GPL“), Version 1/Version 2/Version 3 or GNU Lesser General Public License («LGPL»). You may use the respective software condition to following the GPL licence terms.
You can review, print and download the respective GPL licence terms here. You receive the GPL source codes of the respective software used in TP-Link products for direct download and further information, including a list of TP-Link software that contain GPL software code under GPL Code Center.