Учебник по sqlite3 в python
Содержание:
- 7.2. Reading SQL from a file
- Использование
- 7.6. Export to CSV
- 8. Accessing ZIP Archives As Database Files
- Редактирование и удаление записей
- About The SQLite Team
- 3.1. Determination Of Column Affinity
- 2.2. Date and Time Datatype
- 3. Type Affinity
- Situations Where A Client/Server RDBMS May Work Better
- Licenses (details below)
- Архитектура
- C/C++ Interface APIs
- Создание базы данных
- Как создавать базу данных и вставлять различные данные
- Исключения SQLite3
- Подключение GtkListStore для вывода таблицы
7.2. Reading SQL from a file
In interactive mode, sqlite3 reads input text (either SQL statements
or ) from the keyboard. You can also redirect input from
a file when you launch sqlite3, of course, but then you do not have the
ability to interact with the program. Sometimes it is useful to run an
SQL script contained in a file entering other commands from the command-line.
For this, the «.read» dot-command is provided.
The «.read» command takes a single argument which is (usually) the name
of a file from which to read input text.
sqlite> .read myscript.sql
The «.read» command temporarily stops reading from the keyboard and instead
takes its input from the file named. Upon reaching the end of the file,
input reverts back to the keyboard. The script file may contain dot-commands,
just like ordinary interactive input.
If the argument to «.read» begins with the «|» character, then instead of
opening the argument as a file, it runs the argument (without the leading «|»)
as a command, then uses the output of that command as its input. Thus, if you
have a script that generates SQL, you can execute that SQL directly using
a command similar to the following:
sqlite> .read '|myscript.bat'
Использование
Процедурный интерфейс к SQLite почти такой же, как у MySQL и других расширений БД. По большей части переход к SQLite потребует только изменить mysql/pq/etc… префикс функции на sqlite.
<?php
// создаём новую базу (процедурный интерфейс)
$db = sqlite_open("db.sqlite");

// создаём таблицу foo
sqlite_query($db, "CREATE TABLE foo (id INTEGER PRIMARY KEY, name CHAR(255))");

// добавляем что-нибудь для примера
sqlite_query($db, "INSERT INTO foo (name) VALUES ('Ilia')");
sqlite_query($db, "INSERT INTO foo (name) VALUES ('Ilia2')");
sqlite_query($db, "INSERT INTO foo (name) VALUES ('Ilia3')");

// выполняем запрос
$result = sqlite_query($db, "SELECT * FROM foo");
// проходим в цикле выборкой по ячейкам
while ($row = sqlite_fetch_array($result)) {
    print_r($row);
     /* каждый результат будет выглядеть примерно так
    Array
    (
         => 1
         => 1
         => Ilia
         => Ilia
    )
*/
}

// закрываем соединение с базой
sqlite_close($db);

?>
7.6. Export to CSV
To export an SQLite table (or part of a table) as CSV, simply set
the «mode» to «csv» and then run a query to extract the desired rows
of the table.
sqlite> .headers on
sqlite> .mode csv
sqlite> .once c:/work/dataout.csv
sqlite> SELECT * FROM tab1;
sqlite> .system c:/work/dataout.csv
In the example above, the «.headers on» line causes column labels to
be printed as the first row of output. This means that the first row of
the resulting CSV file will contain column labels. If column labels are
not desired, set «.headers off» instead. (The «.headers off» setting is
the default and can be omitted if the headers have not been previously
turned on.)
The line «.once FILENAME» causes all query output to go into
the named file instead of being printed on the console. In the example
above, that line causes the CSV content to be written into a file named
«C:/work/dataout.csv».
The final line of the example (the «.system c:/work/dataout.csv»)
has the same effect as double-clicking on the c:/work/dataout.csv file
in windows. This will typically bring up a spreadsheet program to display
the CSV file.
That command only works as written on Windows.
The equivalent line on a Mac would be:
sqlite> .system open dataout.csv
On Linux and other unix systems you will need to enter something like:
sqlite> .system xdg-open dataout.csv
7.6.1. Export to Excel
To simplify export to a spreadsheet, the CLI provides the
«.excel» command which captures the output of a single query and sends
that output to the default spreadsheet program on the host computer.
Use it like this:
sqlite> .excel
sqlite> SELECT * FROM tab;
The command above writes the output of the query as CSV into a temporary
file, invokes the default handler for CSV files (usually the preferred
spreadsheet program such as Excel or LibreOffice), then deletes the
temporary file. This is essentially a short-hand method of doing
the sequence of «.csv», «.once», and «.system» commands described above.
The «.excel» command is really an alias for «.once -x». The -x option
to .once causes it to writes results as CSV into a temporary file that
is named with a «.csv» suffix, then invoke the systems default handler
for CSV files.
There is also a «.once -e» command which works similarly, except that
it names the temporary file with a «.txt» suffix so that the default
text editor for the system will be invoked, instead of the default
spreadsheet.
8. Accessing ZIP Archives As Database Files
In addition to reading and writing SQLite database files,
the sqlite3 program will also read and write ZIP archives.
Simply specify a ZIP archive filename in place of an SQLite database
filename on the initial command line, or in the «.open» command,
and sqlite3 will automatically detect that the file is a
ZIP archive instead of an SQLite database and will open it as such.
This works regardless of file suffix. So you can open JAR, DOCX,
and ODP files and any other file format that is really a ZIP
archive and SQLite will read it for you.
A ZIP archive appears to be a database containing a single table
with the following schema:
CREATE TABLE zip(
  name,     // Name of the file
  mode,     // Unix-style file permissions
  mtime,    // Timestamp, seconds since 1970
  sz,       // File size after decompression
  rawdata,  // Raw compressed file data
  data,     // Uncompressed file content
  method    // ZIP compression method code
);
So, for example, if you wanted to see the compression efficiency
(expressed as the size of the compressed content relative to the
original uncompressed file size) for all files in the ZIP archive,
sorted from most compressed to least compressed, you could run a
query like this:
sqlite> SELECT name, (100.0*length(rawdata))/sz FROM zip ORDER BY 2;
Or using , you can extract elements of the
ZIP archive:
sqlite> SELECT writefile(name,content) FROM zip
   ...> WHERE name LIKE 'docProps/%';
Редактирование и удаление записей
Возможность обновлять записи в вашей базе данных это ключ к тому, чтобы ваши данные велись аккуратно, и был полный порядок. Если вы не можете редактировать данные, тогда ваша база станет бесполезной достаточно скоро. Иногда вам, в том числе, нужно будет удалять и строки. Мы рассмотрим оба вопроса в данном разделе. Для начала, давайте немного обновимся.
Python
import sqlite3
conn = sqlite3.connect(«mydatabase.db»)
cursor = conn.cursor()
sql = «»»
UPDATE albums
SET artist = ‘John Doe’
WHERE artist = ‘Andy Hunter’
«»»
cursor.execute(sql)
conn.commit()
|
1 |
importsqlite3 conn=sqlite3.connect(«mydatabase.db») cursor=conn.cursor() sql=»»» UPDATE albums cursor.execute(sql) conn.commit() |
Здесь мы использовали команду SQL UPDATE, чтобы обновить таблицу альбомов. Здесь вы можете использовать команду SET, чтобы изменить поле, так что в нашем случае мы изменим имя исполнителя на John Doe в каждой записи, где поле исполнителя указано для Andy Hunter
Весьма просто, не так ли? Обратите внимание на то, что если вы не подтвердите изменения, то они не будут внесены в базу данных. Команда DELETE настолько же проста
Давайте посмотрим.
Python
import sqlite3
conn = sqlite3.connect(«mydatabase.db»)
cursor = conn.cursor()
sql = «DELETE FROM albums WHERE artist = ‘John Doe'»
cursor.execute(sql)
conn.commit()
|
1 |
importsqlite3 conn=sqlite3.connect(«mydatabase.db») cursor=conn.cursor() sql=»DELETE FROM albums WHERE artist = ‘John Doe'» cursor.execute(sql) conn.commit() |
Удаление еще проще, чем обновление. У SQL это занимает всего две строчки. В данном случае, все, что нам нужно сделать, это указать SQLite, из какой таблицы удалить (albums), и какую именно запись при помощи пункта WHERE. Таким образом, был выполнен поиск записи, в которой присутствует имя “John Doe” в поле исполнителей, после чего эти данные были удалены.
About The SQLite Team
Paid support options and products are provided by
Hipp, Wyrick & Company, Inc., (Hwaci), a
Georgia
corporation
with headquarters in
Charlotte, North Carolina and has been in business since
1992.
Hwaci has an international team of
employees and associates representing the best available talent.
We are a 100% engineering company. There is
no sales staff.
Our goal is to provide outstanding service and honest advice
without spin or sales-talk.
Hwaci is a small company but it is
also closely held and debt-free and has low
fixed costs, which means that it is largely immune to buy-outs,
take-overs, and market down-turns. Hwaci intends to
continue operating in its current form, and at roughly its current
size until at least the year 2050.
We expect to be here when you need us,
even if that need is many years in the future.
3.1. Determination Of Column Affinity
The affinity of a column is determined by the declared type
of the column, according to the following rules in the order shown:
-
If the declared type contains the string «INT» then it
is assigned INTEGER affinity. -
If the declared type of the column contains any of the strings
«CHAR», «CLOB», or «TEXT» then that
column has TEXT affinity. Notice that the type VARCHAR contains the
string «CHAR» and is thus assigned TEXT affinity. -
If the declared type for a column
contains the string «BLOB» or if
no type is specified then the column has affinity BLOB. -
If the declared type for a column
contains any of the strings «REAL», «FLOA»,
or «DOUB» then the column has REAL affinity. -
Otherwise, the affinity is NUMERIC.
Note that the order of the rules for determining column affinity
is important. A column whose declared type is «CHARINT» will match
both rules 1 and 2 but the first rule takes precedence and so the
column affinity will be INTEGER.
3.1.1. Affinity Name Examples
The following table shows how many common datatype names from
more traditional SQL implementations are converted into affinities by the five rules of the
previous section. This table shows only a small subset of the
datatype names that SQLite will accept. Note that numeric arguments
in parentheses that following the type name (ex: «VARCHAR(255)») are
ignored by SQLite — SQLite does not impose any length restrictions
(other than the large global limit) on the length of
strings, BLOBs or numeric values.
Note that a declared type of «FLOATING POINT» would give INTEGER
affinity, not REAL affinity, due to the «INT» at the end of «POINT».
And the declared type of «STRING» has an affinity of NUMERIC, not TEXT.
2.2. Date and Time Datatype
SQLite does not have a storage class set aside for storing
dates and/or times.
Instead, the built-in Date And Time Functions of SQLite are capable of
storing dates and times as TEXT, REAL, or INTEGER values:
- TEXT as ISO8601 strings («YYYY-MM-DD HH:MM:SS.SSS»).
-
REAL as Julian day numbers, the number of days since
noon in Greenwich on November 24, 4714 B.C. according to the
proleptic Gregorian calendar. -
INTEGER as Unix Time, the number of seconds since
1970-01-01 00:00:00 UTC.
Applications can chose to store dates and times in any of these
formats and freely convert between formats using the built-in
date and time functions.
3. Type Affinity
SQL database engines that use rigid typing will usually try to
automatically convert values to the appropriate datatype. Consider this:
Rigidly-typed database will convert the string ‘123’ into an
integer 123 and the integer 456 into a string ‘456’ prior to
doing the insert.
In order to maximize compatibility between SQLite and other database
engines, and so that the example above will work on SQLite as it does
on other SQL database engines,
SQLite supports the concept of «type affinity» on columns.
The type affinity of a column is the recommended type for data stored
in that column. The important idea here is that the type is recommended, not
required. Any column can still store any type of data.
It is just that some columns, given the choice, will prefer to use
one storage class over another. The preferred storage class for
a column is called its «affinity».
Each column in an SQLite 3 database is assigned one of the
following type affinities:
- TEXT
- NUMERIC
- INTEGER
- REAL
- BLOB
(Historical note: The «BLOB» type affinity used to be called «NONE».
But that term was easy to confuse with «no affinity» and so it was
renamed.)
A column with TEXT affinity stores all data using storage classes
NULL, TEXT or BLOB. If numerical data is inserted into a column with
TEXT affinity it is converted into text form before being stored.
A column with NUMERIC affinity may contain values using all five
storage classes. When text data is inserted into a NUMERIC column, the
storage class of the text is converted to INTEGER or REAL (in order of
preference) if the text is a well-formed integer or real literal, respectively.
If the TEXT value is a well-formed integer literal that is too large
to fit in a 64-bit signed integer, it is converted to REAL.
For conversions between TEXT and REAL storage classes, only the first
15 significant decimal digits of the number are preserved.
If the TEXT value is not a well-formed integer or real literal,
then the value is stored as TEXT.
For the purposes of this paragraph, hexadecimal integer
literals are not considered well-formed and are stored as TEXT.
(This is done for historical compatibility with versions of SQLite
prior to version 3.8.6 2014-08-15 where hexadecimal integer
literals were first introduced into SQLite.)
If a floating point value that can be represented exactly as an integer
is inserted into a column with NUMERIC affinity, the value is
converted into an integer.
No attempt is made to convert NULL or BLOB values.
A string might look like a floating-point literal with
a decimal point and/or exponent notation but as long as
the value can be expressed as an integer, the NUMERIC affinity will convert
it into an integer. Hence, the string ‘3.0e+5’ is stored in a
column with NUMERIC affinity as the integer 300000, not as the floating
point value 300000.0.
A column that uses INTEGER affinity behaves the same as a column
with NUMERIC affinity. The difference between INTEGER and NUMERIC affinity
is only evident in a : The expression
«CAST(4.0 AS INT)» returns an integer 4, whereas
«CAST(4.0 AS NUMERIC)» leaves the value as a floating-point 4.0.
A column with REAL affinity behaves like a column with NUMERIC
affinity except that it forces integer values into floating point
representation. (As an internal optimization, small floating point
values with no fractional component and stored in columns with REAL
affinity are written to disk as integers in order to take up less
space and are automatically converted back into floating point as
the value is read out.
This optimization is completely invisible at the SQL level and can only
be detected by examining the raw bits of the database file.)
A column with affinity BLOB does not prefer one storage class over
another and no attempt is made to coerce data from one storage class into
another.
Situations Where A Client/Server RDBMS May Work Better
-
Client/Server Applications
If there are many client programs sending SQL to the same
database over a network, then use a client/server database
engine instead of SQLite. SQLite will work over a network filesystem,
but because of the latency associated with most network filesystems,
performance will not be great. Also, file locking logic is buggy in
many network filesystem implementations (on both Unix and Windows).
If file locking does not work correctly,
two or more clients might try to modify the
same part of the same database at the same time, resulting in
corruption. Because this problem results from bugs in
the underlying filesystem implementation, there is nothing SQLite
can do to prevent it.A good rule of thumb is to avoid using SQLite
in situations where the same database will be accessed directly
(without an intervening application server) and simultaneously
from many computers over a network. -
High-volume Websites
SQLite will normally work fine as the database backend to a website.
But if the website is write-intensive or is so busy that it requires
multiple servers, then consider using an enterprise-class client/server
database engine instead of SQLite. -
Very large datasets
An SQLite database is limited in size to 281 terabytes
(247 bytes, 128 tibibytes).
And even if it could handle larger databases, SQLite stores the entire
database in a single disk file and many filesystems limit the maximum
size of files to something less than this. So if you are contemplating
databases of this magnitude, you would do well to consider using a
client/server database engine that spreads its content across multiple
disk files, and perhaps across multiple volumes. -
High Concurrency
SQLite supports an unlimited number of simultaneous readers, but it
will only allow one writer at any instant in time.
For many situations, this is not a problem. Writers queue up. Each application
does its database work quickly and moves on, and no lock lasts for more
than a few dozen milliseconds. But there are some applications that require
more concurrency, and those applications may need to seek a different
solution.
Licenses (details below)
| 5. |
SQLite License. Warranty of title and perpetual right-to-use for the SQLite source code. |
$6000 one time fee | More InfoPurchase |
| 6. |
SQLite Encryption Extension (SEE). A drop-in replacement for public-domain SQLite source code that has the added ability to read/write AES-encrypted databases. |
$2000 one time fee | More InfoPurchase |
| 7. |
Compressed And Encrypted Read-Only Database (CEROD). A drop-in replacement for public-domain SQLite source code that has the added ability to read database that has been both compressed and encrypted. |
$2000 one time fee | More InfoBuy Now! |
| 8. |
The ZIPVFS Read/Write Compressed Database Extension. The ZIPVFS extension automatically compresses and encrypts your data as it is written to disk, and decompressed and decrypts it while reading. |
$4000 one time fee | More InfoBuy Now! |
-
SQLite License.
Warranty of title and perpetual right-to-use for the SQLite source code.Cost: $6000 one time fee
More Info
Purchase -
SQLite Encryption Extension (SEE).
A drop-in replacement for public-domain SQLite source code that has
the added ability to read/write AES-encrypted databases.Cost: $2000 one time fee
More Info
Purchase -
Compressed And Encrypted Read-Only Database (CEROD).
A drop-in replacement for public-domain SQLite source code
that has the added ability to read database that has been both
compressed and encrypted.Cost: $2000 one time fee
More Info
Buy Now! -
The ZIPVFS Read/Write Compressed Database Extension.
The ZIPVFS extension automatically compresses and encrypts
your data as it is written to disk, and decompressed and decrypts
it while reading.Cost: $4000 one time fee
More Info
Buy Now!
Архитектура
Движок БД представляет библиотеку, с которой программа компонуется и SQLite становится составной частью программы. Вся БД хранится в единственном стандартном файле на машине, на которой исполняется программа.
Несколько процессов или потоков могут одновременно без каких-либо проблем читать данные из одной базы. Запись в базу можно осуществить только в том случае, если никаких других запросов в данный момент не обслуживается; в противном случае попытка записи оканчивается неудачей, и в программу возвращается код ошибки. Другим вариантом развития событий является автоматическое повторение попыток записи в течение заданного интервала времени.
C/C++ Interface APIs
Following are important C/C++ SQLite interface routines, which can suffice your requirement to work with SQLite database from your C/C++ program. If you are looking for a more sophisticated application, then you can look into SQLite official documentation.
| Sr.No. | API & Description |
|---|---|
| 1 |
sqlite3_open(const char *filename, sqlite3 **ppDb) This routine opens a connection to an SQLite database file and returns a database connection object to be used by other SQLite routines. If the filename argument is NULL or ‘:memory:’, sqlite3_open() will create an in-memory database in RAM that lasts only for the duration of the session. If the filename is not NULL, sqlite3_open() attempts to open the database file by using its value. If no file by that name exists, sqlite3_open() will open a new database file by that name. |
| 2 |
sqlite3_exec(sqlite3*, const char *sql, sqlite_callback, void *data, char **errmsg) This routine provides a quick, easy way to execute SQL commands provided by sql argument which can consist of more than one SQL command. Here, the first argument sqlite3 is an open database object, sqlite_callback is a call back for which data is the 1st argument and errmsg will be returned to capture any error raised by the routine. SQLite3_exec() routine parses and executes every command given in the sql argument until it reaches the end of the string or encounters an error. |
| 3 |
sqlite3_close(sqlite3*) This routine closes a database connection previously opened by a call to sqlite3_open(). All prepared statements associated with the connection should be finalized prior to closing the connection. If any queries remain that have not been finalized, sqlite3_close() will return SQLITE_BUSY with the error message Unable to close due to unfinalized statements. |
Создание базы данных
После создания соединения с SQLite, файл БД создается автоматически, при условии его отсутствия. Этот файл создается на диске, но также можно создать базу данных в оперативной памяти, используя параметр «:memory:» в методе connect. При этом база данных будет называется инмемори.
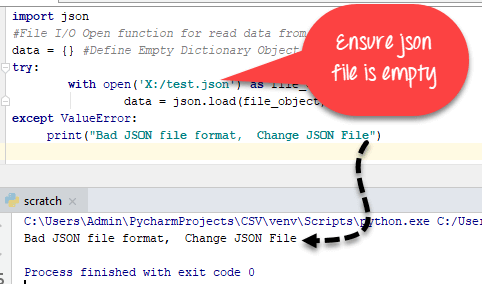
Рассмотрим приведенный ниже код, в котором создается БД с блоками try, except и finally для обработки любых исключений:
Сначала импортируется модуль sqlite3, затем определяется функция с именем sql_connection. Внутри функции определен блок try, где метод connect() возвращает объект соединения после установления соединения.
Затем определен блок исключений, который в случае каких-либо исключений печатает сообщение об ошибке. Если ошибок нет, соединение будет установлено, тогда скрипт распечатает текст «Connection is established: Database is created in memory».
Далее производится закрытие соединения в блоке finally. Закрытие соединения необязательно, но это хорошая практика программирования, позволяющая освободить память от любых неиспользуемых ресурсов.
Как создавать базу данных и вставлять различные данные
Создание базы данных в SQLite – это очень просто, но процесс требует того, чтобы вы немного разбирались в том, что такое SQL. Давайте взглянем на код, который создаст базу данных для хранения музыкальных альбомов:
Python
import sqlite3
conn = sqlite3.connect(«mydatabase.db») # или :memory: чтобы сохранить в RAM
cursor = conn.cursor()
# Создание таблицы
cursor.execute(«»»CREATE TABLE albums
(title text, artist text, release_date text,
publisher text, media_type text)
«»»)
|
1 |
importsqlite3 conn=sqlite3.connect(«mydatabase.db»)# или :memory: чтобы сохранить в RAM cursor=conn.cursor() cursor.execute(«»»CREATE TABLE albums (title text, artist text, release_date text, «»») |
Сначала нам нужно импортировать модуль sqlite3 и создать связь с базой данных. Вы можете передать название файла или просто использовать специальную строку “:memory:” для создания базы данных в памяти. В нашем случае, мы создаем его на диске в файле под названием mydatabase.db.
Далее мы создаем объект cursor, который позволяет нам взаимодействовать с базой данных и добавлять записи, помимо всего прочего. Здесь мы используем синтаксис SQL для создания таблицы под названием альбомы с пятью следующими полями: title, artist, release_date, publisher и media_type. SQLite поддерживает только пять типов данных: null, integer, real, text и blob. Давайте напишем этот код и вставим кое-какие данные в нашей новой таблице. Запомните, если вы запускаете команду CREATE TABLE, при этом база данных уже существует, вы получите сообщение об ошибке.
Python
# Вставляем данные в таблицу
cursor.execute(«»»INSERT INTO albums
VALUES (‘Glow’, ‘Andy Hunter’, ‘7/24/2012’,
‘Xplore Records’, ‘MP3’)»»»
)
# Сохраняем изменения
conn.commit()
# Вставляем множество данных в таблицу используя безопасный метод «?»
albums = [(‘Exodus’, ‘Andy Hunter’, ‘7/9/2002’, ‘Sparrow Records’, ‘CD’),
(‘Until We Have Faces’, ‘Red’, ‘2/1/2011’, ‘Essential Records’, ‘CD’),
(‘The End is Where We Begin’, ‘Thousand Foot Krutch’, ‘4/17/2012’, ‘TFKmusic’, ‘CD’),
(‘The Good Life’, ‘Trip Lee’, ‘4/10/2012’, ‘Reach Records’, ‘CD’)]
cursor.executemany(«INSERT INTO albums VALUES (?,?,?,?,?)», albums)
conn.commit()
|
1 |
# Вставляем данные в таблицу cursor.execute(«»»INSERT INTO albums VALUES (‘Glow’, ‘Andy Hunter’, ‘7/24/2012’, ) conn.commit() albums=(‘Exodus’,’Andy Hunter’,’7/9/2002′,’Sparrow Records’,’CD’), (‘Until We Have Faces’,’Red’,’2/1/2011′,’Essential Records’,’CD’), (‘The End is Where We Begin’,’Thousand Foot Krutch’,’4/17/2012′,’TFKmusic’,’CD’), (‘The Good Life’,’Trip Lee’,’4/10/2012′,’Reach Records’,’CD’) cursor.executemany(«INSERT INTO albums VALUES (?,?,?,?,?)»,albums) conn.commit() |
Здесь мы использовали команду INSERT INTO SQL чтобы вставить запись в нашу базу данных
Обратите внимание на то, что каждый объект находится в одинарных кавычках. Это может усложнить работу, если вам нужно вставить строчки, которые содержат одинарные кавычки
В любом случае, чтобы сохранить запись в базе данных, нам нужно создать её. Следующая часть кода показывает, как добавить несколько записей за раз при помощи метода курсора executemany. Обратите внимание на то, что мы используем знаки вопроса (?), вместо строк замещения (%) чтобы вставить значения. Обратите внимание, что использование строки замещения не безопасно, так как может стать причиной появления атаки инъекций SQL . Использование знака вопроса намного лучше, а использование SQLAlchemy тем более, так как он делаете все необходимое, чтобы уберечь вас от правки встроенных одинарных кавычек на то, что SQLite в состоянии принимать.
Исключения SQLite3
Исключением являются ошибки времени выполнения скрипта. При программировании на Python все исключения являются экземплярами класса производного от BaseException.
В SQLite3 у есть следующие основные исключения Python:
DatabaseError
Любая ошибка, связанная с базой данных, вызывает ошибку DatabaseError.
IntegrityError
IntegrityError является подклассом DatabaseError и возникает, когда возникает проблема целостности данных, например, когда внешние данные не обновляются во всех таблицах, что приводит к несогласованности данных.
ProgrammingError
Исключение ProgrammingError возникает, когда есть синтаксические ошибки или таблица не найдена или функция вызывается с неправильным количеством параметров / аргументов.
OperationalError
Это исключение возникает при сбое операций базы данных, например, при необычном отключении. Не по вине программиста.
NotSupportedError
При использовании некоторых методов, которые не определены или не поддерживаются базой данных, возникает исключение NotSupportedError.
Подключение GtkListStore для вывода таблицы
В GTK+ для работы со сложными данными используется GtkTreeModel — набор функций для хранения и отображения данных.
Существует две модели хранения GtkListStore и GtkTreeStore и один виджет отображения GtkTreeView, который поддерживает обе модели хранения.
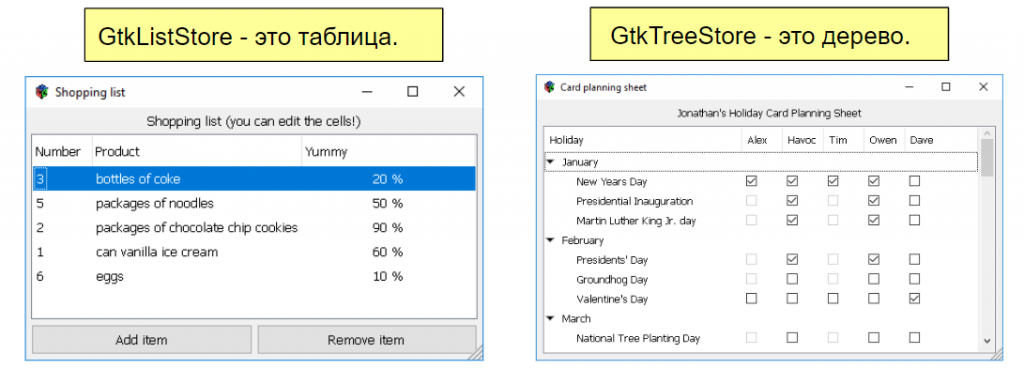
Для работы с таблицами нужно сделать запрос к БД и поместить результат в структуру GtkListStore. Виджет GtkTreeView отобразит данные в виде таблицы.

Для работы с таблицей в GTK+ нужно:
- Создать буфер GtkListStore.
- Добавить строки в буфер.
- Создать таблицу GtkTreeView.
- Добавить столбцы в таблицу.
Для обращения к таблице используется:
- Итератор GtkTreeIter — текущая строка.
- Колонка GtkTreeViewColumn — текущий столбец.
- Рендер GtkCellRenderer — текущая ячейка.
Запускаем Glade и готовим виджет, для этого.
- Создаем буфер liststore1 для модели таблицы,
- Создаем виджет дерева treeview1.
- Указываем для этого виджета буфер liststore1.

Сохраняем интерфейс в файл main.glade. Виджет готов, теперь его надо настроить: указать столбцы и формат ячеек.