Web scraping & custom extraction
Содержание:
- 4) AJAX Crawling
- 2) View & Audit URLs Blocked By Robots.txt
- 2) Crawl New URLs Discovered In Google Analytics & Search Console
- 1) Google Analytics Integration
- 8) Buy An External SSD With USB 3.0(+)
- 3) Switching to Database Storage Mode
- How To Crawl Large Websites Using The SEO Spider
- Introduction To List Mode
- 1) Export A List In The Same Order Uploaded
- 2) Full Command Line Interface & –Headless Mode
- Small Update – Version 9.3 Released 29th May 2018
- 10) Saving HTML & Rendered HTML To Help Debugging
- Viewing Crawl Data
- Small Update – Version 3.3 Released 23rd March 2015
- Redirect Chains Report
- Linux
- 5) Setup your extraction
- 1) ‘Fetch & Render’ (Rendered Screen Shots)
- 1) Tree View
- Adjust your settings
- 3) Store & View HTML & Rendered HTML
4) AJAX Crawling
I’ve been asked quite a few times when we will support crawling of JavaScript frameworks such as AngularJS. While we don’t execute JavaScript, we will crawl a site which adheres to the Google AJAX crawling scheme.
You don’t need to do anything special to crawl AJAX websites, you can just crawl them as normal. We will fetch the ugly version and map it to the pretty version, just like Google.

You can view this all under the ‘AJAX’ tab obviously.
There’s also a ‘with hash fragment’ and ‘without hash fragment’ filters for this tab. This can be useful to identify AJAX pages which only use the meta fragment tag and hence require Google to double crawl (to crawl the page, see the tag and then fetch the ugly version) which can put extra load on your servers.
2) View & Audit URLs Blocked By Robots.txt
You can now view URLs disallowed by the robots.txt protocol during a crawl.
Disallowed URLs will appear with a ‘status’ as ‘Blocked by Robots.txt’ and there’s a new ‘Blocked by Robots.txt’ filter under the ‘Response Codes’ tab, where these can be viewed efficiently.

The ‘Blocked by Robots.txt’ filter also displays a ‘Matched Robots.txt Line’ column, which provides the line number and disallow path of the robots.txt entry that’s excluding each URL. This should make auditing robots.txt files simple!
Historically the SEO Spider hasn’t shown URLs that are disallowed by robots.txt in the interface (they were only available via the logs). I always felt that it wasn’t required as users should know already what URLs are being blocked, and whether robots.txt should be ignored in the configuration.
However, there are plenty of scenarios where using robots.txt to control crawling and understanding quickly what URLs are blocked by robots.txt is valuable, and it’s something that has been requested by users over the years. We have therefore introduced it as an optional configuration, for both internal and external URLs in a crawl. If you’d prefer to not see URLs blocked by robots.txt in the crawl, then simply untick the relevant boxes.
URLs which are linked to internally (or externally), but are blocked by robots.txt can obviously accrue PageRank, be indexed and appear under search. Google just can’t crawl the content of the page itself, or see the outlinks of the URL to pass the PageRank onwards. Therefore there is an argument that they can act as a bit of a dead end, so I’d recommend reviewing just how many are being disallowed, how well linked they are, and their depth for example.
2) Crawl New URLs Discovered In Google Analytics & Search Console
If you connect to or via the API, by default any new URLs discovered are not automatically added to the queue and crawled. URLs are loaded, data is matched against URLs in the crawl, and any orphan URLs (URLs discovered only in GA or GSC) are available via the ‘‘ report export.
If you wish to add any URLs discovered automatically to the queue, crawl them and see them in the interface, simply enable the ‘Crawl New URLs Discovered in Google Analytics/Search Console’ configuration.

This is available under ‘Configuration > API Access’ and then either ‘Google Analytics’ or ‘Google Search Console’ and their respective ‘General’ tabs.
This will mean new URLs discovered will appear in the interface, and orphan pages will appear under the respective filter in the Analytics and Search Console tabs (after performing ).

1) Google Analytics Integration
You can now connect to the Google Analytics API and pull in data directly during a crawl.

To get a better understanding of a website’s organic performance, it’s often useful to map on-page elements with user data and SEOs have for a long-time combined crawl data with Google Analytics in Excel, particularly for Panda and content audits. GA data is seamlessly fetched and matched to URLs in real time as you crawl, so you often see data start appearing immediately, which we hope makes the process more efficient.
The SEO Spider not only fetches user and session metrics, but it can also collect goal conversions and ecommerce (transactions and revenue) data for landing pages, so you can view your top performing pages when performing a technical or content audit.
If you’re running an Adwords campaign, you can also pull in impressions, clicks, cost and conversion data and we will match your destination URLs against the site crawl, too. You can also collect other metrics of interest, such as Adsense data (Ad impressions, clicks revenue etc), site speed or social activity and interactions.
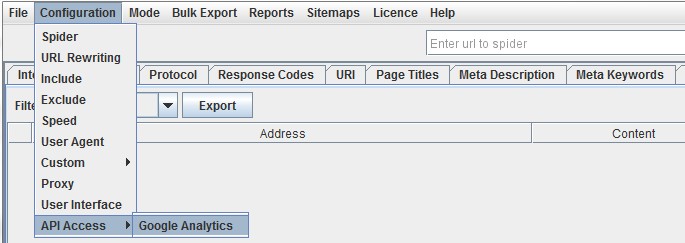
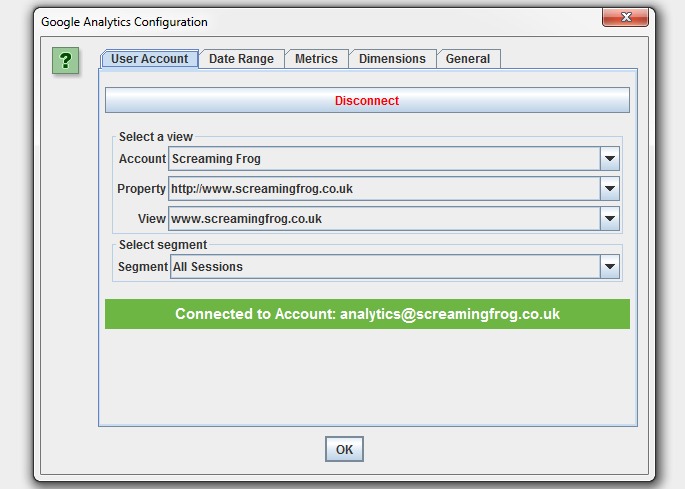
To set this up, start the SEO Spider and go to ‘Configuration > API Access > Google Analytics’.
Then you just need to connect to a Google account (which has access to the Analytics account you wish to query) by granting the ‘Screaming Frog SEO Spider’ app permission to access your account to retreive the data. Google APIs use the OAuth 2.0 protocol for authentication and authorisation.
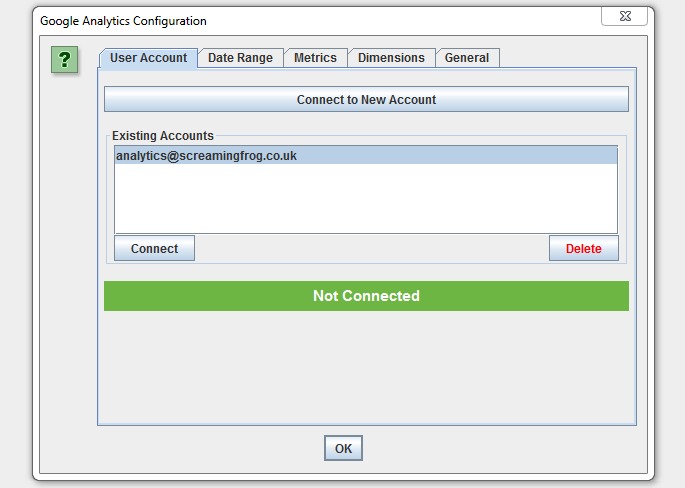
Once you have connected, you can choose the relevant Analytics account, property, view, segment and date range!
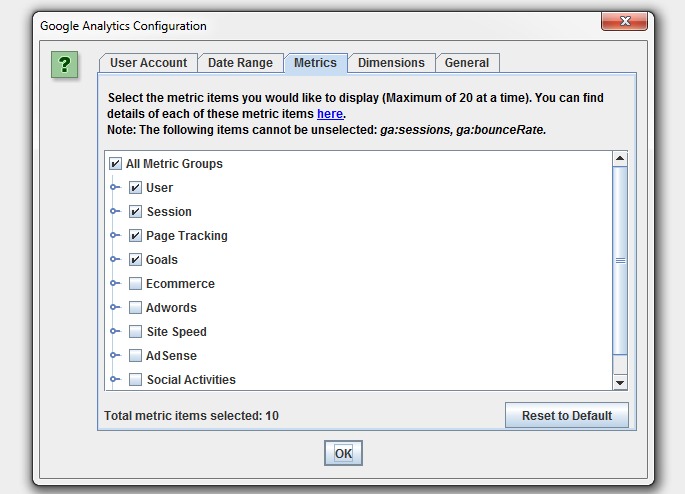
Then simply select the metrics that you wish to fetch. The SEO Spider currently allow you to select up to 20, which we might extend further. If you keep the number of metrics to 10 or below with a single dimension (as a rough guide), then it will generally be a single API query per 10k URLs, which makes it super quick –
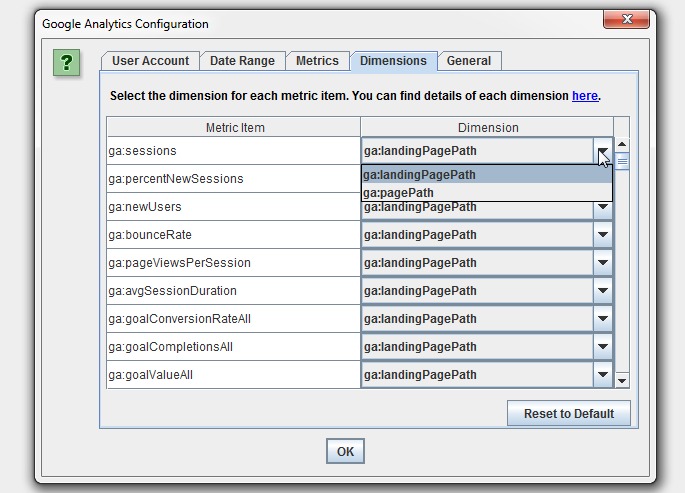
You can also set the dimension of each individual metric, as you may wish to collect data against and, or for example.
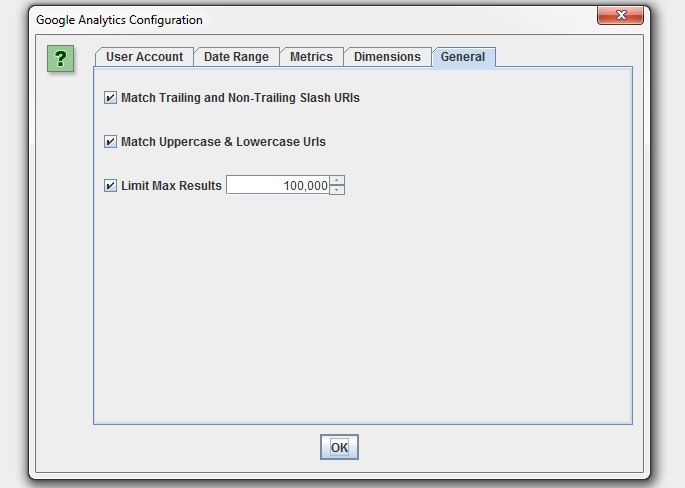
There are circumstances where URLs in Google Analytics might not match URLs in a crawl, so we have a couple of common scenarios covered in our configuration, such as matching trailing and non-trailing slash URLs and case sensitivity (upper and lowercase characters in URLs).
If you have millions of URLs in GA, you can also choose to limit the number of URLs to query, which is by default ordered by sessions to return the top performing page data.
When you hit ‘start’ to crawl, the Google Analytics data will then be fetched and display in respective columns within the ‘Internal’ and ‘Analytics’ tabs. There’s a separate ‘Analytics’ progress bar in the top right and when this has reached 100%, crawl data will start appearing against URLs. Fetching the data from the API is independent of the crawl, and it doesn’t slow down crawl speed itself.
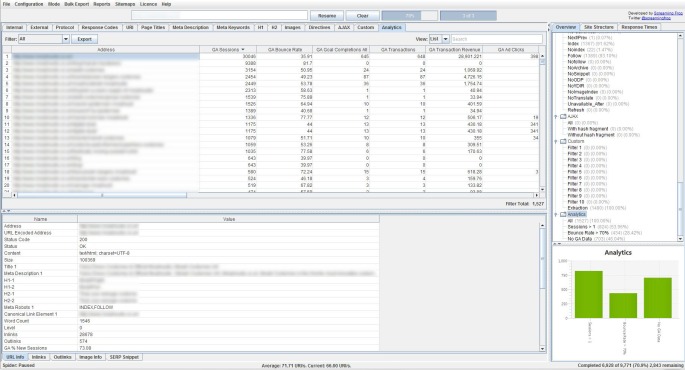
There are 3 filters currently under the ‘Analytics’ tab, which allow you to filter by ‘Sessions Above 0’, ‘Bounce Rate Above 70%’ and ‘No GA Data’. ‘No GA Data’ means that for the metrics and dimensions queried, the Google API didn’t return any data for the URLs in the crawl. So the URLs either didn’t receive any visits (sorry, ‘sessions’), or perhaps the URLs in the crawl are just different to those in GA for some reason.
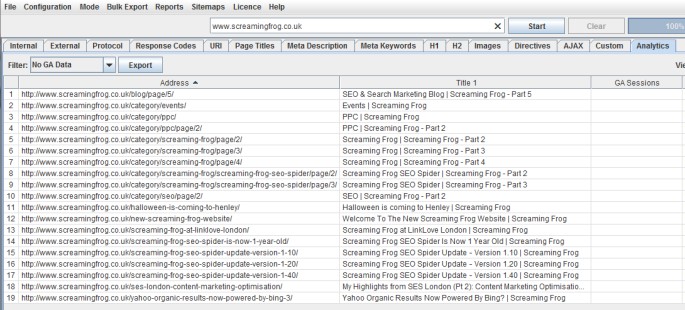
For our site, we can see there is ‘no GA data’ for blog category pages and a few old blog posts, as you would expect really (the query was landing page, rather than page). Remember, you may see pages appear here which are ‘noindex’ or ‘canonicalised’, unless you have ‘‘ and ‘‘ ticked in the advanced configuration tab.
Please note – If GA data does not get pulled into the SEO Spider as you expected, then analyse the URLs in GA under ‘Behaviour > Site Content > All Pages’ and ‘Behaviour > Site Content > Landing Pages’ depending on your query.
If they don’t match URLs in the crawl, then GA data won’t able to be matched up and appear in the SEO Spider. We recommend checking your default Google Analytics view settings (such as ‘default page’) and filters which all impact how URLs are displayed and hence matched against a crawl. If you want URLs to match up, you can often make the required amends within Google Analytics.
This is just our first iteration and we have some more advanced crawling, matching, canonicalisation and aggregation planned which will help in more complicated scenarios and provide further insights.
Enjoy!
8) Buy An External SSD With USB 3.0(+)
If you don’t have an internal SSD and you’d like to crawl large websites using database storage mode, then an external SSD can help.
It’s important to ensure your machine has USB 3.0 port and your system supports UASP mode. Most new systems do automatically, if you already have USB 3.0 hardware. When you connect the external SSD, ensure you connect to the USB 3.0 port, otherwise reading and writing will be very slow.
USB 3.0 ports generally have a blue inside (as recommended in their specification), but not always; and you will typically need to connect a blue ended USB cable to the blue USB 3.0 port. After that, you need to switch to database storage mode, and then select the database location on the external SSD (the ‘D’ drive in the example below).

Simple!
3) Switching to Database Storage Mode
The SEO Spider has traditionally used RAM to store data, which has enabled it to crawl lightning-fast and flexibly for virtually all machine specifications. However, it’s not very scalable for crawling large websites. That’s why early last year we introduced the first configurable hybrid storage engine, which enables the SEO Spider to crawl at truly unprecedented scale for any desktop application while retaining the same, familiar real-time reporting and usability.
So if you need to crawl millions of URLs using a desktop crawler, you really can. You don’t need to keep increasing RAM to do it either, switch to instead. Users can select to save to disk by choosing ‘database storage mode’, within the interface (via ‘Configuration > System > Storage).

This means the SEO Spider will hold as much data as possible within RAM (up to the user allocation), and store the rest to disk. We actually recommend this as the default setting for any users with an SSD (or faster drives), as it’s just as fast and uses much less RAM.
Please see our guide on how to crawl very large websites for more detail.
How To Crawl Large Websites Using The SEO Spider
Crawling websites and collecting data is a memory intensive process, and the more you crawl, the more memory is required to store and process the data. The Screaming Frog SEO Spider uses a configurable hybrid engine, that requires some adjustments to allow for large scale crawling.
By default the SEO Spider uses RAM, rather than your hard disk to store and process data. This provides amazing benefits such as speed and flexibility, but it does also have disadvantages, most notably, crawling at scale.
The SEO Spider can also be configured to save crawl data to disk, by selecting ‘Database Storage’ mode (under ‘Configuration > System > Storage’), which enables it to crawl at truly unprecedented scale, while retaining the same, familiar real-time reporting and usability.

TL;DR Version
If you’d rather not read the full guide below, below are the two main requirements to crawl very large websites.
1) Use a machine with an internal SSD, and switch to database storage mode (‘Configuration > System > Storage Mode’).
2) Allocate RAM (‘Configuration > System > Memory Allocation’). For crawls up to approx. 2 million URLs, allocate 4gb of RAM only. 8gb allocated will allow approx. 5 million URLs to be crawled.
Avoid over-allocating RAM, there is no need, it will simply slow down your machine performance.
The guide below provides a more comprehensive overview of the differences between memory and database storage, the ideal set-up for crawling large websites and how to crawl intelligently to avoid wasting both time and resource unnecessarily.
Introduction To List Mode
There are two fundamental crawling modes in the SEO Spider, the default ‘Spider’ mode which allows you to input and crawl a website, and ‘List’, which enables you to upload a list of URLs and crawl them.
It sounds simple, and it is – but there are some advanced uses of list mode, that are a bit more complex and make it really powerful, which this guide covers below.
First of all, let’s go over the basics. To switch to list mode, click ‘Mode > List’ in the top-level navigation.

‘List’ mode isn’t really that different from regular ‘Spider’ mode, there are two key differences:
- The interface changes to show an upload button instead of an address bar.
- The ‘‘ configuration is automatically enabled and set to ‘0’. This means that only the URLs you upload in list mode will be crawled.
The second point is the important difference, as it means only the URLs uploaded will be crawled. It won’t crawl these URLs and their images, or their external links etc. It will only crawl the URLs uploaded, nothing else*.
*Unless you’re using JavaScript rendering, where the SEO Spider needs to crawl the page resources to accurately render the page in its headless Chrome browser.
Check out our video guide on list mode, or continue to read our guide below.
1) Export A List In The Same Order Uploaded
If you’ve of URLs into the SEO Spider, performed a crawl and want to export them in the same order they were uploaded, then use the ‘Export’ button which appears next to the ‘upload’ and ‘start’ buttons at the top of the user interface.

The standard export buttons on the dashboard will otherwise export URLs in order based upon what’s been crawled first, and how they have been normalised internally (which can appear quite random in a multi-threaded crawler that isn’t in usual breadth-first spider mode).
The data in the export will be in the exact same order and include all of the exact URLs in the original upload, including duplicates, normalisation or any fix-ups performed.
2) Full Command Line Interface & –Headless Mode
You’re now able to operate the SEO Spider entirely via . This includes launching, full configuration, saving and exporting of almost any data and reporting.
It behaves like a typical console application, and you can use –help to view the full arguments available.

You can read the full list of commands that can be supplied and how to use the in our updated user guide. This also allows running the SEO Spider completely headless, so you won’t even need to look at the user interface if that’s your preference (how rude!).
We believe this can be an extremely powerful feature, and we’re excited about the new and unique ways users will utilise this ability within their own tech stacks.
Small Update – Version 9.3 Released 29th May 2018
We have just released a small update to version 9.3 of the SEO Spider. Similar to 9.1 and 9.2, this release addresses bugs and includes some small improvements as well.
- Update SERP snippet pixel widths.
- Update to Java 1.8 update 171.
- Shortcuts not created for user account when installing as admin on Windows.
- Can’t continue with Majestic if you load a saved crawl.
- Removed URL reappears after crawl save/load.
- Inlinks vanish after a re-spider.
- External inlinks counts never updated.
- HTTP Canonicals wrong when target url contains a comma.
- Exporting ‘Directives > Next/Prev’ fails due to forward slash in default file name.
- Crash when editing SERP description using Database Storage Mode.
- Crash in AHREFs when crawling with no credits.
- Crash on startup caused by user installed java libraries.
- Crash removing URLs in tree view.
- Crash crawling pages with utf-7 charset.
- Crash using Datebase Storage Mode in a Turkish Locale.
- Loading of corrupt .seospider file causes crash in Database Storage Mode.
- Missing dependencies when initializing embedded browser on ubuntu 18.04.
10) Saving HTML & Rendered HTML To Help Debugging
We occasionally receive support queries from users reporting a missing page title, description, canonical or on-page content that’s seemingly not being picked up by the SEO Spider, but can be seen to exist in a browser, and when viewing the HTML source.
Often this is assumed to be a bug of somekind, but most of the time it’s just down to the , based upon the user-agent, accept-language header, whether cookies are accepted, or if the server is under load as examples.
Therefore an easy way to self-diagnose and investigate is to see exactly what the SEO Spider can see, by choosing to save the HTML returned by the server in the response.
By navigating to ‘Configuration > Spider > Advanced’ you can choose to store both the and to inspect the DOM (when in JavaScript rendering mode).

When a URL has been crawled, the exact HTML that was returned to the SEO Spider when it crawled the page can be viewed in the lower window ‘view source’ tab.

By viewing the returned HTML you can debug the issue, and then adjusting with a different user-agent, or accepting cookies etc. For example, you would see the missing page title, and then be able to identify the conditions under which it’s missing.
This feature is a really powerful way to diagnose issues quickly, and get a better understanding of what the SEO Spider is able to see and crawl.
Viewing Crawl Data
Data from the crawl populates in real-time within the SEO Spider and is displayed in tabs. The ‘‘ tab includes all data discovered in a crawl for the website being crawled. You can scroll up and down, and to the right to see all the data in various columns.

The tabs focus on different elements and each have filters that help refine data by type, and by potential issues discovered.
The ‘Response Codes’ tab and ‘Client Error (4xx) filter will show you any 404 pages discovered for example.

You can click on URLs in the top window and then on the tabs at the bottom to populate the lower window pane.
These tabs provide more detail on the URL, such as their inlinks (the pages that link to them), outlinks (the pages they link out to), images, resources and more.

In the example above, we can see inlinks to a broken link discovered during the crawl.
Small Update – Version 3.3 Released 23rd March 2015
We have just released another small update to version 3.3 of the Screaming Frog SEO Spider. Similar to the above, this is just a small release with a few updates, which include –
- Fixed a relative link bug for URLs.
- Updated the right click options for ‘Show Other Domains On This IP’, ‘Check Index > Yahoo’ and OSE to a new address.
- CSV files now don’t include a BOM (Byte Order Mark). This was needed before we had excel export integration. It causes problems with some tools parsing the CSV files, so has been removed, as suggested by Kevin Ellen.
- Fixed a couple of crashes when using the right click option.
- Fixed a bug where images only linked to via an HREF were not included in a sitemap.
- Fixed a bug effecting users of 8u31 & JDK 7u75 and above trying to connect to SSLv3 web servers.
- Fixed a bug with handling of mixed encoded links.
You can download the SEO Spider 3.3 now.
Thanks to everyone for all their comments on the latest version and feeback as always.
Redirect Chains Report
There is a new ‘reports’ menu in the top level navigation of the UI, which contains the redirect chains report. This report essentially maps out chains of redirects, the number of hops along the way and will identify the source, as well as if there is a loop. This is really useful as the latency for users can be longer with a chain, a little extra PageRank can dissipate in each hop and a large chain of 301s can be seen as a 404 by Google (Matt discussed this in a Google Webmaster Help video here).
Another very cool part of the redirect chain report is how it works for site migrations alongside the new ‘‘ option (in the ‘advanced tab’ of the spider configuration). Now when you tick this box, the SEO spider will continue to crawl redirects even in list mode and ignore crawl depth.
Linux
This screamingfrogseospider binary is placed in your path during installation. To run this open a terminal and follow the examples below.
To start normally:
screamingfrogseospider
To open a saved crawl file:
screamingfrogseospider /tmp/crawl.seospider
To see a full list of the command line options available:
screamingfrogseospider --help

To start the UI and immediately start crawling:
screamingfrogseospider --crawl https://www.example.com/
To start headless, immediately start crawling and save the crawl along with Internal->All and Response Codes->Client Error (4xx) filters:
screamingfrogseospider --crawl https://www.example.com --headless --save-crawl --output-folder /tmp/cli --export-tabs "Internal:All,Response Codes:Client Error (4xx)"
In order to utilize JavaScript Rendering when running headless in Linux a display is required. You can use a Virtual Frame Buffer to simulate having a display attached. See full details here.
Please see the full list of command line options below.
5) Setup your extraction
Next you need to tell the SEO spider what to extract. For this, go into the ‘Configuration’ menu and select ‘Custom’ and ‘Extraction’ –

You should then see a screen like this –

From the ‘Inactive’ drop down menu you need to select ‘XPath’. From the new dropdown which appears on the right hand side, you need to select the type of data you’re looking to extract. This will depend on what data you’re looking to extract from the search results (full list of XPath syntax and data types listed below), so let’s use the example of related questions –

The above screenshot shows the related questions showing for the search query ‘seo’ in the UK. Let’s say we wanted to know what related questions were showing for the query, to ensure we had content and a page which targeted and answered these questions. If Google thinks they are relevant to the original query, at the very least we should consider that for analysis and potentially for optimisation. In this example we simply want the text of the questions themselves, to help inform us from a content perspective.
Typically 4 related questions show for a particular query, and these 4 questions have a separate XPath syntax –
Question 1 –
Question 2 –
Question 3 –
Question 4 –
To find the correct XPath syntax for your desired element, our web scraping guide can help, but we have a full list of the important ones at the end of this article!
Once you’ve input your syntax, you can also rename the extraction fields to correspond to each extraction (Question 1, Question 2 etc.). For this particular extraction we want the text of the questions themselves, so need to select ‘Extract Text’ in the data type dropdown menu. You should have a screen something like this –

If you do, you’re almost there!
1) ‘Fetch & Render’ (Rendered Screen Shots)
You can now view the rendered page the SEO Spider crawled in the new ‘Rendered Page’ tab which dynamically appears at the bottom of the user interface when crawling in mode. This populates the lower window pane when selecting URLs in the top window.

This feature is enabled by default when using the new JavaScript rendering functionality and allows you to set the AJAX timeout and viewport size to view and test various scenarios. With Google’s much discussed mobile first index, this allows you to set the user-agent and viewport as Googlebot Smartphone and see exactly how every page renders on mobile.

Viewing the rendered page is vital when analysing what a modern search bot is able to see and is particularly useful when performing a review in staging, where you can’t rely on Google’s own Fetch & Render in Search Console.
1) Tree View
You can now switch from the usual ‘list view’ of a crawl, to a more traditional directory ‘tree view’ format, while still mantaining the granular detail of each URL crawled you see in the standard list view.
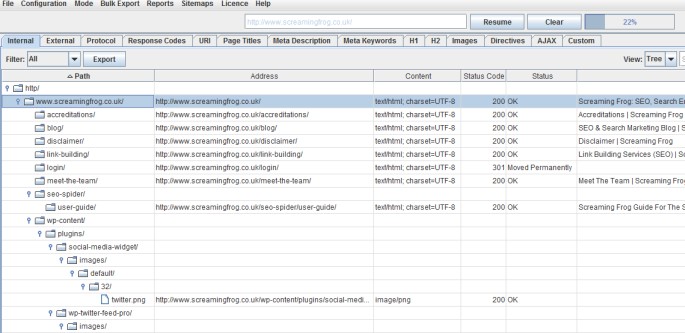
This additional view will hopefully help provide an alternative perspective when analysing a website’s architecture.
The SEO Spider doesn’t crawl this way natively, so switching to ‘tree view’ from ‘list view’ will take a little time to build, & you may see a progress bar on larger crawls for instance. This has been requested as a feature for quite sometime, so thanks to all for their feedback.
Adjust your settings
Now you’ve got the URLs sorted you’ll need to make sure Google doesn’t realise you’re using a bot and bring down the Captcha hammer on you straight away.
- Switch the tool over to list mode, (on the top menu > Mode > List).
- Head over to the rendering panel sitting under Configuration > Spider > Rendering- turn on JavaScript rendering, we also want to increase the AJAX timeout from 5 seconds to 15-20 for safe measure.
- Go to the speed panel (Configuration > Speed) turn the max threads to 1 and the Max URL/s to somewhere between 0.1 & 0.5 a second. You might need to play around with this to find what works for you.
3) Store & View HTML & Rendered HTML
You can now choose to store both the raw HTML and rendered HTML to inspect the DOM (when in JavaScript rendering mode) and view them in the lower window ‘view source’ tab.

This is super useful for a variety of scenarios, such as debugging the (you shouldn’t need to use WireShark anymore), or just when analysing how JavaScript has been rendered, and whether certain elements are within the code.

You can view the original HTML and rendered HTML at the same time, to compare the differences, which can be particularly useful when elements are dynamically constructed by JavaScript.
You can turn this feature on under ‘Configuration > Spider > Advanced’ and ticking the appropriate ‘Store HTML’ & ‘Store Rendered HTML’ options, and also export all the HTML code by using the ‘Bulk Export > All Page Source’ top-level menu.
We have some additional features planned here, to help users identify the differences between the static and rendered HTML.