Bootstrap js carousel
Содержание:
- Установка Owl Carousel 2
- Installation
- More Examples
- Settings
- Howto
- jQuery Carousel Plugins:
- Fully Responsive & Flexible jQuery Carousel Plugin — slick
- Responsive and Flexible Mobile Touch Slider — Swiper
- Responsive & Flexible Content Slider Plugin — flickity
- Blueimp Gallery
- jQurty HTML Content Carousel Plugin — jcarousel
- Responsive & Multi-Functional jQuery Slider Plugin — slider.js
- Lightweight Responsive Content Slider Plugin with jQuery and CSS3 — lightslider
- Responsive Carousel Slideshow with jQuery
- Clean and Responsive jQuery Carousel Plugin — flexisel
- Carousel & Marquee Like List Scrolling Plguin For jQuery — Scrollbox
- Owl Carousel 2: ответы на частые вопросы
- Usage
- Pure CSS/CSS3 Carousels:
- Как создать слайдер с зацикливанием?
- Установка Owl Carousel
- How it works
- JavaScript слайд шоу на базе разработанной библиотеки
Установка Owl Carousel 2
Собсно для начала нам нужно его скачать. Пакет доступен из npm и bower:
npm npm install —save owl.carousel
bower bower install —save owl.carousel
Если вы не хипстер используете пакетные менеджеры, то можно скачать с гитхаба в разделе релизов: Скачать Owl Carousel 2
Само собой нам так же понадобиться jQuery.
Подключаем
Скачав и распаковав Owl Carousel 2 нам нужно его подключить. Для этого в добавляем стили:
Если вам лень писать свои стили для внешнего вида слайдера, то можете подключить CSS файл со стандартной темой от разработчиков.
И внизу страницы подключаем непосредственно саму js’ку. АЛЯРМА! Owl Carousel должен подключаться после jQuery!
Используем
Добавляем в нужное вам место на странице блок со слайдером
Содержимым слайдера может выступать что угодно. Картинки, текст, списки, видео, все на что хватит вашей фантазии, но оно обязательно должно быть обернуто в контейнер (Например
Если вы не используете стандартную тему (owl.theme.default.css) то класс owl-theme добавлять не нужно.
Теперь просто вызываем функцию плагина (добавляем следующий код в конце странице, после подключения owl.carousel.min.js)
Все! Карусель установлена и функционирует. Вы молодец!
Installation
Uploading in WordPress Dashboard
- First download the plugin ZIP file from wordpress.org
- Log in to your website administrator panel
- Go to the ‘Add New’ in the plugins dashboard, click “Upload Plugin”
- Upload WordPress Slider ZIP file by choosing it from your download location
- Click Install Now button
- Then click Activate the Plugin button.
- You can see the plugin installed on WordPress left menu.
Using The WordPress Plugin Dashboard
- Go to the ‘Add New’ in the plugins dashboard
- Search for ‘lgx-owl-carousel’ or ‘OWL Carousel Slider’
- Click Install Now button
- Then click Activate Plugin button
- You can see the plugin installed on WordPress left menu.
Now you can configure your Plugins options from settings.
How to use
- First installed and active the plugin
- Create a new Category
- Create new slides
- Include carousel in your in any content. e.g. post, page, widget, theme
- Set Default Options from Plugin Settings Menu
You can also use custom TinyMCE button to insert shortcode.
Quick Usage
For use template php file:-
You can also use custom TinyMCE button to insert shortcode.
If you have any question contact us at Support Link
- ‘itemlarge'( NEW )
- ‘itemdesk'( NEW )
- ‘itemtablet'( NEW )
- ‘itemtmobile'( NEW )
- ‘navlarge'( NEW )
- ‘navdesk'( NEW )
- ‘navtablet'( NEW )
- ‘navtmobile'( NEW )
- ‘animateout'( NEW )
- ‘animatein'( NEW )
- ‘orderby’
- ‘limit’
- ‘cat’
- ‘color’
- ‘bgcolor’
- ‘bgopacity’
- ‘bgimage’
- ‘itembg’
- ‘margin’
- ‘lazyload’
- ‘loop’
- ‘nav’
- ‘autoplay
- ‘autoplay_timeout’
- ‘add_active’
- ‘hover_pause’
- ‘video’
- ‘dots’
- ‘videoheight’
More Examples
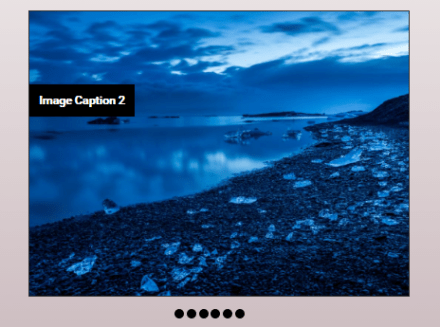
The atmosphere in Chania has a touch of Florence and Venice.

The atmosphere in Chania has a touch of Florence and Venice.

Flowers
Beautiful flowers in Kolymbari, Crete.

Flowers
Beautiful flowers in Kolymbari, Crete.
<div id=»myCarousel» class=»carousel slide» data-ride=»carousel»> <!— Indicators —> <ol class=»carousel-indicators»> <li data-target=»#myCarousel» data-slide-to=»0″ class=»active»></li> <li data-target=»#myCarousel» data-slide-to=»1″></li> <li data-target=»#myCarousel» data-slide-to=»2″></li> <li data-target=»#myCarousel» data-slide-to=»3″></li> </ol> <!— Wrapper for slides —> <div class=»carousel-inner» role=»listbox»> <div class=»item active»> <img src=»img_chania.jpg» alt=»Chania»> <div class=»carousel-caption»> <h3>Chania</h3> <p>The atmosphere in Chania has a touch of Florence and Venice.</p> </div> </div> <div class=»item»> <img src=»img_chania2.jpg» alt=»Chania»> <div class=»carousel-caption»> <h3>Chania</h3> <p>The atmosphere in Chania has a touch of Florence and Venice.</p> </div> </div> <div class=»item»> <img src=»img_flower.jpg» alt=»Flower»> <div class=»carousel-caption»> <h3>Flowers</h3> <p>Beautiful flowers in Kolymbari, Crete.</p> </div> </div> <div class=»item»> <img src=»img_flower2.jpg» alt=»Flower»> <div class=»carousel-caption»> <h3>Flowers</h3> <p>Beautiful flowers in Kolymbari, Crete.</p> </div> </div> </div> <!— Left and right controls —> <a class=»left carousel-control» href=»#myCarousel» role=»button» data-slide=»prev»> <span class=»glyphicon glyphicon-chevron-left» aria-hidden=»true»></span> <span class=»sr-only»>Previous</span> </a> <a class=»right carousel-control» href=»#myCarousel» role=»button» data-slide=»next»> <span class=»glyphicon glyphicon-chevron-right» aria-hidden=»true»></span> <span class=»sr-only»>Next</span> </a></div>
❮ Previous
Next ❯
Settings
| Setting | Type | Default | Description |
|---|---|---|---|
| accessibility | boolean | true | Enables tabbing and arrow key navigation |
| adaptiveHeight | boolean | false | Enables adaptive height for single slide horizontal carousels. |
| autoplay | boolean | false | Enables Autoplay |
| autoplaySpeed | int(ms) | 3000 | Autoplay Speed in milliseconds |
| arrows | boolean | true | Prev/Next Arrows |
| asNavFor | string | null | Set the slider to be the navigation of other slider (Class or ID Name) |
| appendArrows | string | $(element) | Change where the navigation arrows are attached (Selector, htmlString, Array, Element, jQuery object) |
| appendDots | string | $(element) | Change where the navigation dots are attached (Selector, htmlString, Array, Element, jQuery object) |
| prevArrow | string (html|jQuery selector) | object (DOM node|jQuery object) | <button type=»button» class=»slick-prev»>Previous</button> | Allows you to select a node or customize the HTML for the «Previous» arrow. |
| nextArrow | string (html|jQuery selector) | object (DOM node|jQuery object) | <button type=»button» class=»slick-next»>Next</button> | Allows you to select a node or customize the HTML for the «Next» arrow. |
| centerMode | boolean | false | Enables centered view with partial prev/next slides. Use with odd numbered slidesToShow counts. |
| centerPadding | string | ’50px’ | Side padding when in center mode (px or %) |
| cssEase | string | ‘ease’ | CSS3 Animation Easing |
| customPaging | function | n/a | Custom paging templates. See source for use example. |
| dots | boolean | false | Show dot indicators |
| dotsClass | string | ‘slick-dots’ | Class for slide indicator dots container |
| draggable | boolean | true | Enable mouse dragging |
| fade | boolean | false | Enable fade |
| focusOnSelect | boolean | false | Enable focus on selected element (click) |
| easing | string | ‘linear’ | Add easing for jQuery animate. Use with easing libraries or default easing methods |
| edgeFriction | integer | 0.15 | Resistance when swiping edges of non-infinite carousels |
| infinite | boolean | true | Infinite loop sliding |
| initialSlide | integer | Slide to start on | |
| lazyLoad | string | ‘ondemand’ | Set lazy loading technique. Accepts ‘ondemand’ or ‘progressive’ |
| mobileFirst | boolean | false | Responsive settings use mobile first calculation |
| pauseOnFocus | boolean | true | Pause Autoplay On Focus |
| pauseOnHover | boolean | true | Pause Autoplay On Hover |
| pauseOnDotsHover | boolean | false | Pause Autoplay when a dot is hovered |
| respondTo | string | ‘window’ | Width that responsive object responds to. Can be ‘window’, ‘slider’ or ‘min’ (the smaller of the two) |
| responsive | object | none | Object containing breakpoints and settings objects (see demo). Enables settings sets at given screen width. Set settings to «unslick» instead of an object to disable slick at a given breakpoint. |
| rows | int | 1 | Setting this to more than 1 initializes grid mode. Use slidesPerRow to set how many slides should be in each row. |
| slide | element | » | Element query to use as slide |
| slidesPerRow | int | 1 | With grid mode intialized via the rows option, this sets how many slides are in each grid row. dver |
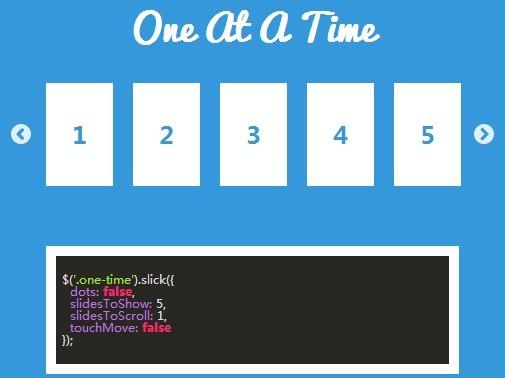
| slidesToShow | int | 1 | # of slides to show |
| slidesToScroll | int | 1 | # of slides to scroll |
| speed | int(ms) | 300 | Slide/Fade animation speed |
| swipe | boolean | true | Enable swiping |
| swipeToSlide | boolean | false | Allow users to drag or swipe directly to a slide irrespective of slidesToScroll |
| touchMove | boolean | true | Enable slide motion with touch |
| touchThreshold | int | 5 | To advance slides, the user must swipe a length of (1/touchThreshold) * the width of the slider |
| useCSS | boolean | true | Enable/Disable CSS Transitions |
| useTransform | boolean | true | Enable/Disable CSS Transforms |
| variableWidth | boolean | false | Variable width slides |
| vertical | boolean | false | Vertical slide mode |
| verticalSwiping | boolean | false | Vertical swipe mode |
| rtl | boolean | false | Change the slider’s direction to become right-to-left |
| waitForAnimate | boolean | true | Ignores requests to advance the slide while animating |
| zIndex | number | 1000 | Set the zIndex values for slides, useful for IE9 and lower |
Howto
The size of the carousel is determined by the size of its outer container. This means
that the carousel wrapper must have a given height in some way.
Carousel wrapper
The outer most element of the carousel that contain all carousel content
<div class="carousel"
     data-carousel-delay="8000"
     data-carousel-indicators=""
     data-carousel-touch-threshold="40%"
     data-carousel-rubberband-swipe="1.5">
| Attribute | Description | Example |
|---|---|---|
| Delay in milliseconds between rotations | 10000 | |
| Add indicators | No value | |
| x distance to swipe before transition starts. Can be either a fixed number (px) or in percent (%) | 100 or 50% | |
| Give a rubber band effect when swipeing. | 1.5 | |
| CSS selector for the outer wrapper. Only used when and are used | .outer-wrapper |
Carousel slider
This is the first child of the Carousel wrapper. This element takes no data attributes
<div class="carousel-slider">
Carousel item
This container is the wrapper for every item in the carousel.
<div class="carousel-item"
     data-carousel-href="http://domain.com/path/">
| Attribute | Description | Example |
|---|---|---|
| URL to goto when the item is clicked | /internal/path | |
| Don’t put the image as background, show the tag instead | «(empty)» | |
| Only used when is set. Will auto-adjust the wrapper height accorning to the height of the . This requires that is set on the Carsousel wrapper |
This container can contain any html.
<div class="carousel-item-text">
Carousel item image
The image tag uses lazy loading so the best thing to do is to set the
attribute to point to an empty pixel image or something like that and use
the attributes for the real image sources. The tag has support
for arbitrary number of sources for different devices (or strictly speaking
media width directives).
The tag will not be displayed per se, but the will rather be placed
as a background image on the element. But the will only be
visibly hidden and still be accessible for screen readers for which, for
instance, the attribute will serve a purpose.
If the media directive attributes are used the priciple of mobile first is applied,
so give the mobile version as value to the attribute, which is
the default source attribute.
<img src="empty/pixel.png" alt="Image description"
     data-carousel-src="real-image.jpg"
     data-carousel-mq-414="real-tablet-image.jpg"
     data-carousel-mq-768="real-desktop-image.jpg">
| Attribute | Description | Example |
|---|---|---|
| Default image src | /images/img1.jpg | |
| Alternative image sources. is an arbitrary number which will be set to the media directive | ||
| Show photo credit | Robert Capa | |
| Like above but for the photo credit. This is only needed if multiple sources are used and should then match of | Another Photographer |
The global object
This object has one static property ( by default) that if set with a
function that function will be called when a slider item is clicked (if the
attribute is used on the item).
Carousel.clickBack = function(item) {
  // Check something....
  // Return false if you want to abort the click
  // For instance:
  if (item.href.indexOf('http:') > -1) {
    window.top.location.href = item.href;
    return false;
  }
}
See the example below for a full implementation
jQuery Carousel Plugins:
Fully Responsive & Flexible jQuery Carousel Plugin — slick
Slick is a fresh new jQuery plugin for creating fully customizable, responsive and mobile friendly carousels/sliders that work with any html elements.
Responsive and Flexible Mobile Touch Slider — Swiper
Swiper is a powerful javascript library to implement responsive, accessible, flexible, touch-enabled carouses/sliders on your mobile websites and apps.

Responsive & Flexible Content Slider Plugin — flickity
flickity is a generic, flexible, modular jQuery slider plugin for creating responsive, touch-enabled content sliders/galleries/slideshows/carousels with physics-based animations and full-feature APIs.

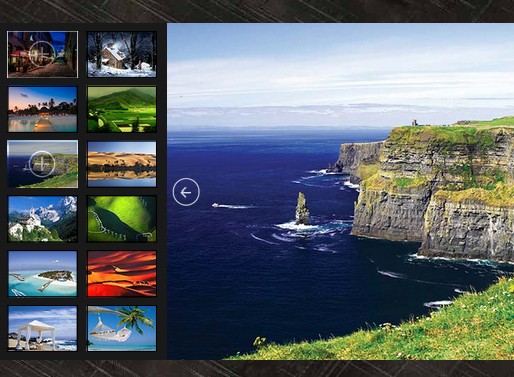
Blueimp Gallery
Blueimp Gallery is a powerful and multi-functional jQuery/Vanilla JavaScript plugin for creating responsive, touch-friendly and fully configurable image/video gallery, carousel slider and lightbox gallery on the page.

jQurty HTML Content Carousel Plugin — jcarousel
jcarousel is a simple and fast jQuery carousel slideshow plugin for controlling a list of items in horizontal or vertical order.

Responsive & Multi-Functional jQuery Slider Plugin — slider.js
slider.js is a robust and efficient jQuery slider solution to create responsive, flexible, highly customizable and mobile-friendly content sliders, slideshows, galleries, rotators and many more. Download and check out more than 30+ examples in the zip for more information.
Lightweight Responsive Content Slider Plugin with jQuery and CSS3 — lightslider
lightslider is a lightweight yet fully customizable jQuery slider plugin that supports any Html contents and makes use of CSS3 transitions and transforms to create smooth ‘fade’ or ‘slide’ effects.
Responsive Carousel Slideshow with jQuery
A jquery Slideshow Plugin for responsive carousels that work with mouse, touch, and keyboard. It comes with Fade transitions, Slide transition with touch or arrow keys, Flip transition with touch & autoplay, Dynamic responsive containers and more.

Clean and Responsive jQuery Carousel Plugin — flexisel
flexisel is a simple, easy-to-use and cross-platform jQuery plugin that make it easy to create a responsive carousel slider with configurable scrolling animations for showcasing any html elements.
Carousel & Marquee Like List Scrolling Plguin For jQuery — Scrollbox
Scrollbox is a lightweight plugin for jQuery that enables you to scroll a list of html elements (text, image, etc…) like a carousel slider or traditional marquee.
Owl Carousel 2: ответы на частые вопросы

При работе с Owl Carousel 2 у многих возникают проблемы. В данной статье я собрал частые вопросы, которые связаны с данным плагином, и постараюсь дать четкие ответы на них.
Отобразить Owl Carousel 2 вертикально
Для этого существуют специальные JavaScript свойства: animateOut : «slideOutUp» animateIn : «slideInUp» Однако, нужно понимать, что они относятся только лишь к стрелкам вперед/назад, а прокрутка мышью в любом случае будет происходить влево/вправо.
Owl Carousel 2 перелистывание на несколько слайдов
Стоит обратить внимание на свойство: slideBy : 1 Оно имеет тип Number, то есть число. По умолчанию перелистывание выполняется по одному слайду
Owl carousel 2 убрать / включить стрелки next prev
Для того, что бы убрать стрелки, необходимо прописать свойство: nav : false Имеет тип Boolean. По умолчанию имеет значение true.
Owl carousel 2 изменить (задать) скорость прокрутки
Скорость прокрутки устанавливается с помощью: autoplayTimeout : 7000 Свойство имеет тип Number, то есть число в миллисекундах. По умолчанию 5000
Для решения данной задачи, с одной стороны, можно воспользоваться свойством navText: navText : Свойство имеет тип Array (массив), в котором заданы два значения для кнопок вперед и назад соответственно.
С другой стороны, данный вопрос можно решить с помощью CSS и скрыть текст у данных элементов: .owl-prev, .owl-next overflow: hidden; text-indent: -99px; >
источник
Usage
Carousel
You can create a carousel based off of a set of predetermined markup. Assuming you have the appropriate elements
already in the DOM and have your CSS set up correctly to show and hide the styles. You can setup Carousel
and navigate to panels programmatically.
var carousel = new Carousel({
    panels: document.getElementsByClassName('carousel-panel')
});

carousel.goTo(1); // go to second carousel panel
Carousel with Clickable Thumbnails
Create a carousel with thumbnails based off of a set of predetermined markup. Assuming, you have your html in the DOM and CSS
set up correctly. You can use the Carousel class to add interactivity:
var thumbnails = document.getElementsByClassName('carousel-thumbnail');

var carousel = new Carousel({
    panels: document.getElementsByClassName('carousel-panel'),
    thumbnails: thumbnails
});

// click on second thumbnail to show second panel
thumbnails1.click();
More details and example can be found here.
Carousel Image Lazy Loading
The carousel class also allows lazy loading images so that you can ensure that large image assets
only load when transitioning to the panel they reside in. This saves us from hogging the user’s bandwidth and downloading
all image assets before a user navigates to it.
To use the lazy loading functionality, let’s assume you have the following in the DOM already:
<div class="carousel-panel">
    <img data-lazy-src="http://www.gstatic.com/webp/gallery/1.jpg" src="" />
</div>
<div class="carousel-panel">
    <img data-lazy-src="http://www.gstatic.com/webp/gallery/2.jpg" src="" />
</div>
Then you can do this:
var carousel = new Carousel({
    panels: document.getElementsByClassName('carousel-panel'),
    panelActiveClass: 'carousel-panel-active',
    lazyLoadAttr: 'data-lazy-src',
    assetLoadingClass: 'image-loading'
});

// go to second panel and lazy load the image it contains
carousel.goTo(1);
A more in-depth, working example of Carousel’s lazy loading can be found here.
Carousel with Arrows
You can easily create a carousel with the traditional left and right arrows. Assuming you have the following markup
and styles in the DOM, you can do something like this:
var leftArrowElement = document.getElementsByClassName('carousel-left-arrow');
var rightArrowElement = document.getElementsByClassName('carousel-right-arrow');

var carousel = new Carousel({
    panels: document.getElementsByClassName('carousel-panel'),
    leftArrow: leftArrowElement,
    rightArrow: rightArrowElement,
    arrowDisabledClass: 'arrow-disabled'
});

// go to first panel which will add a css class on the left arrow to disable it
carousel.goTo();

// click right arrow to navigate to next panel
// which will remove the disabled css class from the left arrow
rightArrowElement.click();
Pure CSS/CSS3 Carousels:
flix-carousel is a pure CSS library to create an interactive hover carousel inspired by Netflix.

Cari is a pure HTML / CSS solution to make a responsive content carousel slider without the need of any JavaScript.

A pure CSS/CSS3 based content carousel/slideshow which allows to present a group of Html elements through user interaction.
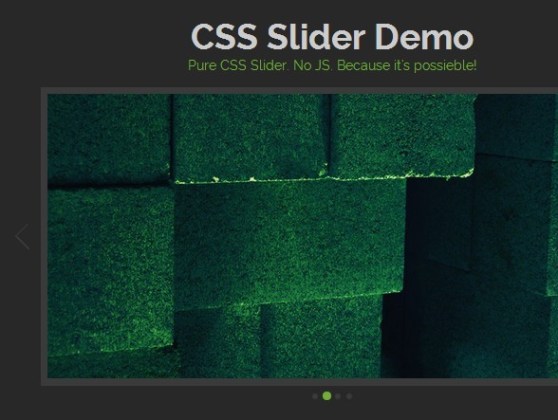
A pure CSS 3D perspective carousel that automatically rotate through a group of html content using CSS3 transforms.

Basic Pure CSS Slideshow / Carousel
CSS Carousal is a pure HTML/CSS slideshow which is animated without using Javascript. It uses radio buttons and labels to trigger the slideshow.
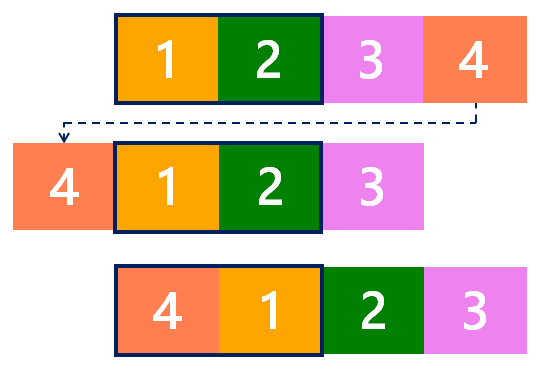
Как создать слайдер с зацикливанием?
Зацикливание слайдов можно выполнить посредством трансформирования элементов .
Для этого необходимо к каждому элементу привязать значения его текущей позиции и трансформации.
Наиболее оптимально эти действия можно выполнить с помощью массива :
var _items = [];

// наполнение массива элементами .slider__item
_sliderItems.forEach(function (item, index) {
  _items.push({ item: item, position: index, transform: 0 });
});
Но связать данные с элементами можно выполнить не только посредством массива, а например, с помощью data-атрибутов. Но операции с DOM самые медленные и ресурсоёмкие, их не рекомендуется использовать, когда это можно выполнить как-то по-другому.
Следующий шаг — это создать функции для вычисления элементов с минимальной и максимальной позицией.
var position = {
  getItemMin: function () {
    var indexItem = 0;
    _items.forEach(function (item, index) {
      if (item.position < _items.position) {
        indexItem = index;`
      }
    });
    return indexItem;
  },
  getItemMax: function () {
    var indexItem = 0;
      _items.forEach(function (item, index) {
        if (item.position > _items.position) {
          indexItem = index;
        }
      });
    return indexItem;
  },
  getMin: function () {
    return _items.position;
  },
  getMax: function () {
    return _items.position;
  }
}
</pre>
<p><span class="font-weight-bold">Последний основной шаг</span>, который предстоит выполнить - это доработать функцию <code class="code">_transformItem</code>. А именно добавить к ней код, который будет изменять позицию элемента <code class="code">.slider__item</code> и выполнять его трансформацию.</p>
<pre class="prettyprint">
var _transformItem = function (direction) {
  var nextItem;
  if (direction === 'right') {
    _positionLeftItem++;
    if ((_positionLeftItem + _wrapperWidth / _itemWidth - 1) > position.getMax()) {
      nextItem = position.getItemMin();
      _items.position = position.getMax() + 1;
      _items.transform += _items.length * 100;
      _items.item.style.transform = 'translateX(' + _items.transform + '%)';
    }
    _transform -= _step;
  }
  if (direction === 'left') {
    _positionLeftItem--;
    if (_positionLeftItem < position.getMin()) {
      nextItem = position.getItemMax();
      _items.position = position.getMin() - 1;
      _items.transform -= _items.length * 100;
      _items.item.style.transform = 'translateX(' + _items.transform + '%)';
    }
    _transform += _step;
  }
  _sliderWrapper.style.transform = 'translateX(' + _transform + '%)';
}
На самом деле здесь всё просто.
Например, для того чтобы осуществить переход к следующему слайду сначала в массиве ищется элемент с позицией большей, чем у текущего крайнего правого элемента .
Если такой элемент в массиве есть, то выполняется трансформация элемента (т.е. действия, как и в алгоритме без зацикливания).
А вот если такого элемента нет, то кроме трансформации , выполняется ещё ряд действий. Во-первых, в массиве ищется элемент с минимальной позицией. После получения этого элемента, ему устанавливается позиция, значение которой будет равно значению текущего правого элемента + 1. Ну и конечно выполняется его трансформация, на такое количество процентов, чтобы он оказался в конце, т.е. после последнего элемента.
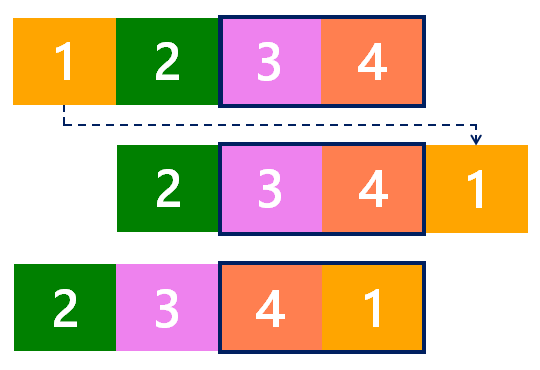
Для перехода к предыдущему слайду выполняются аналогичные действия, но наоборот.
Кроме этого для слайдера с зацикливанием не нужно переключать видимость кнопок «Влево» и «Вправо». Данные кнопки в этой версии слайдера будут отображаться всегда.
Чтобы это выполнить необходимо:
- удалить класс у элемента управления «Вправо»;
- в CSS для селектора изменить значение свойства на .
Демо слайдера
Установка Owl Carousel
Для того, чтобы его установить, вам нужно его скачать на официальном сайте плагина
После того как вы скачали все файлы, нужно подключить их на сайт.
Если у вас не подключена библиотека jQuery, не забудьте подключить сначала ее.
CSS
<script src=»https://ajax.googleapis.com/ajax/libs/jquery/3.3.1/jquery.min.js»></script>
| 1 | <script src=»https://ajax.googleapis.com/ajax/libs/jquery/3.3.1/jquery.min.js»></script> |
Падключаем файлы owl.carousel.css, owl.theme.default.css и owl.carousel.js.
Вот примерно так у вас все это будет выглядеть.
<link rel=»stylesheet» href=»owl-carousel/css/owl.carousel.css»>
<link rel=»stylesheet» href=»owl-carousel/css/owl.theme.default.css»>
<script src=»https://ajax.googleapis.com/ajax/libs/jquery/3.3.1/jquery.min.js»></script>
<script src=»owl-carousel/js/owl.carousel.js»></script>
|
1 |
<link rel=»stylesheet»href=»owl-carousel/css/owl.carousel.css»> <link rel=»stylesheet»href=»owl-carousel/css/owl.theme.default.css»> <script src=»https://ajax.googleapis.com/ajax/libs/jquery/3.3.1/jquery.min.js»></script> <script src=»owl-carousel/js/owl.carousel.js»></script> |
ВАЖНО!!!Путь к подключению файлов может отличаться
Далее нам нужно внедрить разметку слайдера. Она достаточно простая. В основной блок div мы помещаем другие блоки. Выглядеть это будет примерно так:
<div class=»owl-carousel»>
<div>Слайд 1</div>
<div>Слайд 2</div>
<div>Слайд 3</div>
<div>Слайд 4</div>
<div>Слайд 5</div>
<div>Слайд 6</div>
<div>Слайд 7</div>
<div>Слайд 8</div>
<div>Слайд 9</div>
<div>Слайд 10</div>
</div>
|
1 |
<div class=»owl-carousel»> <div>Слайд1<div> <div>Слайд2<div> <div>Слайд3<div> <div>Слайд4<div> <div>Слайд5<div> <div>Слайд6<div> <div>Слайд7<div> <div>Слайд8<div> <div>Слайд9<div> <div>Слайд10<div> <div> |
Ну и вызываем сам метод плагина
JavaScript
$(function() {
$(«.owl-carousel»).owlCarousel();
});
|
1 |
$(function(){ $(«.owl-carousel»).owlCarousel(); }); |
Данный код мы может внедрить в самом конце закрывающего тэга </body> предварительно обернув его в теги <script></script>, или вынести в отдельный файл и подключить его, как ранее подключали сам плагин.
В результате у нас получатся карусель «базовой комплектации»

В оформлении вы можете сами разгуляться и набросать стилей для вашего слайдера.
Также вы туда можете вставить картинки или сформировать мини таблицы. Короче говоря- все что вашей душе угодно.
В общем то, сам слайдер готов, но вам нужно его еще настроить под ваши потребности. Например зациклить его, или добавить кнопки навигации, ускорить прокрутку слайдов, установить число слайдов для одновременного показа и т.д.
С полной документацией, вы можете ознакомиться на официальном сайте, а ниже я вам приведу таблицу с основными настройками слайдера.
И да, если данная статья вам понравилась, помогла или просто нужна помощь по внедрению, оставляйте свои комментарии.
А также чтобы не пропустить выхода новых статей подписывайтесь на наш и соц.сети
How it works
The carousel is a slideshow for cycling through a series of content, built with CSS 3D transforms and a bit of JavaScript. It works with a series of images, text, or custom markup. It also includes support for previous/next controls and indicators.
In browsers where the Page Visibility API is supported, the carousel will avoid sliding when the webpage is not visible to the user (such as when the browser tab is inactive, the browser window is minimized, etc.).
Please be aware that nested carousels are not supported, and carousels are generally not compliant with accessibility standards.
Lastly, if you’re building our JavaScript from source, it .
JavaScript слайд шоу на базе разработанной библиотеки
Иногда на практике может потребоваться сделать JS карусель с прокруткой, которую часто называют слайд шоу. В моём случае этого не требовалось, но я всё же решил сделать такую на базе итогового кода библиотеки для случая, когда это может пригодиться.
На самом деле, реализация JavaScript слайд шоу отличается от обычного слайдера совсем незначительно. Разница заключается лишь в том, что в слайд шоу слайды переключаются автоматически с заданным временным интервалом, а в случае обычной JS карусели они меняются вручную с помощь элементов навигации.
Для автоматической прокрутки слайдов я добавил в самый конец своего класса следующий метод:
slideShow: function (timeout) {
    var sliderCount = this.links.length;
    var self = this;

    this.slideCycle = setInterval(function () {
        var currentSlideNumber = document.querySelector('#slider-nav a.current').getAttribute("data-slide");
        var slideId = parseInt(currentSlideNumber, 10) + 1;
        self.slide(document.querySelector(''));
    }, timeout);
}
Что здесь происходит — думаю, понятно. Для создания данного метода я скопировал код из события клика на кнопки ручного переключения слайдов и разместил его внутри вызова JavaScript функции setInterval(), которая выполняет указанное действие через заданный промежуток времени.
Сценарий действия передаётся первым аргументом в виде анонимной функции, а временной интервал — вторым, который я решил сделать в виде переменной, значение которой передаётся при вызове slideShow().
Единственная модификация кода внутри setInterval(), которая потребовалась, — это определение количества слайдов и сравнение с ним индекса текущего слайда для зацикленности автоматического переключения.
Ну, и для того, чтобы данный код заработал, сам метод необходимо вызвать. Я решил сделать это всё в том же navigate(), который как раз и является сборником всяких сценариев. Вызов я разместил в самом конце, передав в качестве аргумента значение временного интервала для автоматической смены слайдов в нашем JS слайд шоу (я выбрал 2000 милисекунд или 2 секунды, вы можете по необходимости изменять это число):
self.slideShow(2000);
После этого проверяйте работу JavaScript слайдера, не забыв при этом почистить кэш сайта и браузера.
В итоге, у нас получилось JS слайд шоу, в котором слайды переключаются автоматически и по кругу, т.е. при достижении последнего слайда шоу переходит на новый цикл, и показ снова начинается с самого первого элемента.
При работе с различными библиотеками JS каруселей картинок и отзывов я заметил, что данную практику разработчики активно применяют, но с некоторым дополнением. Во всех увиденных мною решениях автоматический показ слайдов прерывается, если пользователь сделал ручное переключение. Поэтому я решил сделать подобное и в своей библиотеке.
Для прерывания автоматического показа слайдов JavaScript карусели я решил воспользоваться стандартной JS функцией clearInterval(), которой в качестве аргумента передаю идентификатор временного интервала, возвращаемого функцией setInterval() при его установке.
В итоге, получился следующий код, который я решил не оформлять отдельным методом:
clearInterval(self.slideCycle);
И разместил его в местах описания действий при кликах на различные элементы навигации, т.е. в следующих:
link.addEventListener("click", function (e) {...});

self.prevBtn.addEventListener('click', function (e) {...});

self.nextBtn.addEventListener('click', function (e) {...});
Вызов clearInterval() лучше делать поближе к самому событию клика, главное, чтобы перед ним, а не после.