Установите веб-интерфейс в ubuntu
Содержание:
- How to install it on different platforms?
- What is the difference between full allocation and compact allocation?
- Deluge Daemon Setup
- CHANGE LOG
- 10-Aug-2020 — fix 3rd party plugins, build maintainability and readability
- 3-Aug-2020 — fix missing files for Test connection
- 2-Aug-2020 — publish build scripts and guide at on github
- 31-Jul-2020 — 34% smaller, Win integration, portability&build fixes, new vers
- 20-Jun-2020 — revive deluge-console, updated Deluge patch, reduced build size, enhanced build scripts, ChangeLog
- 02-Jun-2020 — deluge*.exe portability regression fix, build script fixes
- 29-May-2020 — libtorrent and boost upgrades and optimization
- Clients
- Where can you use Deluge?
- Install Deluge on Windows and Configure ThinClient
- What does «Auto Managed» do?
- What bandwidth settings should I use?
- Пользовательский опыт
- Ubuntu / Debian
- Шаг 7. Включите поддержку HTTPS (или SSL) (необязательно)
- Web UI
- Создание торрент-демона
- особенности
- Is Deluge a programming language or a scripting language?
- Daemon
- Как пользоваться
- Подготовка
- Достоинства и недостатки
How to install it on different platforms?
When downloading your Deluge client, you will find a wide availability of different platforms to choose from.

Download the correct version and follow the next instructions to install Deluge.
How to install Deluge on Ubuntu?
The official repositories of Ubuntu include Deluge, so you might get away with using Ubuntu GUI install from terminal “sudo apt-get install deluge”. Unfortunately, those repositories might be outdated, so you might need to use PPA repository instead. Copy and Paste the following lines in the terminal:
sudo add-apt-repository ppa:deluge-team/ppa
sudo apt-get update
sudo apt-get install deluge
|
1 |
sudo add-apt-repository ppadeluge-team/ppa sudo apt-get update sudo apt-get install deluge |
How to install Deluge on Debian 8.3?
To install Deluge on Debian, you first need to add the repositories to the sources.list with an editor like “nano”.
nano /etc/apt/sources.list
| 1 | nano/etc/apt/sources.list |
Then copy/paste the following lines at the end of the file.
#Deluge PPA
deb http://ppa.launchpad.net/deluge-team/ppa/ubuntu trusty main
deb-src http://ppa.launchpad.net/deluge-team/ppa/ubuntu trusty main
|
1 |
#Deluge PPA deb http//ppa.launchpad.net/deluge-team/ppa/ubuntu trusty main deb-src http//ppa.launchpad.net/deluge-team/ppa/ubuntu trusty main |
Save your changes, then update and install.
apt-get update
apt-get install -t trusty deluged deluge-web
|
1 |
apt-get update apt-get install-ttrusty deluged deluge-web |
How to install Deluge on Windows?
To install Deluge on Windows platforms is really straightforward. Once downloaded, run the executable file (.exe). If it was downloaded from a source other than deluge-torrent.org, you might want to scan it against Malware.

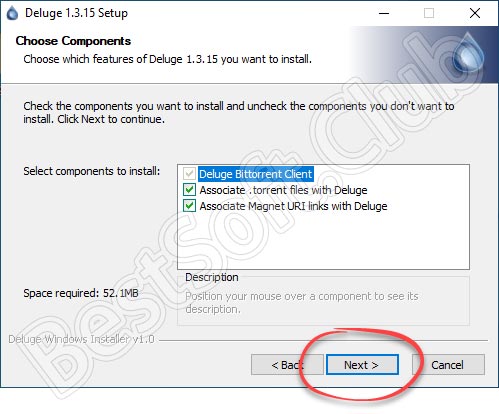
In the next step, you will need to select the components to install with Deluge.
The client is grayed out because you are installing the client itself, but if you have another torrent client, such as uTorrent and want to leave that client to handle all .torrent files, and let Deluge handle all magnet links, this is your chance to customize which components to manage with Deluge.
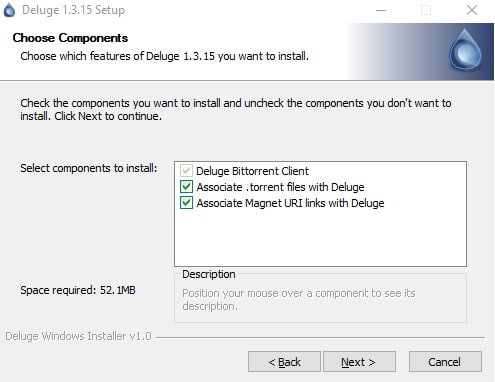
In the next steps, choose your install location and click Install. That’s it… Deluge is installed on your device.
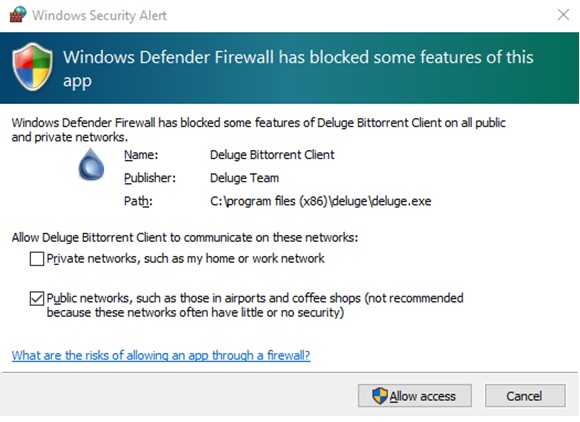
You might be faced with the following Windows Security Alert from the Firewall. It is recommended (as Windows suggests) to leave Deluge client to operate in trusted networks. You might leave Deluge ports open while connected to a public coffee shop’s WiFi, but you can easily be found and probably hacked…
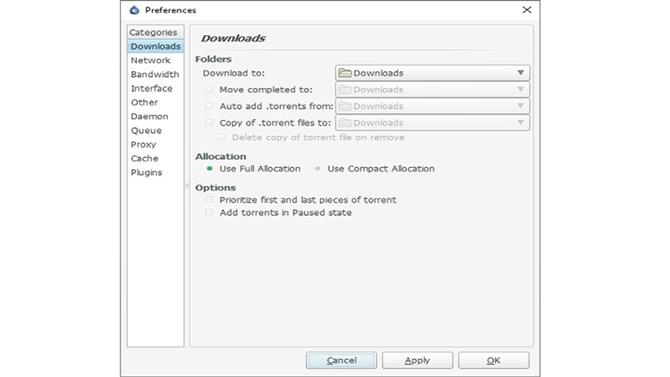
What is the difference between full allocation and compact allocation?
Compact allocation only allocates as much storage as it needs to keep the pieces downloaded so far. This means that pieces will be moved around to be placed at their final position in the files while downloading (to make sure the completed download has all its pieces in the correct place). In full allocation, the entire space that a file needs is allocated as soon as one piece of that file is downloaded, thus decreasing fragmentation.
We suggest that our users use full allocation.
Deluge uses sparse files for full allocation, the compact allocation option is only useful on file systems that don’t support sparse files (such as FAT or HFS+).
Deluge Daemon Setup
The Deluge daemon deluged and deluge-console should be installed on the server.
See the service guides to run deluged as a service so that it starts/stops on server boot/shutdown. Substitute any daemon start or stop commands below with the appropriate service commands.
To debug any problems setting up deluged and check for errors.
Create Default Config
To create the config directory and populate with the default files, run and then stop deluged. (If using a service substitute appropriate operating system commands):
deluged
killall deluged
Note: The config location is either the with reference to the user that deluged is running as. Alternatively if using a service it will be specified in the service config files with -c <path> option.
Add User to the authentication file
Create a Deluge user for clients/UIs to access the daemon by editing the authentication file, auth, located in the above config location.
The auth file should consist of lines of <username>:<password>:<level>. Replace <username> and <password> with your choice and <level> with the desired authentication level.
You can use your favourite text editor to achieve this or can be done with a one-line echo command e.g.:
echo "alice:MyC0mpL3xPass:10" >> ~/.config/deluge/auth
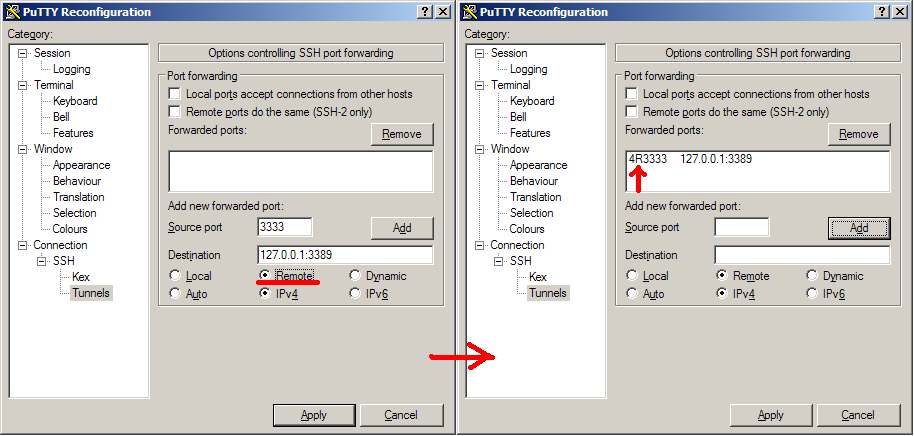
Enable Remote Connection
We will use deluge-console to configure deluged to accept connections from computers other than localhost. For SSH Tunnelling you do not need to enable remote connections so this step can be skipped.
Using the Console in command-line mode, set the allow_remote option and then verify with these commands:
deluge-console "config -s allow_remote True"
deluge-console "config allow_remote"
If you are running deluged under another user (e.g. deluge) you will need to temporarily login as that user to enable deluge-console to access that daemon’s config:
su --shell /bin/bash --login deluge
Alternatively you can edit core.conf (deluged must not be running) in the config and change allow_remote from false to true.
Verify Server IP Address
You will need to know the server’s IP address for configuring clients, for private IP: hostname -I or public IP: curl ifconfig.me
Congratulations! The server is now setup for remote client access.
CHANGE LOG
10-Aug-2020 — fix 3rd party plugins, build maintainability and readability
- Added YaRSS2 plugin to the installer and re-added the files that were missing for those.
- Patched out the complex code in log.py trying (and failing on Windows) to monkey-patch the calling module’s attribute, and just leave the original warning there to help the users of 3rd party plugins using deprecated log interfaces.
- Create a single installer build script with paramteres
- Added Build Menu cmd file from MHerz.
- Added a lib folder for common build code an createlinks.cmd to create a symlink to it into each build folder
- Made sure the curl we use is from the MSYS2 we installed, not the windows one.
- Reverted installing 7zip for windows and instead added it to the packages installed in MSYS2.
- Start using color to make build messages pop more out of the build output
- Unified Copyright notices in all CMD files
3-Aug-2020 — fix missing files for Test connection
- The extensive file clean up removed a bit too many files, fixed for test connection problem reported.
- Shorten installer filename another 7 characters.
2-Aug-2020 — publish build scripts and guide at on github
- Find the scripts and guide on github
- Removed the patches from the relese download site as now they are available on github.
31-Jul-2020 — 34% smaller, Win integration, portability&build fixes, new vers
- One third smaller installer and Installed Deluge folder through profiling of deluge, deluged, deluge-web and deluge-console using Process Monitor and removing the files not used according to the profiling.
EXCEPTIONS are .exe files and folders that have ‘locale’ or ‘hazmat’ in their name.
PLEASE test and let me know if I have removed too much!!! - Better Windows integration through alternative loaders, courtesy of @MHerz:
- Now can pin deluge on taskbar
- shows only one deluge / deluged / deluge-web process, python.exe is embedded.
- loader has Deluge icons
- Updated LibTorrent to 1.2.8 released 30-Jul-2020.
- Updated to Python to version 3.8.5 released on 20-Jul-2020.
- Portable install fix to put the deluge profile folder as well in the data subfolder of the deluge install folder in case of portable installations, courtesy of @MHerz.
- Updated te GeoIP database and added the automated GeoIP database update to the build system, courtesy of @MHerz.
- Fixed the torrentmanager.py patch from @djlegolas for the stable deluge-build.
- Install wheel using pip during deluge-build to avoid build warnings.
- Removed LIBTORRENT_REVISION from the file names as it seems useless. Other installer name fixes.
- Stopped copying the vcvarsall.bat around to make the LibTorrent build happy using proper build commands.
- Added up to date , and to the «Deluge2 Unofficial Installer for Windows» folder to make it easy for you to check what fixes are included in the new version.
- Moved earlier releases to an Archive folder.
20-Jun-2020 — revive deluge-console, updated Deluge patch, reduced build size, enhanced build scripts, ChangeLog
02-Jun-2020 — deluge*.exe portability regression fix, build script fixes
- update to libtorrent 1.2.7 (thanks for the report @highvoltage!)
- I got rid of the remnants of the C:\Program Files\Deluge2 folder, anyways, for a long time this installer too installs into .
- Updated and the to handle 8.3 paths as well.
- updated fixdeluged.py and fixdeluge-web.py did need updates too
- indicate the python, OpenSSL and GTK versions used for the build in the installer name.
29-May-2020 — libtorrent and boost upgrades and optimization
- boost is updated to 1.73
- both 1.1.x and 1.2.x libtorrent builds are optimized for speed not space.
- libtorrent and boost versions used for the build are indicated in the installer name.
Clients
The console client can be run with:
$ deluge-console
Enter the command for a list of available commands.
GTK
Note: It is necessary to select Thin Client Mode in Edit -> Preferences -> Interface for daemon (server) setups.
The GTK client can be run with:
$ deluge-gtk
or:
$ deluge
The GTK client has a number of useful plugins:
- AutoAdd — Monitors directories for .torrent files
- Blocklist — Downloads and imports an IP blocklist
- Execute — Event-based command execution
- Extractor — Extracts archived files upon completion (beware of random high disk I/O usage)
- Label — Allows labels to be assigned to torrents, as well as state, tracker, and keyword filters
- Notifications — Provides notifications (email, pop-up, blink, sound) for events as well as other plugins
- Scheduler — Limits active torrents and their speed on a per-hour, per-day basis
- WebUi — Allows the Web UI to be started via the GTK client
Web
Just as with deluge daemon mentioned above, the web client can be started several different ways:
- Systemd system service (runs as the deluge user).
- Systemd user service (runs as another user).
- Running it directly (runs as another user).
Note:
- The default password for the web interface is deluge.
- The web client offers many of the same features of the GTK UI, including the plugin system.
- It is recommended to use HTTPS for the Web client to protect against a man-in-the-middle attack.
- Users may be greeted by a warning from the browser that the SSL certificate is untrusted. Add an exception to this in the browser to continue on. See the OpenSSL page for information on creating your own certificate.
- If multiple users are running a daemon, the default port (8112) will need to be changed for each user.
Tip: For the highest level of security, running via the systemd system service () is recommended since the deluge user has no shell access (limited account) or other group affiliation on the host system. In addition to the security benefits of running as the non-privileged deluge user, the system service can also run at boot without the need to start Xorg or a client.
System service
Deluge ships with , a systemd system unit, which is used to start the Deluge Web UI. The Deluge Web UI uses a Connection Manager, allowing managing of multiple Deluge clients running under the same host or on an entirely different one. Remember to start and optionally enable the service to allow the Web UI connect to the host Deluge client.
User service
A user service will allow to run when is started. This is accomplished by creating a user service file:
/etc/systemd/user/deluge-web.service
Description=Deluge Web UI
After=deluged.service


ExecStart=/usr/bin/deluge-web --ssl


WantedBy=default.target
The deluge user service can now be started and enabled by the user.
The user service can also be placed in . See systemd/User for more information on user services.
Where can you use Deluge?
Over thirty Zoho Products currently support Deluge, which are listed in the image below. Products marked with stars are in private release stages, or we’re close to getting it up and running for those products. When an action happens in one of these Zoho applications, it can trigger a Deluge script that does some workflow action for us.
Generally, you’ll be using Deluge to manipulate data in some way, such as creating or updating a record, or deleting a record that exists in other Zoho or external applications. You can also choose when that action happens. We have already defined all the events across Zoho applications in which you can trigger Deluge scripts. The following image displays a few sample events in which Deluge functions can be triggered.
Install Deluge on Windows and Configure ThinClient
We will install Deluge on Windows 10 (it is the same procedure for all the supported Windows versions). Download Deluge for Windows from Deluge’s official site, select the latest version (at the moment of writing this guide it is version 1.3.12.1) and install. When ready, start Deluge.
Click on Preferences (1), then Interface (2), and unselect Enable under Classic Mode (3), as in the screenshot. Click OK. Deluge will prompt you that you need to restart, click yes, and start Deluge again.

When Deluge starts, you should see the Connection Manager windows. If not, click on the icon (1). Make sure Automatically connect to selected host on start-up (2) and Do not show this dialog on start-up (3) are selected. This will make Deluge automatically connect to the configured Deluge daemon on each start and not prompt you to select which daemon to control each time you start Deluge on your client.
To add the host click Add (4) and under Hostname (5) enter the IP address of your server where Deluge daemon is running. You can use the DynamicDNS address if you want to be able to access Deluge daemon from you client outside of your local network. (If you want to make Deluge daemon accessible outside of your local network, you will need to forward port 58846 in your router. The connection between Deluge daemon and the ThinClien is encrypted!) Next, leave the Port as is, and enter the Username (6) and the Password (7) you selected for your client and added to the auth file. Click Add, and Connect.

Deluge is configured as a ThinClient. Compared to the Web UI, you have full control and access to all the features of Deluge, including all the plugins.
What does «Auto Managed» do?
An «auto managed» torrent, is a torrent managed by Deluge.
This means that it obeys Deluge’s queue settings.
By disabling «auto managed», a torrent will become active (i.e. start downloading/uploading).
It will still be be bound by the stop ratio though (see ‘Stop seed at ratio’ under the Queue section of the torrent’s Options tab).
Note: All active torrents (including those not «auto managed») are counted in the total active queue settings. This means that if the total number of active torrents («auto managed» and not) exceed the limit for total active torrents in the queue settings, Deluge will automatically queue any «auto managed» torrents until the limit is no longer exceeded.
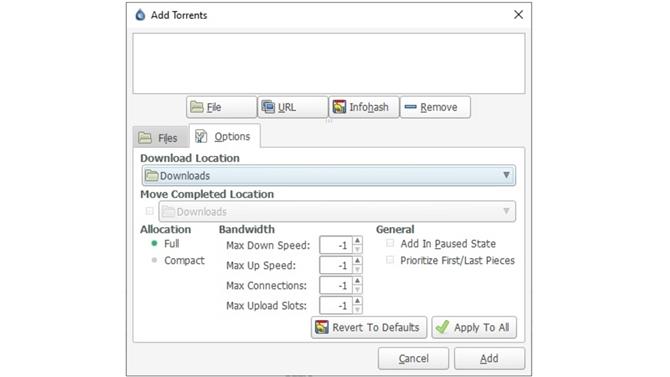
What bandwidth settings should I use?
Start with the following:
| Maximum Connections | 200 |
| Maximum Download Speed (Kib/s) | -1 |
| Maximum Upload Speed (Kib/s) | 80% of upload speed |
| Maximum Upload Slots | 4 |
| Maximum Half-Open Connections | 20 |
| Maximum Connection Attempts per Second | 20 |
If you’re using Windows XP*:
| Maximum Half-Open Connections | 8 |
If you’re using pre-SP2 Windows Vista*:
| Maximum Half-Open Connections | 4 |
You can then tweak those settings to suit your connection. See Bandwidth Tweaking.
Note: if you do not know your upload speed, go to http://speedtest.net and run a test. You can view the results in KB/s by choosing «kilobytes» for «Speed Measurement» which can be accessed under «Settings» in the top left corner of the page.
If you have Deluge setup as a ThinClient then this setting is determined by the OS the daemon is running on, not the thin client.
Пользовательский опыт
На первый взгляд Deluge может выглядеть просто и немного устаревшим по сравнению с другими клиентами BitTorrent, такими как Vuze. Тем не менее, как только вы начнете использовать его, Deluge делает для себя случай с простым интерфейсом и широкими возможностями.
Огромное количество плагинов, которые поддерживает этот клиент, позволяет пользователю очень легко получить максимум от Deluge. Он использует libtorrent для поддержки бэкэнда и предоставляет доступ к нескольким пользовательским интерфейсам..
Как клиент BitTorrent, Deluge предлагает множество вариантов получения поддержки, таких как электронная почта и часто задаваемые вопросы, если у вас есть какие-либо вопросы. На официальном сайте представлен широкий спектр инструкций по установке и использованию для всех платформ..
У сообщества также есть полезный модерируемый форум, чтобы помочь, округляя поддержку приятно.
(Изображение предоставлено: Deluge)
Ubuntu / Debian
- Install dependencies for libtorrent build automatically using build-dep:
sudo apt-get build-dep libtorrent-rasterbar
sudo apt-get install checkinstall
- Download libtorrent and extract:
tar xf libtorrent-rasterbar.tar.gz
cd libtorrent-rasterbar
- Configure:
./configure --enable-python-binding --with-libiconv
- Missing configure script: (e.g. source code from git) create it with ./autotool.sh (requires extra packages: sudo apt-get install autoconf automake libtool).
- Logging: Add --enable-logging=default to get logs in the current working directory. verbose and error can also be used.
- Debug: To create a debug build add --enable-debug=yes.
- ARM architecture (Raspberry Pi, etc): add --with-boost-libdir=/usr/lib/arm-linux-gnueabihf at the end to avoid boost library error.
- Build:
make -j$(nproc)
- CPU Cores: The make option -j$(nproc) will utilize all available cpu cores.
- Non-specific errors: e.g. g++: internal compiler error: Killed (program cc1plus) try using a
- Install library and python bindings:
sudo checkinstall
sudo ldconfig
Substituted make install for checkinstall as it creates a deb package for easier removal/re-install by dpkg. Running ldconfig avoids an ImportError for libtorrent-rasterbar.so, a result of Python being unable to find the main library.
- Verify libtorrent and the python bindings are installed correctly:
python3 -c "import libtorrent; print (libtorrent.version)"
>> 1.0.6.0
Temporary Swap File for Rasperry Pi or low memory systems
Compiling libtorrent requires a lot of memory/swap during the make process ~1-2GB.
If you get an internal error during the make phase on a computer with low memory and/or no swap partition (verify with free -m ) you can try the below procedure.
- Create a 1GB empty swap file, (use a drive location that has enough free space):
dd if=/dev/zero of=/.swapfile bs=1M count=1024
- Format swap file:
mkswap /.swapfile
- Activate swap file:
sudo swapon /.swapfile
- Verify swap file is recognized:
swapon -s
- Start/restart your libtorrent build.
- Disable swap file:
swapoff /.swapfile
- Delete swap file:
rm -f /.swapfile
Шаг 7. Включите поддержку HTTPS (или SSL) (необязательно)
Соединение SSL обеспечивает шифрование и, следовательно, больше конфиденциальности. Deluge поставляется с набором сертификатов и ключей по умолчанию для шифрования соединения. Все, что вам нужно сделать, это включить HTTPS в настройках.

Deluge Web Interface SSL
Если вы предпочитаете использовать самозаверяющие сертификаты, перейдите к этому шагу.
Сначала убедитесь, что установлен на вашем сервере Ubuntu. Если не установить его. Затем создайте файлы сертификатов:
Следуйте инструкциям на экране. Просто нажмите Enter, чтобы выбрать значения по умолчанию или настроить его, как вам нравится. В конце оставьте «пароль для вызова» пустым. И файлы будут генерироваться в папке.

Создание Сертификата SSL Deluge
Включите HTTPS в конфиге webui. Или вручную отредактируйте следующие разделы файла :
Перезапустите Deluge и Deluge webui с помощью команды:
Есть две дополнительные настройки, которые я хотел бы включить. Одним из них является «Разрешить удаленные подключения», который позволяет удаленно подключаться к демону Deluge с помощью, например, мобильных приложений, как описано в этом посте.
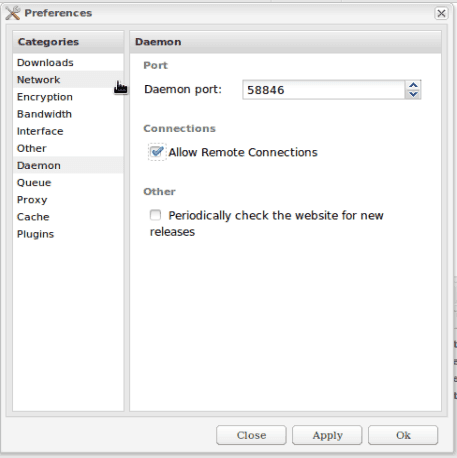
Deluge Webui Remote Connections
Второй параметр – это файлы «Autoadd .torrent» из указанной папки. Таким образом, все, что вам нужно сделать, это поместить файл .torrent в указанную папку, и загрузка начнется автоматически.

Deluge Auto Add
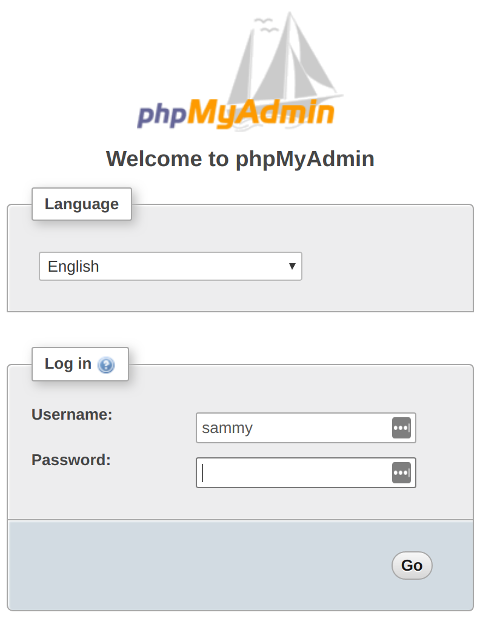
Web UI
How do I start the Web UI?
The web interface enables access to Deluge from your browser.
There are two ways to enable this interface:
- From the GTK UI you can enable the WebUI plugin.
- If running the Deluge daemon deluged it is recommended not use the plugin and instead run the standalone Web UI:
deluge-web
Open the browser at http://localhost:8112.
The Web UI default password is deluge.
For security you should change this upon first login.
How do I change the password?
In the Web UI:
- Click on Preferences.
- Select the Interface category.
- Fill out the fields under Password.
- Click Change button.
How can I reset forgotten password?
- Stop the Web UI before modifying the web.conf file.
- Edit web.conf in and delete the entire pwd_sha1 line or use quick method via command-line e.g.:
sed -i.bak "/pwd_sha1/d" ~/.config/deluge/web.conf
- Start the Web UI and the password will have been reset to default password deluge.
How do I configure plugins with the Web UI?
Not all plugins are configurable directly with the Web UI, see table for those with Web UI code.
The easiest way to configure plugins is using the GTK UI. If unable to use GTK UI on the machine with your daemon, it is possible to connect to that daemon from another computer with the GTK UI. See ThinClient for more information on remote GTK UI setup.
How do I auto-connect to a specific daemon?
- Stop the Web UI before modifying the web.conf file.
- Edit web.conf in , find "default_daemon" and set its value to the daemon id in hostlist.conf
e.g. To connect to localhost you would open hostlist.conf as see a snippet such as:... "123459d5a5b414159caa1323f6e0c9b240c7abcd", "localhost", 58846, ... - Use the first entry from hostlist, which is the id and add it to web.conf:
"default_daemon": "123459d5a5b414159caa1323f6e0c9b240c7abcd",
- Restart the Web UI.
How do I enable HTTPS?
- Create a (self-signed) SSL certificate:
- Put the resulting deluge.crt and deluge.key in the ssl directory.
- Enable HTTPS in Web UI config and modify the filepaths to match the above files.
- Restart the Web UI.
Can I bind the Web UI to port 80 in Linux?
You cannot bind to anything under 1024 in Linux, however with kernel >=2.6.24, you can use capabilities to allow Python to bind to port 80 securely.
So for example in Debian or Ubuntu:
- sudo apt-get install libcap2-bin
- sudo setcap 'cap_net_bind_service=+ep' /path/to/python
- Configure the Web UI to use port 80
- Restart the Web UI.
Создание торрент-демона
Торрент-демоном (в целях настоящий статьи) называется программа торрент-клиент запущенная в фоне.
Развёртывание торрент-демона может быть полезно например для добавления возможности скачивания файлов с торрентов на сервере домашней сети.
Для создания торрент-демона Deluge
устанавливаем на рабочую станцию торрент-демона Deluge и веб-панель управления
  # apt-get install deluged deluge-common  - установка демона Deluge
  # apt-get install deluge-web             - установка веб-панель управления
                                             параметры панели по умолчанию: адрес http://<IP-СЕРВЕРА>:8112, пароль deluge
  # apt-get install deluge-console         - текстовая консоль управления
создаём файл конфигурации /etc/default/deluge-daemon
  DELUGED_USER="deluge_user"               - пользователь от имени которого будет запущен демон
  RUN_AT_STARTUP="YES"                     - запускать ли демон при загрузке ОС
создаём загрузочный скрипт
  # adduser deluge_user
  ...
настраиваем демон
  # /etc/init.d/deluge-daemon start        - запускаем демон,
  # /etc/init.d/deluge-daemon stop         - останавливаем демон, создаются все необходимые файлы конфигурации в каталоге ~/.config/deluge
  # echo "deluge_user:password" >> ~/.config/deluge/auth   - добавляем пароль для доступа к каталогу пользователя демону deluged
разрешаем удаленные подключения (? проверить требуется ли пункт)
  Вариант №1
  # deluge-console                         - запускаем консоль управления
    > config -s allow_remote True          - разрешаем удаленные подключения
  Вариант №2
  # nano ~/.config/core.conf
     в строке allow_remote и ставим true
стартуем демон
  # /etc/init.d/deluge-daemon restart
  # ps -A | grep deluge                    - проверяем старт демона и веб-панели управления
Торрент-демон настроен.
Теперь при подключении к рабочей станции http://<IP-ТОРРЕНТ-ДЕМОНА>:8112 вводим пароль зарегистрированного пользователя deluge_user и используем.
Ссылки
особенности
Хотя Deluge не так хорошо известен, как некоторые из его основных конкурентов, таких как uTorrent, Vuze или qBittorrent, он обладает множеством функций, впечатляющим минималистским дизайном и высокой производительностью..
Одна из его сильных сторон заключается в том, что Deluge может быть настроен в значительной степени с помощью различных плагинов. Это могут быть как официальные, так и сторонние плагины, в том числе специально разработанные для браузеров, таких как Chrome или Firefox. Наличие этих дополнений является одной из причин того, что Deluge является отличным выбором для более серьезных пользователей торрента..
(Изображение предоставлено: Deluge)
Другая сила в том, что Deluge является полностью бесплатным и открытым исходным кодом, а также без рекламы. Он лицензируется по лицензии GPL, и, таким образом, код может быть проверен любым пользователем, что помогает сделать программное обеспечение более безопасным..
Говоря о безопасности, Deluge предлагает пользователям расширенные возможности шифрования. Он использует надежные методы шифрования, такие как шифрование потока сообщений и шифрование протокола. Это имеет большое значение в обеспечении конфиденциальности и безопасности. Поскольку интернет-провайдеры могут отслеживать пользователей, посещающих торрент-сайты, и регулировать их скорость интернета в эти дни, такие дополнительные настройки конфиденциальности полезны.
Deluge также предлагает расширенные приоритеты и выборочную загрузку. Он даже может обрабатывать IPv6 и прокси-серверы для расширенного опыта торрент.
Интерфейс командной строки также предоставляет отличную возможность для пользователей, которые не довольны стандартным графическим интерфейсом или альтернативным веб-интерфейсом. Командная строка дополнительно обеспечивает возможность удаленного подключения.
(Изображение предоставлено: Deluge)
Is Deluge a programming language or a scripting language?
Programming, in a nutshell, is a sequence of instructions to enable the computer to do something. It’s like writing down the steps it takes to do something. These instructions are written in a programming language, and the stuff that these instructions manipulate is different types of data, like numbers or words.
A scripting language, on the other hand, is a form of programming language that is used to create scripts or bits of code. Most commonly, scripting languages are written to facilitate enhanced features of websites. For example, when you search something on Google, the results are dynamic. This is because of scripts. The Google search itself is processed on the server (or, in other words, done using a programming language) but it’s enhanced with features like dynamic auto-suggest using scripts that run on the user’s browser.
When compared to programming languages, scripting languages are easy to learn and use, and do not require much programming knowledge or experience. Complex tasks can be performed in relatively few steps using scripts, unlike programming languages, which are generally lengthy. Apart from these basic differences, there are a few technical differences as well, but what makes a programming language or a scripting language has nothing to do with technicalities. A scripting language is available to the user at runtime, and allows the user to direct the behavior of the main program. And that is precisely what Deluge is, to Zoho Services.
In a programming language, you write a large number other things apart from the custom action you are trying to achieve. Basically, there are a lot of dependencies you need to work out to trigger your custom action. In a scripting language like Deluge, you simply write the script for the action that you want to achieve. This is because we have already taken care of the dependencies.
Deluge is our own scripting language, which you can use to write logic and automate actions across multiple Zoho applications.
Daemon
deluged
pkill deluged
Note: Deluge accepts the SIGTERM signal and cleanly shuts down.
See:
Using the --do-not-daemonize (-d) option you can also log to console:
deluged -d
I can’t connect to the daemon from another machine
See ThinClient for more information but the summary steps are:
- Configure the daemon to allow remote connections
- Configure Authentication
- Restart the daemon.
How do I make Deluge connect to a different daemon?
By default, Deluge (GTK UI) is in classic mode, the daemon and GTK UI are linked together.
To disable classic mode:
- Preferences -> Interface
- Disable (untick) Classic Mode
- Restart Deluge and it will now start in thin-client mode
- Use the Connection Manager to enter the other daemon details
See ThinClient for more information on remote GTK UI
See above.
Как пользоваться
Обзор программы на этом завершен и чтобы не терять время мы будем переходить к инструкции по ее установке.
Загрузка и установка
Первое, что понадобится сделать, это загрузить архив с приложением, а потом распаковать исполняемый файл. Придерживаемся приведенной ниже пошаговой инструкции:
- Изначально переходим в конец этой статьи и жмем кнопку, которая загрузит архив с программой.
- Распаковываем полученный файл, а затем запускаем его, произведя двойной левый клик.

- Откроется окно инсталлятора, в котором нам понадобится принять лицензионное соглашение программы.
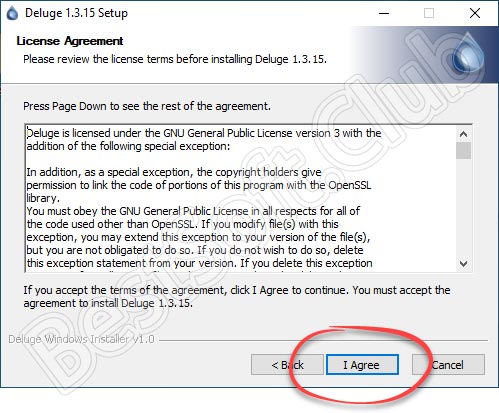
Также важно установить ассоциации торрент-клиента с поддерживающимися файлами. Для этого оставляем оба флажка на своих местах и просто переходим к следующему шагу
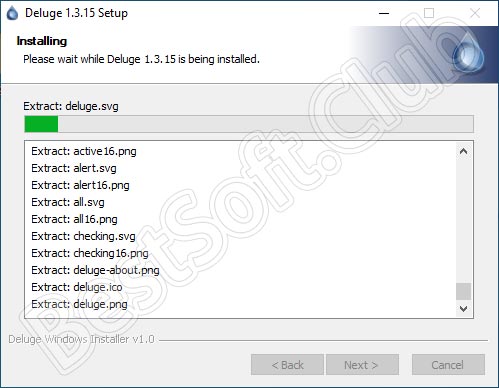
- После этого запустится сама установка.
- Так как данное приложение предназначено для скачивания файлов, ему понадобится доступ в сеть. После первого запуска появится небольшое окно, в котором мы должны утвердить тот самый доступ. Жмем обозначенную на скриншоте ниже кнопку.

Наша программа установлена и теперь можно переходить непосредственно к инструкции по ее использованию.
Инструкция по работе
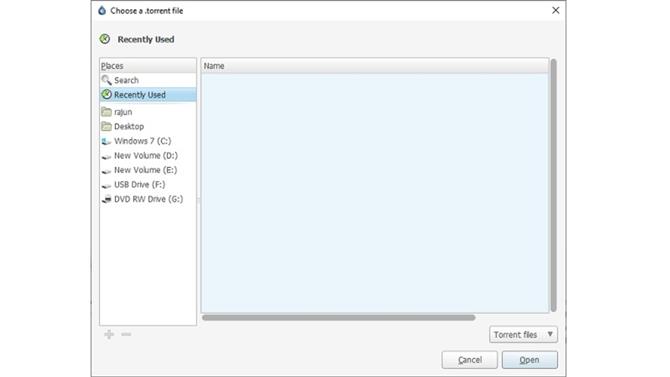
Итак, запускаем торрент-клиент и перетаскиваем в его окно торрент-файл. Также, если ассоциации в процессе установки были назначены, мы можем запускать сам торрент-файл, сделав на нем двойной левый клик. В результате откроется небольшое окошко, в котором будут показаны все объекты, входящие в данную раздачу. Соответственно, после клика по кнопке с надписью «Добавить», задача будет поставлена в очередь на загрузку.

Все что нам останется сделать, это дождаться завершения скачивания файла.
Подготовка
Для более прозрачного и понятного доступа или управления массивами данных, которые будут появляться после скачивания медиа данных торрент-клиентом, настоятельно рекомендуется сразу сделать отдельную шару на сервере.
Для себя я сделал шару Media, в которой сосредоточил все закачки из Deluge. Для создания новой шары переходим на вкладку SHARES.

Далее нажимаем ADD SHARE, к заполнению несколько пунктов:
- Share name: имя новой шары (Media)
- Comments: комментарий, подробно описывающий, что внутри, заполнять по желанию (All my Media content/Media content)
- Use cache (for new files/directories): новые файлы не будут использовать кеш и будут сохранены сразу на дисковый массив под защиту parity диска (No)

По завершении нажимаем ADD SHARE, и видим, что ниже появились дополнительные настройки, позволяющие открыть доступ по SMB. Откроем доступ Export: Yes

Применим изменения APPLY и вернемся обратно во вкладку SHARES нажав DONE. В окне появится созданная шара, которая и будет использоваться для всех скачанных данных. прикладываю скриншот своей шары наполненной контентом.

Данный шаг с созданием отдельной шары необходим для дальнейшей автоматизации процесса нахождения, скачивания и размещения скаченных данных с длинной связкой Jackett, Radarr, Lidarr, Sonarr, Ombi, Plex.
Описание назначения этих пакетов можно посмотреть в описании
Достоинства и недостатки
Кто-то спросит, но зачем нужен данный торрент-клиент, если существует большое количество других? Давайте рассмотрим положительные и отрицательные особенности Deluge по сравнению с его аналогами.
Плюсы:
Именитые приложения, которые давно захватили рынок, раздражают пользователя большим количеством рекламы. В данной программе ее нет вообще. Существует версия для Linux. К достоинствам можно отнести полностью переведенный на русский язык пользовательский интерфейс, а также стопроцентную бесплатность
Еще одной важной особенностью, способной склонить пользователя в сторону выбора именно Deluge является симпатичный программный интерфейс и удобство использования. Если вы взглянете на скриншот, то увидите, что все кнопки имеют вид симпатичных иконок, четко дающих понять с первого взгляда, для чего они предназначены
Минусы:
К недостаткам можно отнести разве что не на 100% переведенный пользовательский интерфейс. Причем заметили мы это лишь в глубине настроек.